Lentil Meatloaf

Lentil Meatloaf

I have gotten a few requests for this recipe and since it is one of my favorite weeknight meals, I thought I would share it here!  This recipe is a lot like the meatball recipe I have posted here, but just a little different.  I usually do the prep work for this the night before or on the morning of the day I am going to eat it.  That way I can just throw it in the oven when I get home from work and not worry about it!

Lentil Meatloaf

Lentil Meatloaf


  • 1 cup cooked lentils
  • 1/2 cup rolled oats (gluten free if needed)
  • 2 large carrots, shredded
  • 2 tsp basil
  • 2 tsp oregano
  • 2 tsp parsley
  • 1 tsp thyme
  • 1/2 tsp rosemary
  • 1/2 tsp red pepper flakes (more if you like it spicier)
  • 1 medium onion chopped
  • 2 cloves garlic, minced
  • 1/4 cup vegetable broth or water
  • 2 tbsp liquid aminos or soy sauce

1. In a food processor combine lentils, oats, carrots, and all herbs and spices.  Pulse a few times to combine everything, but don’t turn it into a paste, you still want some texture.  Set aside

2. In a medium skillet, heat up some olive oil and saute onions until soft about 7 min.  Add in garlic and saute a few more minutes.  Add in your lentil mixture and cook until it starts to brown up.  About 10 minutes.

3.  Pour in your vegetable broth and liquid aminos or soy sauce.  Cook for about 10 more minutes or until most of the liquid has been absorbed.  Take the skillet of the heat and allow it to cool enough to handle it.  Pre-heat oven to 425.

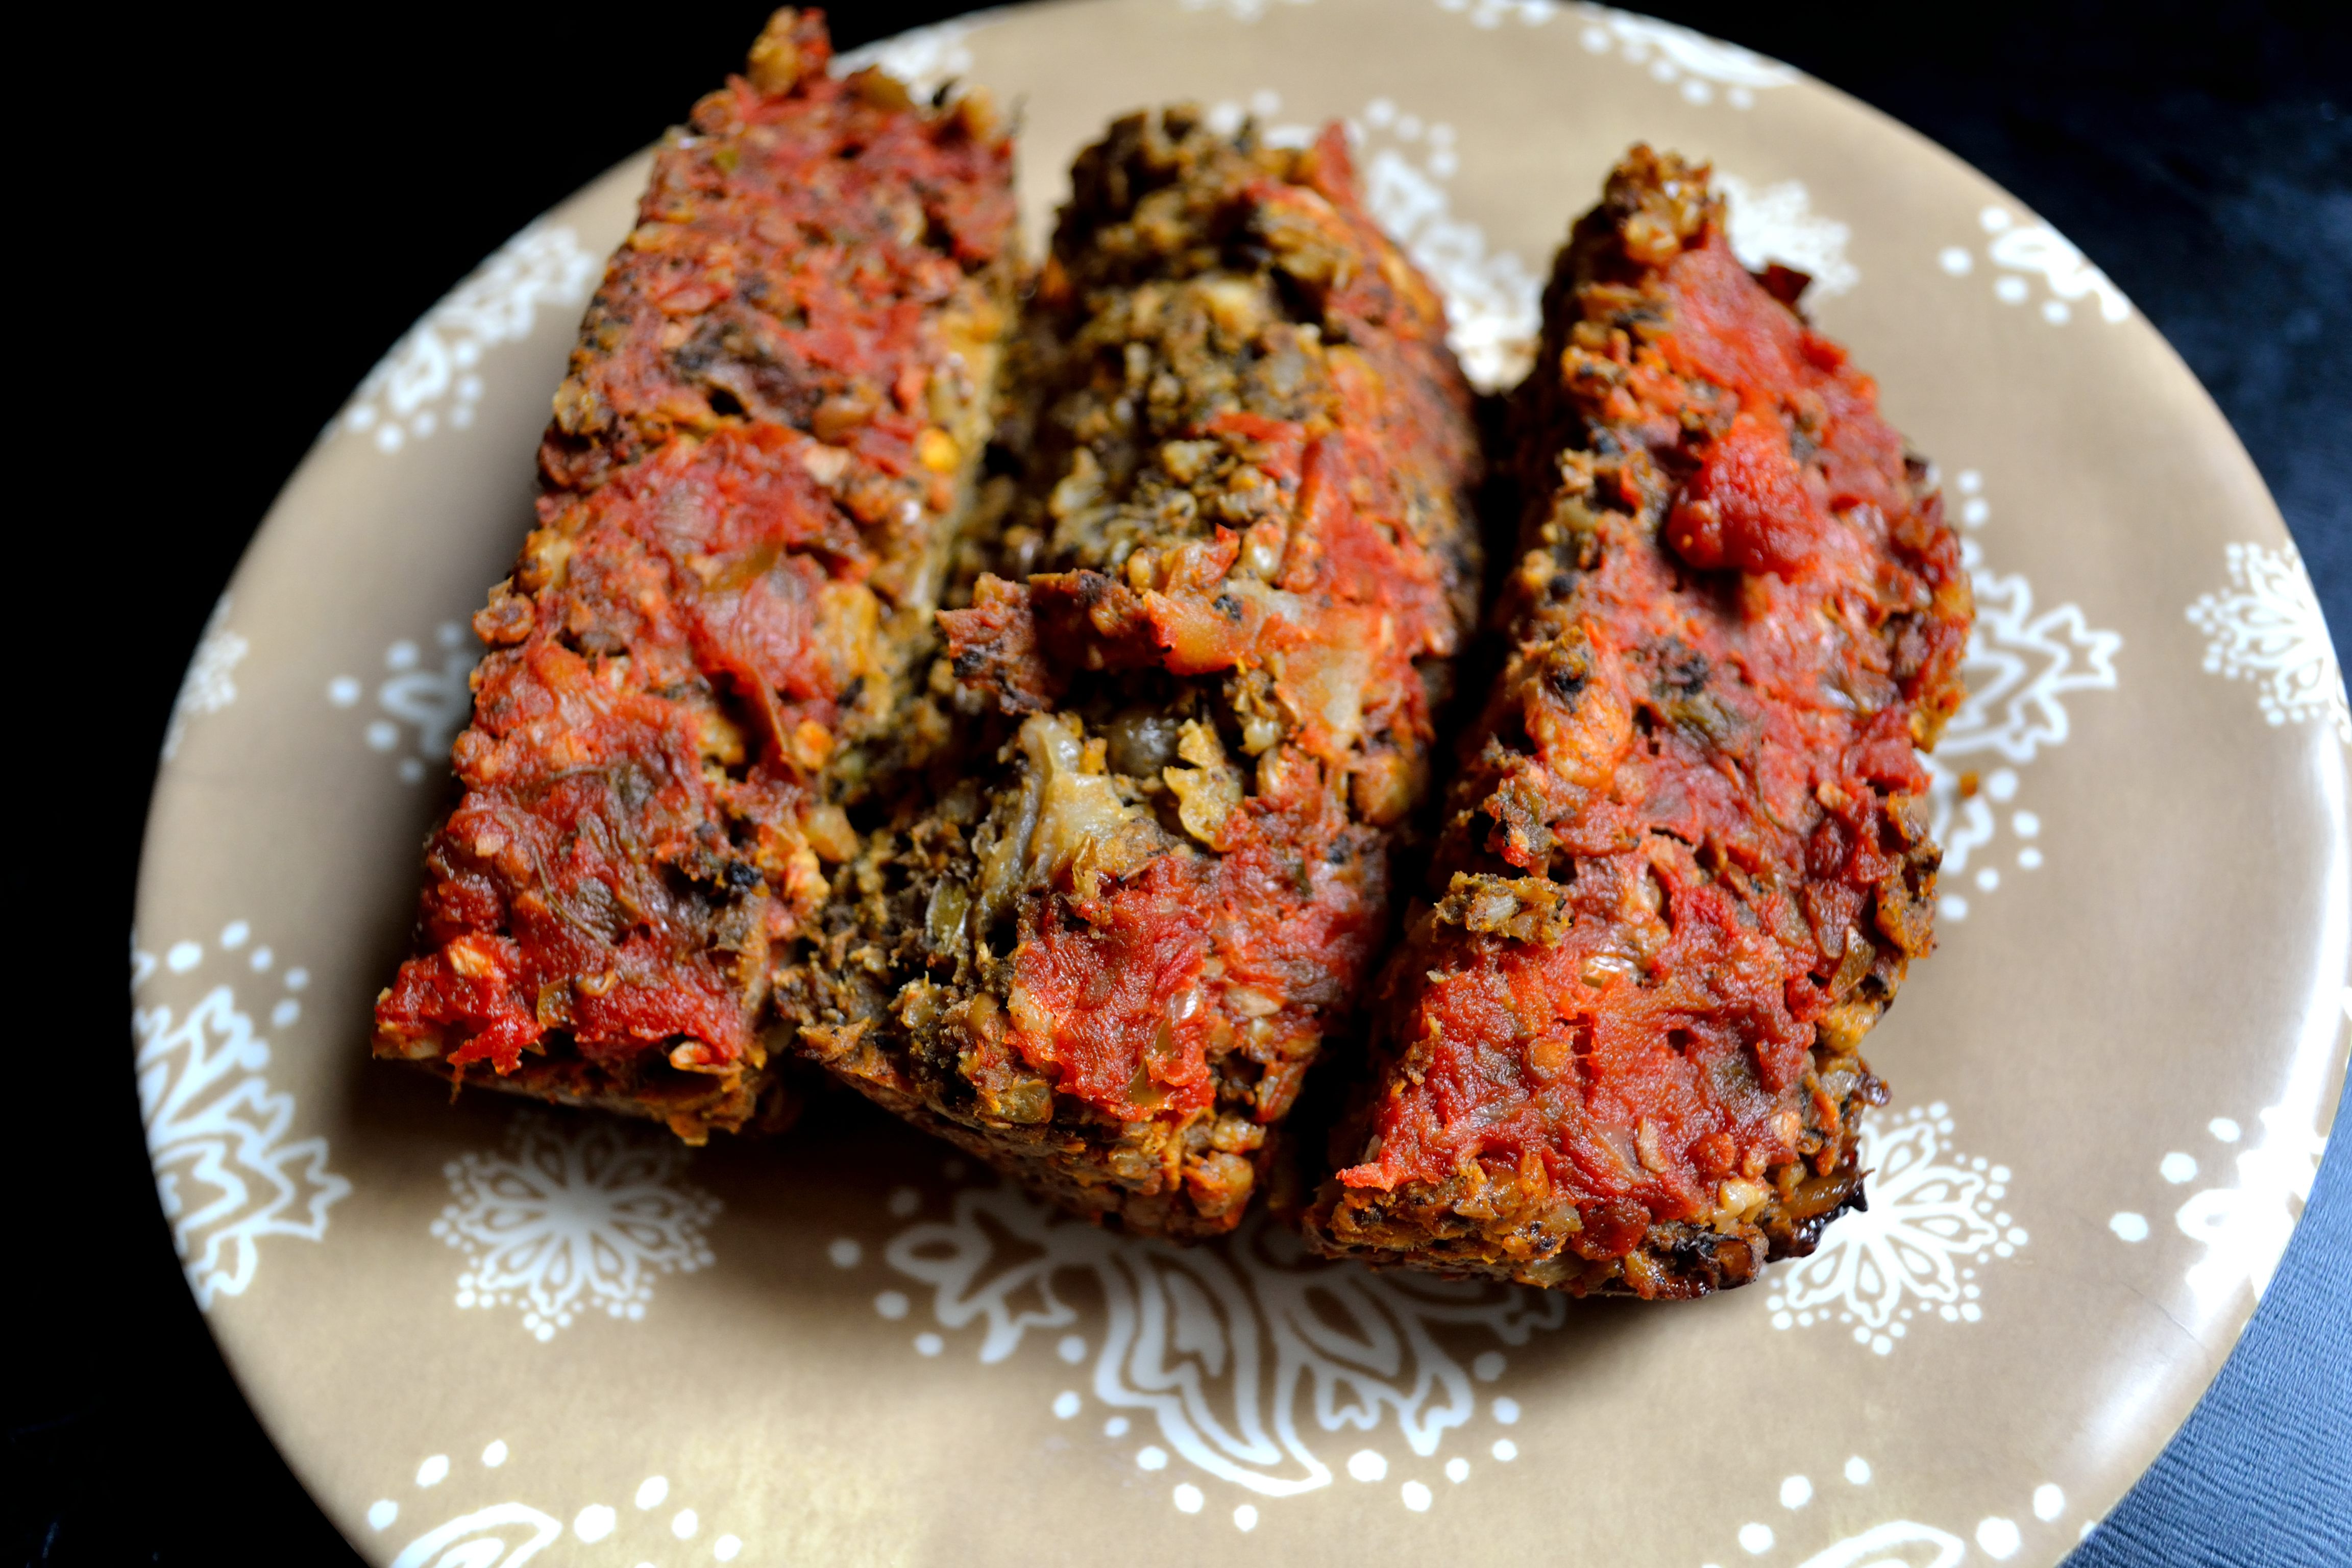
4.  Grease a loaf pan with a little olive oil and once your lentil mixture is cool transfer it to the loaf pan.  Place aluminum foil over the pan and place in the oven.  Bake for 30 minutes.  After 30 minutes, remove the aluminum foil and bake for an additional 10 minutes.  Once it’s a little crispy on the edges, remove from the oven and let it cool for 5 minutes.  Slice it up and enjoy!


This is also a great meal to add in extra vegetables or use up stuff that you have in your fridge.  I’ve added green peppers, mushrooms, spinach, and fresh herbs as well.  I also sometimes pour leftover soup, salsa, or tomato sauce on the top for extra flavor.  Get creative and find the version that you really love!

Pumpkin Gnocchi

I’vePumpkin Gnocchi | Life Healthfully Lived always wanted to make fresh pasta, but it also intimidates me.  I worried that I would mess it up and just get frustrated.  Well after mastering another one of my culinary fears, a poached egg, I decided that I could take on pasta.

I am pleased to report that it was a huge success and now one of my favorite meals!  This isn’t a typical gnocchi, I’ve tweaked it just a little.  Italian grandmothers everywhere will probably want to beat me with a wooden spoon, but I think this is pretty darn close to the real thing in texture and taste.

If you have some extra time on the weekend, give this recipe a shot.  I think that you will be surprised at how easy it is to make and how tasty it is to eat!

Pumpkin GnocchiPumpkin Gnocchi | Life Healthfully Lived


  • 1 cup brown rice flour, plus more for rolling the dough
  • 1/4 cup psyllium husk (my grocery store sells this in the bulk section, but check in the spice or health food section too)
  • pinch of salt
  • heaping 1/2 cup of pumpkin or butternut squash puree
  • 1/4 cup vegetable broth, plus more if dough gets too dry


  1. In a large bowl mix together all your dry ingredients.  Then add in your pumpkin and vegetable broth.  Mix everything together (I find a wooden spoon works best).  Once everything is incorporated, let your dough sit for about 5 minutes.
  2. The dough will be soft, but if it is too soft or wet add in a little more flour.  If it isn’t holding its shape or is too crumbly add in some more broth.  Once you get the right consistency, take the dough out of the bowl and knead it a little into a good size ball.  Don’t get frustrated if it takes a while to get the dough just right.  It takes a little time.
  3. Cut your dough into four equal sections.  Then take each section and roll it out into a medium size rope.  Don’t make it too thick or too thin because then it won’t cook properly.  Cut each rope into about 5 or 6 little gnocchi’s.  Press each one down with the tines of a fork.  Continue this process until all your dough is used.
  4. In a medium saucepan, bring about 4 cups of water to a boil.  Drop in 10 to 12 gnocchi at a time and cook until they float to the top.  Pull them out with a slotted spoon and continue until all the gnocchi is cooked.

Now at this point you could go ahead and eat the gnocchi as is, but I like to saute them with a little olive oil, sage, and minced garlic.  I have also sauteed them with pesto, which was delicious!  I would recommend keeping whatever topping you choose light.  A tomato or alfredo sauce might overwhelm the gnocchi, and that is just no good.  I know this recipe seems a little daunting, but trust me, you can do it!  The more you make it the easier gets and you can be enjoying fresh gnocchi all the time.  I haven’t tried it yet, but if you wanted to make an extra batch of gnocchi and freeze it after it has been boiled, I bet that would work.  Now go make some delicious pasta!Pumpkin Gnocchi | Life Healthfully Lived

Oven Roasted Brussels Sprouts

I know, I know.  The title of this post might be enough to make a lot of you turn right around and run away screaming.  Brussels sprouts are not a very popular vegetable, but I think they get a bad rap because they aren’t prepared properly.  I think that most of the people who don’t like brussels sprouts have been served bland, over-boiled, and mushy sprouts.  Anyone would push that mess away from them.  Enter my brussels sprouts.  Now I’m not going to say that these will instantly convert you to a sprout lover, but it is a step in the right direction.  By roasting these in the oven, you add a delicious flavor without overcooking them.  The seasonings add even more flavor and can be customized to your tastes.  This is a great side dish for any holiday meal, and a great way to get in a delicious serving of vegetables. So disregard your thoughts about stinky, gross brussels sprouts and give these a try.  You might just find a new favorite!

photo (52)

Oven Roasted Brussels Sprouts

  • 1 lb brussels sprouts
  • Extra virgin Olive Oil
  • 1-2 cloves garlic minced
  • fresh black pepper
  • 1-2 tsp smoked paprika (I highly suggest smoked paprika instead of sweet. It adds an awesome smoky flavor to the sprouts)


1. Preheat oven to 425 and line a baking sheet with aluminum foil.

2. Cut the ends off of the brussels sprouts and remove any loose or discolored leaves.  If some of the greener leaves come off, that’s fine  Keep those and you can roast those as well.

3.  Place your brussels sprouts in a bowl and drizzle a little EVOO over them.  Coat them and then spread them on the baking sheet.  Add in your garlic cloves and sprinkle everything with the smoked paprika and pepper.

4.  Place the sheet in the oven and roast for about 15 to 25 minutes.  The sprouts will be done when they have a nice golden brown color.

That’s it!  A very simple way to prepare a great dish.  Like I said you can experiment with the seasonings and find one that is your favorite.  Eat up and enjoy!

Creamy Tomato Soup

Hello everyone!  I know that I haven’t posted in awhile, but with the holiday season upon us, things get just a bit crazier.  I also like to spend time with my friends and family, away from the computer and all other social media.  It’s nice to unplug and enjoy the company of real humans!  That being said, I do have a new recipe for you!  One of my favorite meals as a kid was tomato soup and grilled cheese.  I had a hankering for it the other day, but I wanted to make it in a healthier way (read: not from a can or with mounds of cheese).  I used cashews to add the creaminess to the soup and I think that this meal was a winner in the Dawson house! Plus you can make it in the slow cooker, what’s better than that?

Creamy Tomato Soup with Grilled Cheese

  • photo (49)2 cups raw cashews
  • 2 cups water
  • 1 large onion, diced
  • 4 cloves garlic, minced
  • 3 carrots, peeled and diced
  • 2 stalks celery, chopped
  • 4 cups diced tomatoes (about 2 cans worth)
  • 1 tbsp oregano
  • 1 tsp dill weed
  • 1 tsp basil
  • 1 tsp cumin
  • 1 tsp coriander
  • 1 tsp curry powder, optional (but it adds a really nice flavor)
  • 1 tbsp fresh parsley

1. Place cashews and water in a bowl and soak for at least an hour or overnight if you have the time.  Using an immersion blender, blender, or food processor, blend the cashews and water until they are smooth.  Set aside

2. Saute all your vegetables except for the tomatoes, for about 7-10 minutes.  Place everything in your slow cooker and mix well.  Cook on low for 6-8 hours.

3. If you would like a smooth soup, use your immersion blender to blend the soup to your desired consistency.  You can also leave it chunkier, totally up to you!

For the grilled cheese, my husband Adam made me some gluten free bread and I used my “cheese” sauce from the taco casserole.  I just omitted the chili powder.  You can make your grilled cheese however you like it best, but this was actually REALLY good and totally filled my craving.

In the next few weeks, I will try to regularly post on the blog, but there may be some days when I don’t.  Think of it as a winter vacation!  Go and enjoy the Christmas spirit and this soup!

Slow Cooker Minestrone Soup

Another slow cooker recipe for you today! I have been on a soup kick lately, probably because of the colder weather.  I have been craving warm and hearty and delicious soup. Plus the house smells amazing all day as the soup simmers in the slow cooker!  Slow Cooker Minestrone Soup | Life Healthfully Lived Continue reading