Creamy Tomato Soup

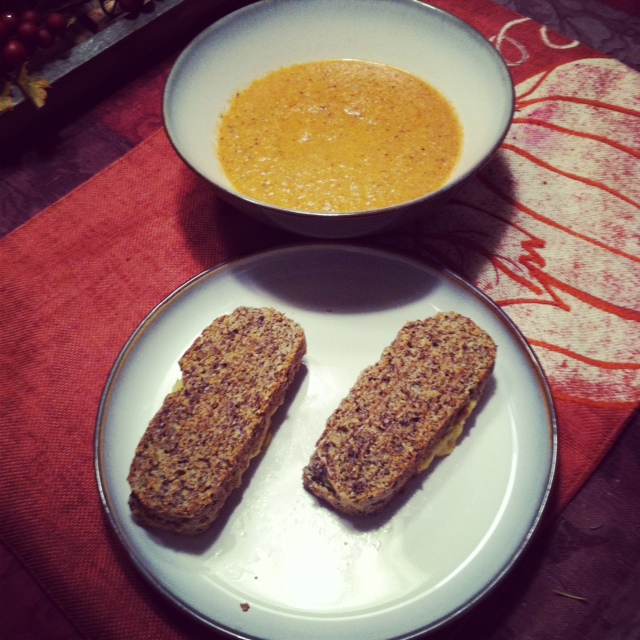
Hello everyone!  I know that I haven’t posted in awhile, but with the holiday season upon us, things get just a bit crazier.  I also like to spend time with my friends and family, away from the computer and all other social media.  It’s nice to unplug and enjoy the company of real humans!  That being said, I do have a new recipe for you!  One of my favorite meals as a kid was tomato soup and grilled cheese.  I had a hankering for it the other day, but I wanted to make it in a healthier way (read: not from a can or with mounds of cheese).  I used cashews to add the creaminess to the soup and I think that this meal was a winner in the Dawson house! Plus you can make it in the slow cooker, what’s better than that?

Creamy Tomato Soup with Grilled Cheese

  • photo (49)2 cups raw cashews
  • 2 cups water
  • 1 large onion, diced
  • 4 cloves garlic, minced
  • 3 carrots, peeled and diced
  • 2 stalks celery, chopped
  • 4 cups diced tomatoes (about 2 cans worth)
  • 1 tbsp oregano
  • 1 tsp dill weed
  • 1 tsp basil
  • 1 tsp cumin
  • 1 tsp coriander
  • 1 tsp curry powder, optional (but it adds a really nice flavor)
  • 1 tbsp fresh parsley

1. Place cashews and water in a bowl and soak for at least an hour or overnight if you have the time.  Using an immersion blender, blender, or food processor, blend the cashews and water until they are smooth.  Set aside

2. Saute all your vegetables except for the tomatoes, for about 7-10 minutes.  Place everything in your slow cooker and mix well.  Cook on low for 6-8 hours.

3. If you would like a smooth soup, use your immersion blender to blend the soup to your desired consistency.  You can also leave it chunkier, totally up to you!

For the grilled cheese, my husband Adam made me some gluten free bread and I used my “cheese” sauce from the taco casserole.  I just omitted the chili powder.  You can make your grilled cheese however you like it best, but this was actually REALLY good and totally filled my craving.

In the next few weeks, I will try to regularly post on the blog, but there may be some days when I don’t.  Think of it as a winter vacation!  Go and enjoy the Christmas spirit and this soup!

Healthy Brownie Bites

Sometimes, you just need some chocolate.  Sometimes, that chocolate needs to come in the form of a brownie.  We all know that brownies are not the healthiest of treats, but they are delicious.  Have no worries though because the brownie bites will satisfy your chocolate/brownie craving without making all the not so good for you ingredients.  Plus they are the perfect snacking size!  With the holidays right around the corner, these are a quick and easy way to have tasty dessert on hand!

Healthy Brownie Bites

photo (44)

  • 1 cup tahini, ground sesame seeds (you could also use almond butter, but the tahini really enhances the chocolate flavor)
  • 3/4 cup canned pumpkin (not pumpkin pie filling)
  • 1 egg or 1 flax egg (1 tbsp flax meal and 3 tbsp water mixed together)
  • 1/3 cup honey or maple syrup
  • 1 tsp baking soda
  • 1/2 tsp salt, optional
  • 1 tsp cinnamon
  • 2 tbsp cocoa powder

1.  Preheat oven to 350.  Mix all the wet ingredients together and then whisk in the dry.  Make sure your batter is smooth with no lumps.

2.  In a mini muffin tin drop in about 1 tbsp of the batter.  Bake for about 15 minutes or until the middle of the bites are set.  Remove from oven and let cool before you pop them out of the tins.

See?  Super quick and easy way to get a brownie in your belly!  You could also make extra because these freeze really well.  Just pull them out of the freezer a few minutes before you want to eat them.  Eat, enjoy, and if you try them out let me know what you think!

Slow Cooker Minestrone Soup

Another slow cooker recipe for you today! I have been on a soup kick lately, probably because of the colder weather.  I have been craving warm and hearty and delicious soup. Plus the house smells amazing all day as the soup simmers in the slow cooker!  Slow Cooker Minestrone Soup | Life Healthfully Lived Continue reading

Baked Falafel with Tahini Sauce

I didn’t think that this recipe would be a winner.  I had a vague idea of what I wanted to do, and in my head I could see it working, but as I started to put this together, I got nervous.  Luckily it all worked out and this turned into a favorite around here!  This makes a lot of falafel, so it would be good for a get-together or even as appetizers at a party.

Baked Falafel with Tahini Sauce 

photo (41)

  • 2 cups dried chickpeas, soaked in a big pot overnight
  • 1 onion, diced small
  • 5 cloves garlic, minced
  • 1 bunch fresh parsley
  • 1 bunch fresh cilantro
  • 3 tbsp almond flour
  • 1 tbsp coriander
  • 3 tsp cumin
  • 2 tsp salt
  • 1/2-1 tsp cayenne, depending on how spicy you want your falafel
  • 1 tsp baking soda
  • 1/2 tsp baking powder

Tahini Sauce

  • 1 cup unsweetened coconut milk (you could use any non-dairy milk, but I think coconut works the best)
  • 1/4 cup tahini (sesame seed butter)
  • 2 cloves garlic, minced
  • 1 tbsp lemon juice
  • 2 tbsp liquid aminos or soy sauce or coconut aminos
  • 1/2 tsp cayenne

1.  Preheat oven to 400.  Drain and rinse your soaked chickpeas, place them in a food processor and pulse until crumbly.  Place in a large bowl.  Place the diced onion, parsley, cilantro, and garlic cloves into the processor and pulse until it looks like paste.  Add the herb paste to the chickpeas and combine.  Mix in the seasonings and then the baking soda and powder.

2.  Using a tablespoon, ice cream or cookie scooper, form the chickpea mixture into little balls.  Don’t make them too big or they will fall apart.  Place the falafel onto a cookie sheet that has been oiled or use a baking mat.  Flatten the balls just a little, brush with a little olive oil and bake in the oven for 10 min.  After 10 minutes, flip the falafel and place back in the oven for another 10 minutes.

3.  For the sauce, combine all ingredients in a medium saucepan and heat over medium-low heat until thick.  Pour over falafel or use it as a dipping sauce.  Either way is delicious!

Don’t freak out if it looks like the falafel is not going to hold together, it will.  Do be gentle with these, though, since falafel is usually fried, these are just a little bit more delicate (and healthier).  So get to cooking and let me know what you think!

Taco Casserole

This recipe is a winner. Ask my husband, he is crazy about this one.  I have to admit it is one of my new favorites too, it is creamy and a little spicy and fulfils that need for Mexican food without making you feel gross afterwards.  Now, because I don’t eat dairy or buy processed products, I made my own nacho “cheese” sauce.  It looks and sounds like it will taste really gross, but I promise you it tastes phenomenal.  If you don’t want to use the sauce I used you can use store bought nacho cheese sauce, but I don’t recommend it.  Also, give yourself some time to make this recipe, this is a really good weekend meal.  Ok enough talking, let’s get to it!

Taco Casserole

photo (36)

For the Nacho “Cheese” Sauce

  • 1/4 cup cashews
  • 2 cups warm water
  • 1 tsp salt
  • 1 cup nutritional yeast (do NOT use baking yeast, you will be very unhappy with the results)
  • 1 tsp chipotle chili spice (more if you want a spicer cheese sauce)
  •  2 tbsp tapioca starch (cornstarch or arrowroot powder would also work)
  • 1 tbsp lemon juice
  • 1 tsp garlic powder
  • 1 tsp onion powder


For the filling

  • 8 oz cremini mushrooms, sliced
  • 3 cloves garlic, diced
  • salt and pepper to taste
  • 1 can black beans drained and rinsed
  • 1 cup corn kernels
  • 1 jar salsa (I make my own, but there are plenty of good store bought brands that work)
  • 6-8 tortillas (I use corn, but flour works too)

1. About an hour or so before you want to eat, dissolve the salt for the cheese sauce in 2 cups warm water.  Add in the cashews and let them soak for an hour.  After an hour, place cashews and water into a blender or food processor.  Add in the rest of the cheese sauce ingredients and blend until smooth.  You want to get the consistency really smooth with no cashew chunks in it.

2. Transfer the cheese sauce to a medium saucepan and heat on medium-high until the sauce is nice and thick.  This will take about 10 minutes.  Remove from heat and add in the black beans and corn kernels.

3. While cheese sauce is heating, turn oven to 400 and heat some olive oil in a medium skillet over medium heat.  Add in the mushrooms, garlic, and salt and pepper.  Cook the mushrooms until they are a nice golden brown and have released their moisture.  This takes about 7 minutes.  Add the mushrooms into the cheese sauce with the beans and corn.

4. Now it’s time to assemble everything.  In a large casserole dish, spread a thin layer of salsa on the bottom.  Layer a few tortillas on top of this.  My casserole dish usually fits 3, but if yours is bigger or smaller use however many.  On top of the tortillas add a layer of the cheese sauce, then another layer of salsa, then more tortillas.  Keep layering until all your stuff is gone.  Cover the dish with tinfoil and bake for 30 minutes.  When it’s done let it sit uncovered for 5 minutes before you cut it up

Like I said, this meal takes a little more time to put together which is why it’s a good meal to make for the weekend.  You can also sub in ground beef or turkey for the mushrooms, just make sure to brown the meat first.  I also really like to top this with guacamole or my avocado cream sauce.  This dish gets even better the next day and makes for really good lunch leftovers.  Again, ask my husband 😉 Enjoy!