Mac N’ Greens

In one week, Adam and I will officially live in Chicago.  Technically our lease started yesterday but we won’t be moving until next Thursday.  This move has come really fast and while I still have a to do list a mile long, I don’t feel as stressed as I usually do when we move.  Although that could all change in an instant, talk to me next week!  This will probably be my last post for a few weeks while we get everything moved and settled in our new place.  Once we’re in Chicago though my blogging will be much more regular and there will be some changes happening to the site!  Excited for all the new things that we are going to do and experience in the next few weeks!


This meal is a quick and easy meal to throw together and it makes a lot of leftovers.  It’s kind of the perfect meal to make when you’re moving to a new city…
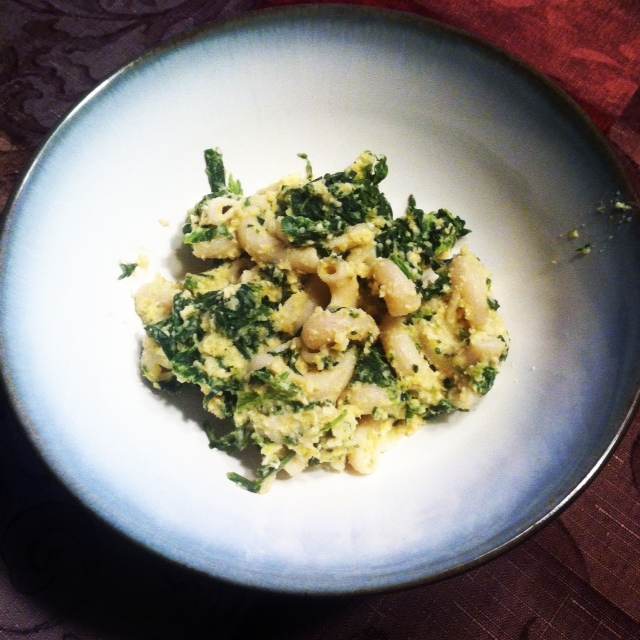
Mac N’ Greens

photo (69)

  • 1 package of pasta (I used brown rice pasta to keep it gluten free.  Whole wheat would be good too)
  • 1 bag of frozen kale or spinach, thawed (could also use fresh and whatever green you want like collard or mustard)
  • Olive oil
  • 1 onion, diced
  • 3-4 cloves garlic, minced
  • 1/2 cup raw cashews
  • 1 3/4 cup vegetable broth or water
  • 1 1/2 cup cooked cannellini beans (or 1 can)
  • 2 tsp lemon juice
  • 1 tsp brown mustard


1.  If you’re using dried beans, soak them overnight, then drain and rinse them and cook them on the stove for about 20 minutes.  Drain and set aside.

2.  Make sure your greens are completely thawed.  If you are using fresh, chop them up and set aside.  Cook your pasta according to the directions on the package.  Once the pasta is cooked, drain and set aside.

3.  In a medium skillet saute the onions in olive oil for about 5 to 7 minutes until they are soft.  Add in the garlic and saute for another minute or two.

4.  In a blender or food processor, grind the cashews until they are a fine powder.  Add in about 1 cup of the broth or water and blend until smooth.  Add in the onions and garlic, beans, lemon juice, and mustard.  Combine until smooth and add in salt and pepper to taste.

5.  In a large pot, combine the pasta and greens until fully mixed together.  Pour the sauce into the pot and heat over medium heat until everything is warmed through.


Enjoy your delicious and nutritious pasta dish, and I’ll see you in Chicago!

“Parmesan” Topping

Growing up, my sister and I topped many a meal with the green container of “shake-y cheese”.  Thats what we called it in our house, because you could shake cheesy goodness on to anything.  Clever I know.  I also know that shake-y cheese isn’t really cheese at all, but that didn’t stop it from tasting delicious sprinkled on top of a big ol’ plate of spaghetti.  There are a variety of different healthier and dairy free versions of this topping out there, but I think this one comes closest to the salty and slightly buttery taste of my beloved shake-y cheese.  Plus it is really simple to make a bunch and then store it in a container in the fridge.  Make this and get to shakin’!


“Parmesan” Topping  

photo (68)

  • 1 cup walnut pieces
  • 3-4 tablespoons nutritional yeast, depending on how cheesy you want the flavor to be
  • 2-3 tsp salt, depending on taste


1. Preheat oven to 250.  In a blender or food processor, pulse the walnuts a few times until coarsely chopped.  Add in nutritional yeast and salt and process everything until it has a fine breadcrumb like texture.

2. Line a large baking pan with parchment paper or a silpat.  Spread the walnut mixture evenly over the pan and place in the oven.  Bake for 30-40 minutes in 10 minute increments.  After each 10 minutes move the mixture around so it doesn’t burn.  It will be done when it has a nice golden brown color.

3. Let the topping cool and then transfer to a container.  You can store this in your fridge for up to a month.


Simple and easy way to add flavor to any of your meals!  This is great on vegetables, lasagna, spaghetti, casseroles, or anything else your little heart desires.  Enjoy!

Dairy Free Lasagna

I don’t eat dairy anymore, and for the most part, I really haven’t missed it all that much.  But every once in awhile, I get a hankering for something gooey, cheesy, and delicious.  Those hankerings usually lead to creative and tasty recipes.  This one is no different.  You might be thinking to yourself, “There is no way that you can have a delicious lasagna without wonderfully yummy ricotta cheese.”  And I say to you, nay nay.  You can have a delicious lasagna without wonderfully yummy ricotta.  Just ask my husband who has no problem with dairy and would love it if there were more of it in the house (there’s none).  He loved this meal and devoured second helpings.  I may have too…


Dairy Free Lasagna 

DSC_0550

  • 1 batch of my tomato sauce, or store bought sauce (just make sure to read the ingredients!)
  • 1 package of lasagna noodles (I used brown rice to keep it gluten free but whole wheat would work well too)
  • 1 cup raw cashews, soaked in water overnight
  • 1/2 cup water
  • 2 tbsp lemon juice
  • 1 tsp salt
  • 1/2 tsp rice vinegar
  • 1 to 2 tsp italian seasoning
  • 1 to 2 cloves garlic

*If you’re using my tomato sauce, you can prepare it ahead of time and store in the refrigerator.  That way you can just assemble everything.

1.  Cook noodles according to instructions on the package.  Once cooked drain and set aside to cool a little bit.  You might want to undercook your noodles just a little so they won’t turn to mush when you cook them in the oven.

2.  While the noodles are cooling, drain soaked cashews and place into a blender or food processor.  Add in water, lemon, salt, rice vinegar, italian seasoning, and garlic.  Pulse to combine everything and then let it run to smooth everything out.  You can leave it a little chunky or totally smooth, it’s your preference.

3.  Preheat oven to 375 and get out a 9 x 13 casserole dish.  Line up the tomato sauce, noodles, and cashew cheese for easy assembly.  Pour a little tomato sauce on the bottom of the pan so the noodles don’t burn.  Then put a layer of noodles down, then a layer of cheese, and finally a layer of tomato sauce.  Keep layering everything until you run out of noodles.  You might have a little cheese and sauce leftover, that’s fine  You can use it to dress up another dish!

4.  Cover lasagna with aluminum foil and bake in the oven for 20 minutes.  Remove from oven and take of the aluminum foil.  Place back in the oven for another 5 minutes.  Take lasagna out of the oven and let it rest for 5 to 10 minutes (this helps it set so when you cut it, it doesn’t fall apart).  Cut into squares and eat up!

DSC_0555


This lasagna tastes even better the next day once the flavors have melded and really set.  So make sure that you leave some leftovers for later!

Roasted Chickpeas

Hello everyone!  I hope that you have had a great week and that you are starting to emerge from the caves of winter into the warmth (sort of) of spring!  I know that I haven’t done a regular post that doesn’t include a recipe in a while, but I have a few coming your way soon and once this move is over they will be coming more often!  Today I have a quick and healthy snack recipe for you.  I have been having a love affair with chickpeas lately, I can’t seem to get enough of them!  I eat them any way I can, in hummus, in salads, sauteed with greens, and roasted.  Roasted chickpeas are a great crunchy snack that you can season any way you like.  If you want a sweeter snack you can use cinnamon or nutmeg and if you are craving salty you can try garlic and pepper.  The options are endless!


Roasted Chickpeas

photo (66)

  • 1 cup dried chickpeas, soaked overnight and rinsed (you could use canned, but the texture isn’t quite the same)
  • 2-3 tbsp olive oil
  • seasonings of your choice (I like garlic, garam masala, cumin, or italian seasonings)
  • silpat or parchment paper (aluminum foil doesn’t work well with these)
  • large baking sheet


1. Cook your soaked and rinsed chickpeas in a large pot.  Bring to a boil, then lower the heat to a simmer and cook for about 20-30  minutes.  You want a firm texture, not too mushy.

2. Preheat oven to 425.  Place your silpat or parchment paper on to a large baking sheet.  You want the baking sheet to be big enough that the chickpeas will have enough room to spread out, otherwise you’ll get chewy not crunchy chickpeas

3.  Pat the chickpeas dry and place into a large mixing bowl.  Add in the olive oil (enough to cover the chickpeas, but don’t drown them in it) and whichever seasonings you’re going to use.  Mix well so everything is coated.

4.  Spread the chickpeas out in a single layer on the baking sheet, making sure they have a enough room between each and place in the oven.  Cook for about 15 minutes, then rotate the pan and cook for about 5 more minutes.  Keep an eye on them for the last 5 minutes so they don’t burn.


That’s it!  Remove them from the oven and let them cool a bit before you dig in.  I promise I have never burnt my fingers or tongue trying to eat these right out of the oven… Enjoy your tasty and healthy snack!  Have a great weekend and see you all on Monday!

Herb-Crusted Tilapia

I haven’t ever really posted a recipe with meat as the main ingredient mostly because I don’t eat meat.  I am a huge supporter of eating real foods that work best for you.  For some people that means including meat in their diet, I just happen to feel my best on a non-meat diet.  My husband, Adam, on the other hand tends to like having a few meat dishes a week.  One of the easiest and simple ways to do this in our house is to make fish.  Fish, and tilapia in particular, can be a nice clean slate when it comes to seasonings and flavor.  Tilapia is a very mild tasting fish so you can do anything you would like to flavor it.  This recipe is one of my go-to’s and I use it every week.  It’s simple and quick which are musts for a weekday dinner.  We buy big bags of individually wrapped frozen fish so it’s easy to just grab one filet and thaw it in the fridge before dinner.  So grab what ever fish is your favorite and give this recipe a try!


Herb-Crusted Tilapia

photo (64)

  • 1 filet tilapia or any other mild fish (sole or cod would work well)
  • 1 egg, beaten
  • 1 tbsp nutritional yeast
  • small handful of cashews (you could also use almonds or sunflower seeds)
  • 2 tsp oregano
  • 2 tsp basil
  • 1 tsp thyme
  • 1 tsp garlic powder
  • 1 tsp onion powder
  • 1/2 tsp red pepper flakes
  • salt and pepper to taste


1.  Beat your one egg in a shallow dish and set aside.  In a food processor or blender, pulse cashews (or other nut) a few times until they are broken up into small chunks.  You don’t want to pulse it into a powder.  Add in the nutritional yeast, oregano, basil, thyme, garlic, onion, and red pepper flakes.  Pulse a few times until everything is combined

2.  Dump your seasoning mix out onto a plate and spread it around evenly.  Line up your egg dish and your seasoning dish next to your stove.  In a small skillet, heat a little olive oil and heat over medium heat.

3.  Take your tilapia and add a little salt and pepper.  Then, dunk it into the egg and make sure it is coated.  Transfer the fish over to the seasoning plate and coat both sides evenly.

4.  Place the fish into the skillet and cook for about 2-3 minutes and then flip and cook for about 1-2 minutes, until the fish is flaky and opaque.

Serve over some brown rice or quinoa and add some vegetables on the side and you have a great and filling dinner!  You can obviously make more than one piece of fish if you are serving more than one person.  Just up your egg count to 2 or 3 and make enough seasoning to cover each piece.  I hope you enjoy and I will try to include more variety of recipes like this for you guys. Have a great weekend!