DIY Wednesday: Herbed Macadamia Butter

HaveDIY Wednesday: Herbed Macadamia Butter | Life Healthfully Lived you ever seen a log of herbed butter?  All cut into pretty round slices and full of delicious herbs like parsley, chives, basil, and oregano?

This is not like that.

Well, it’s sort of like it but not quite.  I had the idea to try and come up with an alternative to those fancy herbed butters that are so delicious.  I haven’t had dairy in years, and I wanted to see if I could make a dairy-free version.

Sure, there are tons of vegan specialty butters that you can buy.  But many times those butters are full of processed ingredients that aren’t any better for me than regular butter.

So I decided to go the route of making a savory nut butter.  First I had to decide which type of nut to use.  Almonds and peanut butter have their own distinct taste and I wanted to use something a bit milder so that you could really taste the herbs.

Cashews are pretty mild, but they can be a little grainy in texture unless you have a high-powered blender.  I settled on macadamia nuts.  They are mild and have a slightly buttery taste to them and come out nice and smooth when blended into butter.DIY Wednesday: Herbed Macadamia Butter | Life Healthfully Lived

I was surprised how quickly this came together and I was pleased with the taste and the spreadability.  The only thing that I couldn’t really change was the color.  Yeah, it’s kind of an icky brown, but sometimes the ugliest concoctions taste the best.  Just trust me on this one.

A few notes about the recipe.  You don’t have to roast the nuts, but it adds a nice depth of flavor to the savory butter.  Raw nuts will give you a lighter, more appealing color.  Don’t worry about the coconut oil giving this butter a coconut-y flavor, it’s just to help the butter set in the fridge and spread nicely on things like bread.

Herbed Macadamia ButterDIY Wednesday: Herbed Macadamia Butter | Life Healthfully Lived

  • 2 cups raw macadamia nuts
  • 2 tsp roasted garlic
  • 2 tsp coconut oil, melted
  • 1 tsp salt
  • 1 tsp dried oregano
  • 1 tsp dried basil
  • 1 tsp dried thyme
  1. Preheat oven to 350 and spread the macadamia nuts on a large baking sheet in an even layer.
  2. Roast the nuts for 10 minutes and then transfer to a blender or food processor immediately.
  3. Blend the nuts, scraping down the sides as needed, until you have a smooth and drippy butter.  It should be almost liquid like.
  4. Add in the teaspoons of coconut oil and the 1 tsp of salt and blend until combined.
  5. Add in the garlic and the rest of the seasonings and blend until completely combined.  Taste and adjust any seasonings as needed.

This will obviously not act the same way as real butter, as in it won’t melt.  But it does add a nice salty, herby, and fatty quality to whatever you use it on.  And really, who doesn’t like things that are salty, herby, and fatty?DIY Wednesday: Herbed Macadamia Butter | Life Healthfully Lived

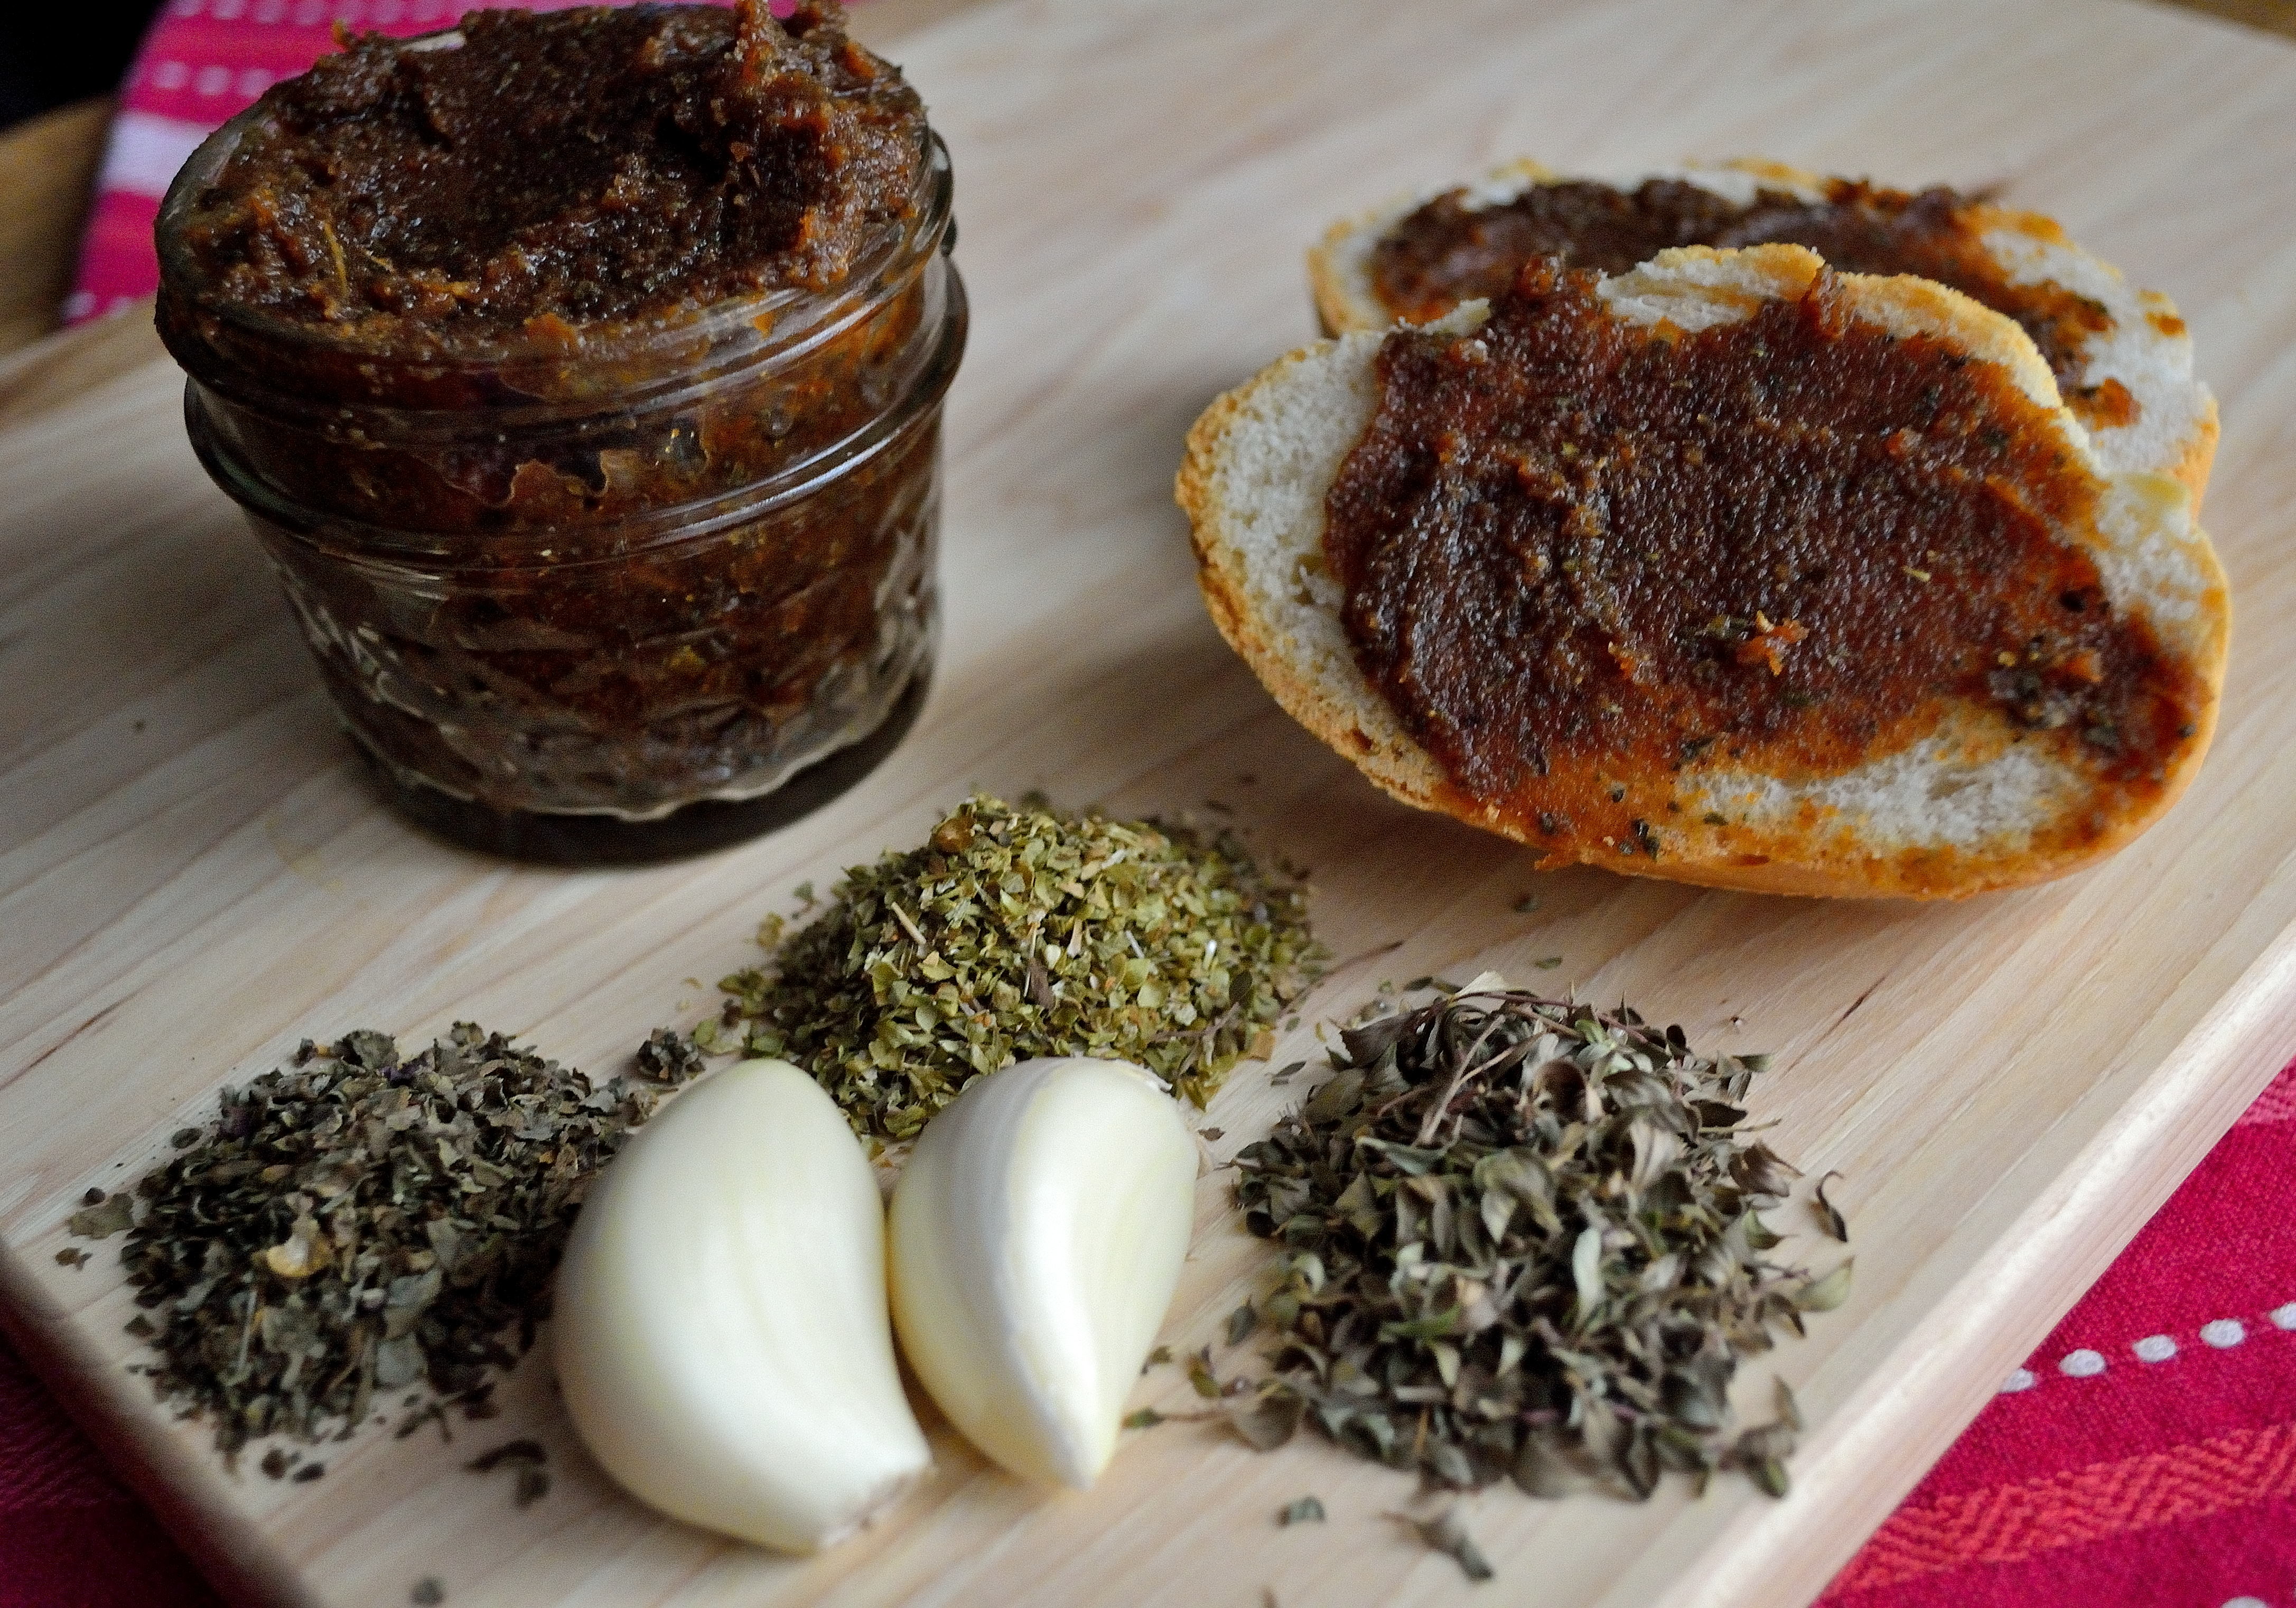
Keep this in an airtight container in your fridge and let it warm up a few minutes before you use it so it spreads easily.  And there you have it!  Your own savory spread that you didn’t have to pay top dollar for! Enjoy!

Things That Are Making Me Happy Right Now

I don’t know about you, but I had a pretty great weekend.  It was filled with family, laughs, and covered bridges.  Adam and I spent the weekend in Brazil, Indiana and I got to experience the covered bridge festival for the first time.

Yes, there was a covered bridge.  There was also a ton of food, crafty things, and pretty much anything else you could think of.  I had a good time and was glad for the time to relax. Things That Are Making Me Happy Right Now | Life Healthfully Lived

So while covered bridges have made me happy, I thought I would share a few other things that are making me happy right now.

Changing Leaves

It felt like fall would never really come this year.  For most of October, our neighborhood has been surrounded by green leaves and summertime vibes.  Just in the past week or so we have finally had leaves falling and changing color.  I love how pretty this city gets in the fall!

Fall Running PaceThings That Are Making Me Happy Right Now | Life Healthfully Lived

I love the beginning of fall and the cooler temps because it means I run even faster than normal.  I can’t seem to slow down for the first few weeks of fall running and that’s just fine with me.  I love feeling like I’m flying down the Lake Shore Trail.

New Quilted Sheet SetThings That Are Making Me Happy Right Now | Life Healthfully Lived

This is how I know that I’m an adult.  I am super excited about a brand sheet set.  This was a covered bridge find and an early birthday present (12 days and counting).  I have been wanting to change up our bedspread for awhile now to something more bright and cheery.  I love the grey and yellow together and I think that Dot approves as well.

All The BakingThings That Are Making Me Happy Right Now | Life Healthfully Lived

Now that it isn’t torture to turn on the oven, baking all the things can commence.  I am not a strong baker, so I am always trying to improve.  I gave you some carrot cake cookies last week and I’m working on a fall banana bread for you guys this week.  You can also check out my cranberry coffee cake over on Girlish.  Yay baked goods!

Kuri Squash

I am all about fall/winter squash and I’m always excited to try new to me varieties.  I found this one at Whole Foods the other day and figured I would give it a go.  Whelp, now I’m obsessed with it.  I love that you don’t have to peel it, just scoop out the seeds, cut into chunks, and roast it at 425 with a little oil and your favorite seasonings.  It’s creamy and a little sweet like butternut squash.  I bet it would be great in soup or my gnocchi.

The CubsThings That Are Making Me Happy Right Now | Life Healthfully Lived

I was born a Cubs fan and have always hoped that maybe next year would be their year.  It’s looking like 2015 could be it… I will be cautiously optimistic and just keep rooting for my Cubbies.

28

I don’t know why but turning 28 is sounding pretty good to me.  I think there are some good things in store for my 28th year on this big blue marble we call Earth.  Can’t wait to see what they are…

Carrot Cake Breakfast Cookies

RememberCarrot Cake Breakfast Cookie | Life Healthfully Lived those cookies I made for my cream cheese frosting?  Well, you can stop wondering about them.

I know this is the time of year that pumpkin flavored everything is everywhere.  Coffee, cookies, bread, muffins, oatmeal, stew, candles, air fresheners…. You get the idea.  Don’t get me wrong, pumpkin is awesome.  I have a whole shelf in my closet dedicated to my stock of pumpkin.  But it isn’t the only fall produce that deserves some love.

Carrots are a really versatile vegetable.  Kind of like pumpkin, they do well in sweet and savory dishes.  While I do love a good carrot soup or stew, carrot cake is where it’s at for me. Carrot Cake Breakfast Cookie | Life Healthfully Lived

These carrot cake cookies are more of a breakfast type cookie because they aren’t super sweet.  You can make it a little more decadent by turning it into a cream cheese frosting and carrot cake cookie sandwich.  Believe me, it’s delicious.

Leave the frosting off and you have a healthy breakfast cookie that’s lightly sweetened with raisins and a little maple syrup.  A cookie for breakfast?  Now that’s the dream!

Carrot Cake Breakfast CookieCarrot Cake Breakfast Cookie | Life Healthfully Lived

  • 1 cup regular oats, not instant
  • 1/2 cup coconut flour
  • 1 tsp baking powder
  • 2 tsp cinnamon
  • 1 tbsp flax
  • 3 tbsp water
  • 1/4 cup raisins
  • 1/3 cup coconut oil
  • 2 tbsp maple syrup
  • 1 cup shredded carrots
  1. Preheat the oven to 350 and line a baking sheet with parchment paper or a Silpat.  Mix the flax seed and water together and set aside.
  2. Combine all the dry ingredients in a bowl and set aside.
  3. In a food processor or blender, combine the raisins and coconut oil until you have a smooth paste.  Add the shredded carrots and pulse a few more times.
  4. Add the dry ingredients to the carrot mixture and pulse until everything is mixed together.
  5. Scoop out about a tablespoon or so and slightly flatten them into discs and place on the baking sheet.
  6. Bake for 10 to 15 minutes until the cookies are slightly brown around the edges.  Let them cool on the sheet for 5 minutes and then transfer to a wire rack to cool completely.

That’s it!  Keep them in an airtight container and they should last about a week, longer if you put them in the fridge. Carrot Cake Breakfast Cookie | Life Healthfully Lived

Do you have any fun plans for this weekend?  Adam and I are headed to Brazil (Indiana, not the country) to spend some time with his folks at the covered bridge festival.  It will be nice to spend time with family and just relax!

DIY Wednesday: Hot Sauce

ThisDIY Wednesday: Hot Sauce | Life Healthfully Lived post is compliments of my dad.  On Monday, we spent the whole day together apple picking at Royal Oaks Farm.  I love apple picking, it’s the perfect fall time activity.  Plus you get to eat delicious apples while you pick them.  It’s the best!

While we were getting lunch, I told him I needed to come up with a DIY post for today.  He gave me some good ideas, but hot sauce was the one that won for today.

DIY Wednesday: Hot Sauce | Life Healthfully Lived

I’m surprised I didn’t think of this one sooner.  A lot of people buy hot sauce and there are a ton of varieties at the store.  When I took a look at the ingredients on most hot sauces, I saw that it was really a simple product.  There are  of course different variations and levels of heat, but the basic ingredient list is short and sweet.  Which makes it a perfect product to make at home.

While I love making things at home to save money and know exactly what is going into my food, I also like playing around with flavors and ingredients.  Putting my little twist on common staples is fun and is a great way to learn how different ingredients go together or don’t.

This hot sauce came together quickly and I love how fresh it tastes.  Just a little will go a long way in your recipes and it will last you a long time.  Just a few tips for you while making this:

  • If you have any cuts or scrapes on your hands, WEAR GLOVES!  Trust me you do not want to be getting hot pepper juice in your wounds.
  • Do NOT rub your eyes/nose/mouth while making this unless you enjoy feeling like your face is on fire.
  • If you choose not to wear gloves, wash your hands REALLY well after you’re done.  Again, avoid the eye/nose/mouth region with your hands.

Long story short, protect your skin from the hot peppers or else you will feel the burn.  And not in a good way.

Hot SauceDIY Wednesday: Hot Sauce | Life Healthfully Lived

  • 10-15 habanero peppers
  • 2-3 jalapeno peppers
  • 3 tsp roasted garlic or 3 cloves fresh garlic, roughly chopped
  • 2 large carrots, shredded
  • 2 cups water
  • juice of one lime
  • 2-3 tbsp white vinegar
  • salt to taste
  1. Take off the stems from the peppers and roughly chop.  If you like super spicy hot sauce, you can leave in the seeds.
  2. Heat a little oil in a medium saucepan over medium-high heat, if you’re using fresh garlic add that in and saute for a few minutes.  Then add the carrot shreds and saute for 2 to 3 more minutes.
  3. Add the two cups of water and bring everything to a boil.  Cover and lower to a simmer and cook for 5 minutes.
  4. Remove the lid and take the pot off of the heat.  Add the peppers to the mixture and then stir in the vinegar and lime juice.  Add a little salt and stir again.
  5. Pour the whole mixture into a blender and puree until smooth.  Taste and add more salt if needed.
  6. Let the sauce cool and then store in an airtight container in the fridge.  DIY Wednesday: Hot Sauce | Life Healthfully Lived

That’s it.  I can’t stress enough about protecting your hands and then not touching your face while making this.  Or any other sensitive areas…. OUCH!  But afterward you will get an awesome hot sauce that you made with your own, possibly slightly burned, hands!

Rock What You Got

I’m going to have you do a little homework before you read this post.  Oh stop moaning, it’s not that hard.

I want you to listen to this song:

Did you listen?  Good.  I’m trusting that you did.

I have listened to Superchick for years and in fact, I have heard this song a good 50 times before.  But as I was out running about the other day, this song came on and it kind of hit me in a new light.

Rock what you got.

I have spent a lot of time trying to change things about me so that I can “rock it”.  I focus on what needs to be fixed or adjusted to get to a point where I feel like I am worthy of being awesome.

That’s not cool.

I have been given everything that I need to rock.  There are so many awesome things about me that no one else has, and I’m doing myself a disservice if I don’t choose to rock what I’ve got.

I’m not saying that I don’t want to improve myself or do things to meet new goals.  It’s ok to rock what you have right at this moment while working to achieve other things.  Be proud of YOU every single second of the day.  That pride and encouragement, even if it just comes from you alone, can help push you forward.

So how about it?  I’m making a pledge to start rocking everything I got.

My ability to push myself at the end of a long run?  Rocking it.

My willingness to try a new or difficult yoga pose even if I faceplant?  Rocking it.

My desire to help serve others in the best way I know how?  Rocking it.

My hope to accomplish new goals and dreams?  Rocking it.

You don’t have to wait until you think you have what it takes to rock it.  Start now, this very second.  You have everything you need in this moment.  Even if you don’t feel that way, act like you do.  I bet pretty soon you won’t have to be faking it. rock

Have an awesome Monday and remember, rock what you got!