Healthy Fast Food: Is There Such a Thing?

A few weeks ago, I posted this article over on my Facebook page.  A reporter for Business Insider decided to eat a fast food diet for an entire week.  The catch?  She would only choose the healthy options at each place.

More and more, fast food restaurants are adding things like kale salads, quinoa, and overall healthier items.  Their customers are demanding better food and they’re trying to deliver.  But are they really? Sometimes the healthy option is actually worse than their regular fair.Healthy Fast Food: Is There Really Such A Thing? | Life Healthfully Lived

I totally understand how it sounds complaining about fast food.  Everyone does it.  They are an easy target.  It’s simple to point at McDonald’s, Wendy’s, and Burger King and say, “You’re what’s wrong with our health and obesity problem.”  There have been countless documentaries, news stories, articles, and research dedicated to this theory.  I don’t want to add more noise to the crowd with this.

I just want you to really think about your own life and your food choices.Healthy Fast Food: Is There Really Such A Thing?

Is a McDonald’s kale salad really fulfilling your nutrition needs or are you getting it because it’s convenient and you think it’s what you should get?  How often are you getting fast food, healthy options or not?  Does your body feel as good as it possibly could?  Do have energy to get through your day, exercise in some form, and enjoy your hobbies?

These are the thoughts that should go through your mind each time you sit down to a meal and yes, please try to sit down for your meals.  More often than not, I’m going to guess eating anything at a fast food joint isn’t going to leave you feeling as satisfied as a homemade meal.  Like the reporter in the article found, she actually wasn’t eating enough at each meal and she was eating way too much salt.  Fast food isn’t meant to really nourish your body.  It’s meant to be, well, fastHealthy Fast Food: Is There Really Such A Thing? | Life Healthfully LivedHealthy Fast Food: Is There Really Such A Thing?

If you get the majority of your meals in the form of fast food, I’m not saying you’re a bad person or unhealthy.  I just want you to think about your options.  Could you possibly make some of the things you’re eating in your own home?  Making your own food is always going to be better for you than getting it from somewhere else.  It doesn’t have to be difficult or complicated, just a little meal prep and you could be eating your own kale salad for lunch instead of relying on McDonald’s. Healthy Fast Food: Is There Really Such A Thing?

I get it.  Fast food is easy and cheap.  You don’t have to think too much about it.  But maybe you should.  You might see a big change, not only in your waistline, but your whole well-being.


Buffalo Cauliflower Taquitos

Buffalo Cauliflower Taquitos | Life Healthfully Lived
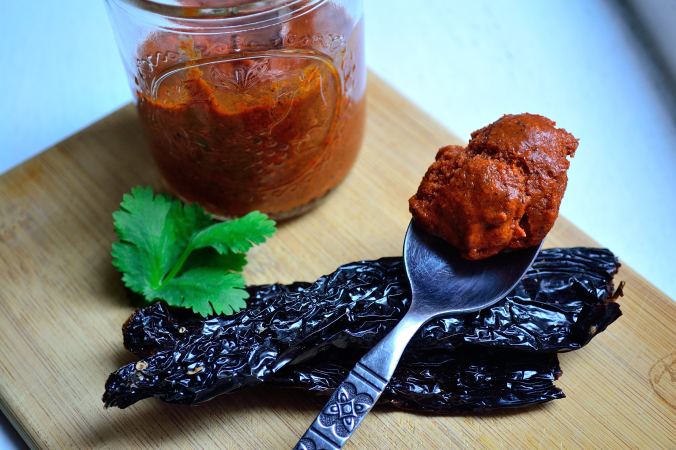
Fun fact:  I’ve never had taquitos.  Ok, that isn’t really a fun fact but it is a fact.  I’ve never had fresh taquitos, I’ve never had them from the frozen food section, and I’ve never thought, “Man, I could really go for a nice taquito right now.”  Then as I was roaming around the internet I saw a few recipes for taquitos and they looked really good and simple to make.

And they are good and simple to make.  Really good.  Like so good I seriously thought about eating leftover taquitos for breakfast the next day.  And if the taquitos were delicious, the dip I used was heaven.  I could have stuck a straw in it and had that alone.  Not even exaggerating.Buffalo Cauliflower Taquitos | Life Healthfully Lived

You busy people out there are going to like these too because you can make a big batch and then freeze them.  Now you have a quick dinner ready to go on a busy night.  Just take them out of the freezer and heat them up in the oven.  Boom! Healthy dinner.

If you have time, you can make the filling beforehand and then when you’re ready to make the taquitos all you have to do is fill, roll, and bake.  That sounds like a new dance craze that all the younguns will be into next week.  Just remember, I started it here first.

Buffalo Cauliflower TaquitosBuffalo Cauliflower Taquitos | Life Healthfully Lived

  • 1 large head of cauliflower
  • 1/4 cup of my buffalo sauce or your favorite brand
  • 1 cup butternut squash puree, you can also use sweet potato or canned pumpkin
  • 1 package of small tortillas, I used corn but you can use flour shells or a paleo version
  • 1 batch of my dairy-free ranch with a few changes, recipe below
  • optional: guacamole, salsa, regular ranch or bleu cheese dressing
  1. Preheat the oven to 325. Remove the leaves from the cauliflower and cut into florets removing as much of the stem from each floret as possible.
  2. Place the cut cauliflower into a food processor or blender and pulse a few times until the cauliflower looks like rice.  Scoop it out and place it into a bowl
  3. Add the butternut squash to the cauliflower rice and stir so everything is coated.  Heat a little (like about 1 tsp) olive oil in a large skillet over medium-high heat.
  4. Put the cauliflower into the skillet and saute for about 10 minutes.  Add the 1/4 cup of buffalo sauce and stir to combine everything.  You can add a little more buffalo sauce if the cauliflower doesn’t look like it’s coated enough.
  5. Cook this for another five minutes and then turn the heat to low and cover the skillet.  Let this sit for 5 minutes and then move to a large bowl.
  6. Put a little skillet (about the size of your tortilla shells) over low heat.  Don’t add any oil, you’re just using this to heat up the tortilla shells so the roll easily.
  7. Heat the shells about 15 to 20 seconds on each side then add a large spoonful of filling and roll the tortilla up.  Place it seam side down on a large baking sheet. Do this until you’ve used up all the filling.
  8. Bake for 20 minutes, checking towards the end to make sure the tortilla edges aren’t burning.  Remove from the oven and let cool then serve with fancy ranch (that’s what I’m calling it), salsa, and guacamole!

Fancy RanchBuffalo Cauliflower Taquitos | Life Healthfully Lived

  • 1/2 cup full-fat coconut milk
  • 1/4 cup cashews, soaked overnight or in boiling water for 15 minutes
  • 1 tbsp apple cider vinegar
  • 1 tsp roasted garlic
  • 2 tsp ranch seasoning
  • 2 tsp smoked paprika
  • 1 tsp cumin
  1. Blend everything together and taste to see if you need to add salt or pepper.  This will thicken up even more in the fridge so don’t worry if it’s a little soupy.Buffalo Cauliflower Taquitos | Life Healthfully Lived

DIY Wednesday: Butter-Free Buffalo Sauce

I’m going to be honest with you, I’m not a huge fan of buffalo sauce.  I don’t hate it, it’s just not really on my radar.  I’ve gone most of my life without and I would say I’ve lived a good life.

But that has changed.

I had an idea for a recipe and I was going to need to rely heavily on buffalo sauce so I started looking around.  Store-bought was out of the question because I couldn’t find any that any redeemable qualities.  That left making my own, which I’m all about anyway.  Well, there were a few good ones out there but a lot of them relied heavily on butter and Worchester sauce (which I will NEVER be able to pronounce properly) and I didn’t want to use those.

Long story short, I created a buffalo sauce that’s made with real ingredients and doesn’t include butter.  It is really easy to make and you can put it on anything that you would use buffalo sauce.  Wings, cauliflower bites, celery, fingers…. Also heads up, you’re going to want to make a batch of this for Friday’s recipe!

Buffalo Sauce: DIY Wednesday: Butter-Free Buffalo Sauce | Life Healthfully Lived

  • 1/4 cup hot sauce, I used this one, but use your favorite or make your own!
  • 1 tsp tomato paste
  • 1/2 tsp coconut aminos (or soy sauce)
  • 1 tbsp white vinegar
  • 1/2 tsp molasses
  • 3 tbsp coconut oil, melted
  • 2 tsp chili powder
  • 1 tsp garlic powder
  • 1/4 tsp cumin
  • 1/4 tsp smoked paprika
  1. Combine all the ingredients in a small bowl and whisk to combine.  Transfer to an airtight container, like a mason jar, and store in your fridge for up to 2 weeks.

Simple and tasty, just the way I like it!  You can easily double or triple this recipe to make enough for all your buffalo needs! DIY Wednesday: Butter-Free Buffalo Sauce | Life Healthfully Lived

Creamy Broccoli Spinach Soup

Creamy Broccoli Spinach Soup | Life Healthfully Lived
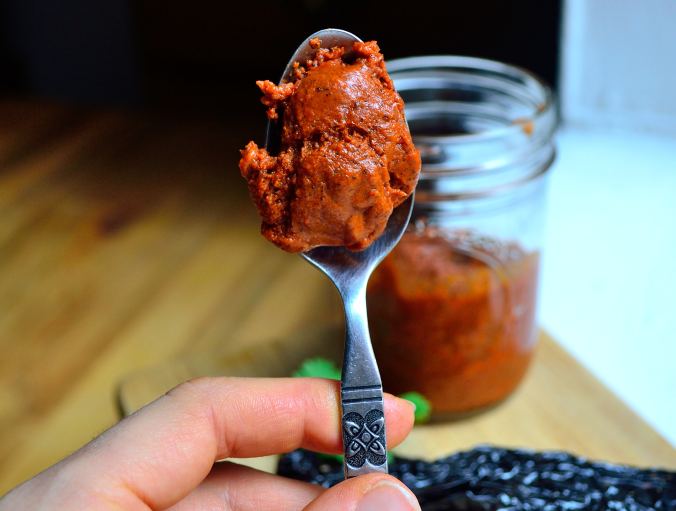
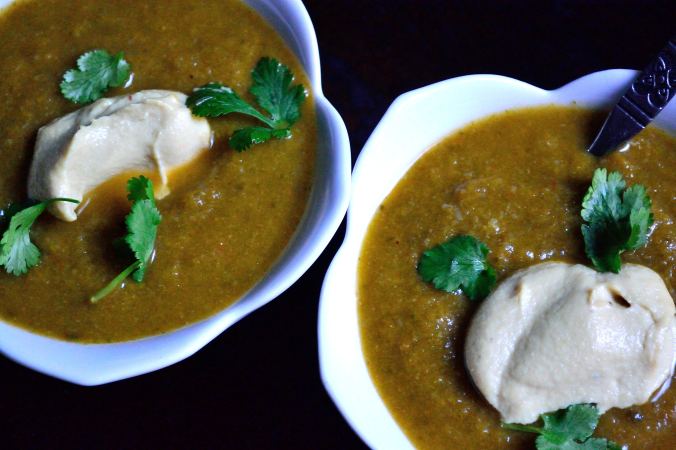
I have been living off of this soup for the past few weeks, it’s that good.  It’s hearty enough to make a good meal but not so heavy that you feel like taking a nap after you’re done.  I feel like that’s a good judge of a meal.  Do you feel like laying in bed for six hours when you’re done?  Nope?  Then you should eat this meal again or try harder next time.

This winter we haven’t had many days where you just want to wrap your body around a bowl of soup and swim in a giant mug of hot chocolate.  I’m not complaining, but I do enjoy those super cold nights where a warm meal is the only way to feel comfortable.  I’m probably the only weirdo like that.

On the nights that it is frigid out, try this super simple soup.  It’s stuffed full of vegetables and then blended to make it creamy and delicious.  No dairy, no cheese, and yet it’s still smooth and wonderful.  That’s my kind of soup.Creamy Broccoli Spinach Soup | Life Healthfully Lived

What do you guys have planned for your weekend?  I’m on my own this Saturday and I’ll probably end up running a few errands and catching up on some work.  I know, wild and crazy over here.  But that also means that I’ll spend a good portion of my day in the kitchen coming up with yummy things for you.  Any suggestions?

My suggestion to you?  Make a big batch of this soup on Sunday night and have lunches or dinners set for the rest of the week.  Your future self will thank me!

Creamy Broccoli Spinach SoupCreamy Broccoli Spinach Soup | Life Healthfully Lived

  • 1 cup carrots, peeled and sliced
  • 1 cup celery, sliced
  • 2/3 cup onion, diced
  • 3 cups broccoli, cut into florets (you can also use frozen, just make sure it’s completely thawed)
  • 1 cup roasted red or orange bell peppers
  •  4 cloves garlic, minced
  • 3 to 4 cups spinach, tightly packed (I used a whole 8 oz bag for reference)
  • 4 to 5 cups vegetable broth or water
  • 2 tsp smoked paprika
  • 2 tsp chili powder
  • 1 tsp oregano
  • salt and pepper to taste
  1. To roast your bell peppers: Preheat the oven to 400 and cut the tops off of the peppers.  Remove all seeds and place the whole peppers on a baking sheet lined with parchment paper.  Roast for about 30 minutes, turning the peppers over half-way through.  Take the peppers out of the oven and place them on a cutting board and place a large glass bowl over them so the steam will loosen the skins.  After 15 minutes, remove the bowl, slip off the skins, and dice the peppers. FYI: you can do this a few days ahead of time so you don’t have to do it right before you make your soup.
  2. For the soup: Heat a large dutch oven or stockpot over medium-high heat.  Add a little olive oil and add in the carrots, celery, and onion.  Saute them for about 8 minutes until the onion is soft and translucent.
  3. Add the minced garlic, roasted bell peppers, and broccoli florets.  Stir everything together and sprinkle with a little salt.  Saute for a few minutes.
  4. Pour in the vegetable broth or water.  You want the broth to cover all the vegetables and about 1/2 inch above.  Turn your heat to high and bring the soup to a boil.  Add all of the seasonings and stir to combine.
  5. Once the soup is boiling, add the spinach and cover the pot.  Turn the heat to low and simmer the soup for 15 minutes, stirring once.
  6. After 15 minutes, remove the lid and using an immersion blender, blend everything until it is smooth and creamy.  If you don’t have an immersion blender, you can work  in batches with your regular blender.  Just return everything to the pot when you’re done.Creamy Broccoli Spinach Soup | Life Healthfully Lived

The best thing about this soup?  It tastes AMAZING with a healthy dollop (read: massive spoonful) of my cheesy garlic spread. Yum!

DIY Wednesday: Paleo Porridge

DIY Wednesday: Paleo Porridge | Life Healthfully Lived
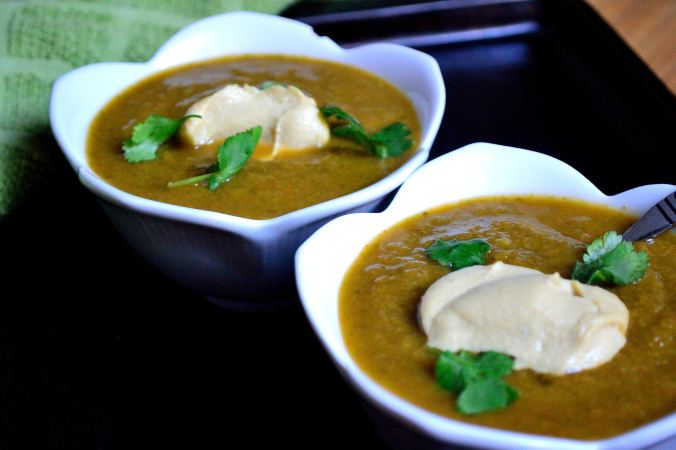
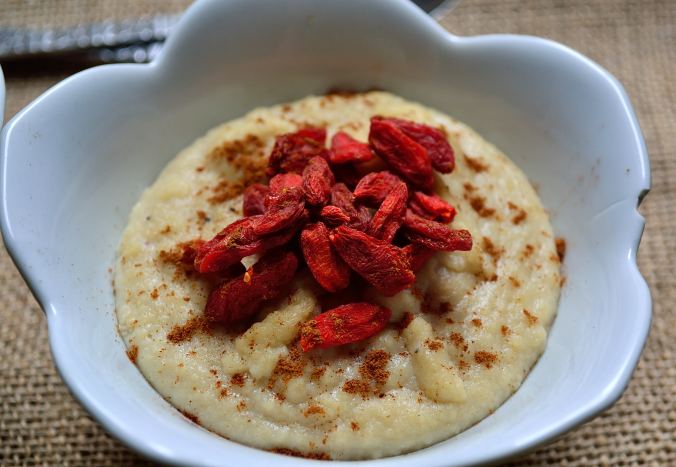
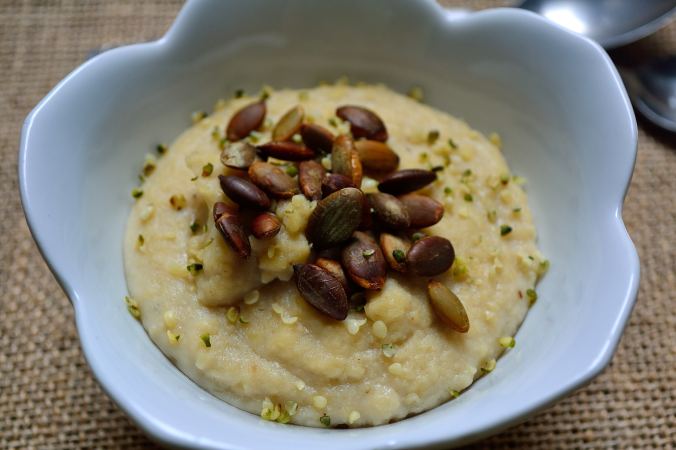
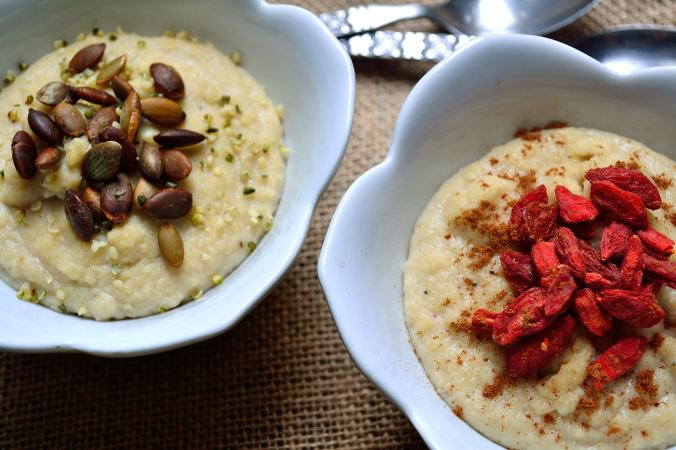
Doesn’t the word porridge always conjure up old-timey meals like in Oliver Twist?  Or at the very least make you think of Goldilocks and the only three bears on the planet that prefer a hot breakfast over raw carcass?

Just me?  Cool.

Porridge is actually any type of oatmeal, grain, or cereal that is cooked with boiling water or milk.  Most people go for oatmeal because it’s the most readily available but you can make porridge out of a lot of different things.  But for the most part it’s usually made out of some kind of grain and if you happen to be following the paleo diet, grains are a no-go.  So does that mean you can never enjoy a warm bowl of porridge on a cold winter morning again?DIY Wednesday: Paleo Porridge | Life Healthfully Lived

Of course not!  Not when you’ve got me around.

Not only can you make porridge out of cereals or grains, you can also make it out of meals (as in ground up stuff) and that includes nut meals.  Finely ground nuts make a great base for porridge and it is entirely paleo-approved!  I decided to go with almond meal because it can be made savory or sweet and it’s what I had on hand.  Also, almond meal is fairly easy to find so you won’t have to hunt through a specialty store to make your own paleo porridge.

I have a recipe for a sweet porridge and a savory porridge, both are essentially same, but the seasonings and liquid choices are a bit different.  If you’ve been missing your morning bowl of warm, cozy porridge try this easy grain-free version!

Paleo Porridge- Makes two servings

Sweet PorridgeDIY Wednesday: Paleo Porridge | Life Healthfully Lived

  • 2/3 + 2 tbsp almond meal (go for meal instead of flour because you don’t want it too finely ground)
  • 1 cup almond milk or any other non-dairy milk you prefer
  • 1 tbsp honey, maple syrup, or coconut nectar
  • 1 tsp cinnamon
  • 1/4 tsp sea salt

Savory PorridgeDIY Wednesday: Paleo Porridge | Life Healthfully Lived

  • 2/3 + 2 tbsp almond meal
  • 1 cup vegetable broth or water
  • 1/4 tsp freshly ground black pepper
  • salt to taste
  1. No matter what version you make, the directions are going to be the same.  In a medium saucepan, bring the liquid to a boil.
  2. Whisk in the almond meal and turn the heat to low.  Keep whisking as the almond meal thickens.  This will take about 5 to 8 minutes.
  3. Add in the sweetener (if making the sweet version) and seasonings as you keep whisking.  Once you’re porridge has reached your desired thickness, pour into a bowl and finish it with your favorite toppings.

If you’re porridge is too thin add more almond meal, one tablespoon at a time.  If it’s too thick add more liquid, one tablespoon at a time. As for topping ideas?  How about:

  • any kind of berry
  • raisins
  • bananas or any fruit
  • cacao nibs
  • pumpkin seeds
  • hemp seeds
  • flax or chia seeds
  • chopped nuts
  • nut or seed butter
  • herbs like parsley or cilantro
  • salsa
  • roasted squash
  • poached egg
  • mushrooms
  • heck, you could even add cooked meat or fish to your savory bowl!DIY Wednesday: Paleo Porridge | Life Healthfully Lived

There you have it!  Porridge two ways for all you grain-free people out there!