DIY Wednesday: Infused Olive Oil

We’reDIY Wednesday: Infused Olive Oil | Life Healthfully Lived about to get fancy people.  Today you are going to learn just how easy it is to make flavored and infused olive oils.  If you have never tried an infused olive oil, then you and your food are in for quite the treat.

I have had a variety of infused oils before, but I have never bought my own.  They were either gifts or I was using someone else’s when cooking at their house.  The reason I never bought my own?  They are expensive!  A good infused oil can be $15 to $20 a bottle and sometimes even more.  Don’t get me wrong, they’re delicious and add a ton of flavor to a dish, but I’m not spending $20 on a bottle of fancy oil.  Sorry, I’m just not that girl.

DIY Wednesday: Infused Olive Oil | Life Healthfully Lived

Then I learned just how simple it is to make your own fancy oil.  For some reason, I thought it was this complicated and mysterious process to infuse olive oil.  It really isn’t.  It’s as simple as choosing the flavors you want, heating those flavors with some olive oil, cooling/straining, and then using your infused oil in all the foods.

The options are endless when it comes to infused oil.  You can do fruit/citrus, garlic, onions, herbs, or even flowers.  It’s all up to you.  A few pointers before we get started:

  • Use decent olive oil.  It doesn’t have to be super expensive, but better oil will result in better flavor
  • For herbs, try to use fresh instead of dried.  Both will work, but fresh will leave a more powerful and fresher flavor. Also, blending the herbs with the oil will have a more intense flavor
  • For spices, buy whole and either leave them that way or ground them at home.  Store-bought ground spices just don’t have the same freshness as whole and home-ground
  • For aromatics like garlic or onion, you can leave them in the oil instead of straining them out.  This will keep infusing the oil with their flavor and make them stronger
  • Infused oils HAVE to be stored in the fridge.  Because the oil has been heated it will spoil faster if left out on the counter.  Just pull the oil out of the fridge a few minutes before you use it.

Once you start infusing your olive oil, you’ll want to try all the different kind of flavors.  Infused oils are great for adding another layer of flavor to dishes, work really well in salad dressings, and are great for dipping bread into.  They also make really pretty and thoughtful gifts.  So let’s get to the infusing!

Infused Olive Oil

DIY Wednesday: Infused Olive Oil | Life Healthfully Lived

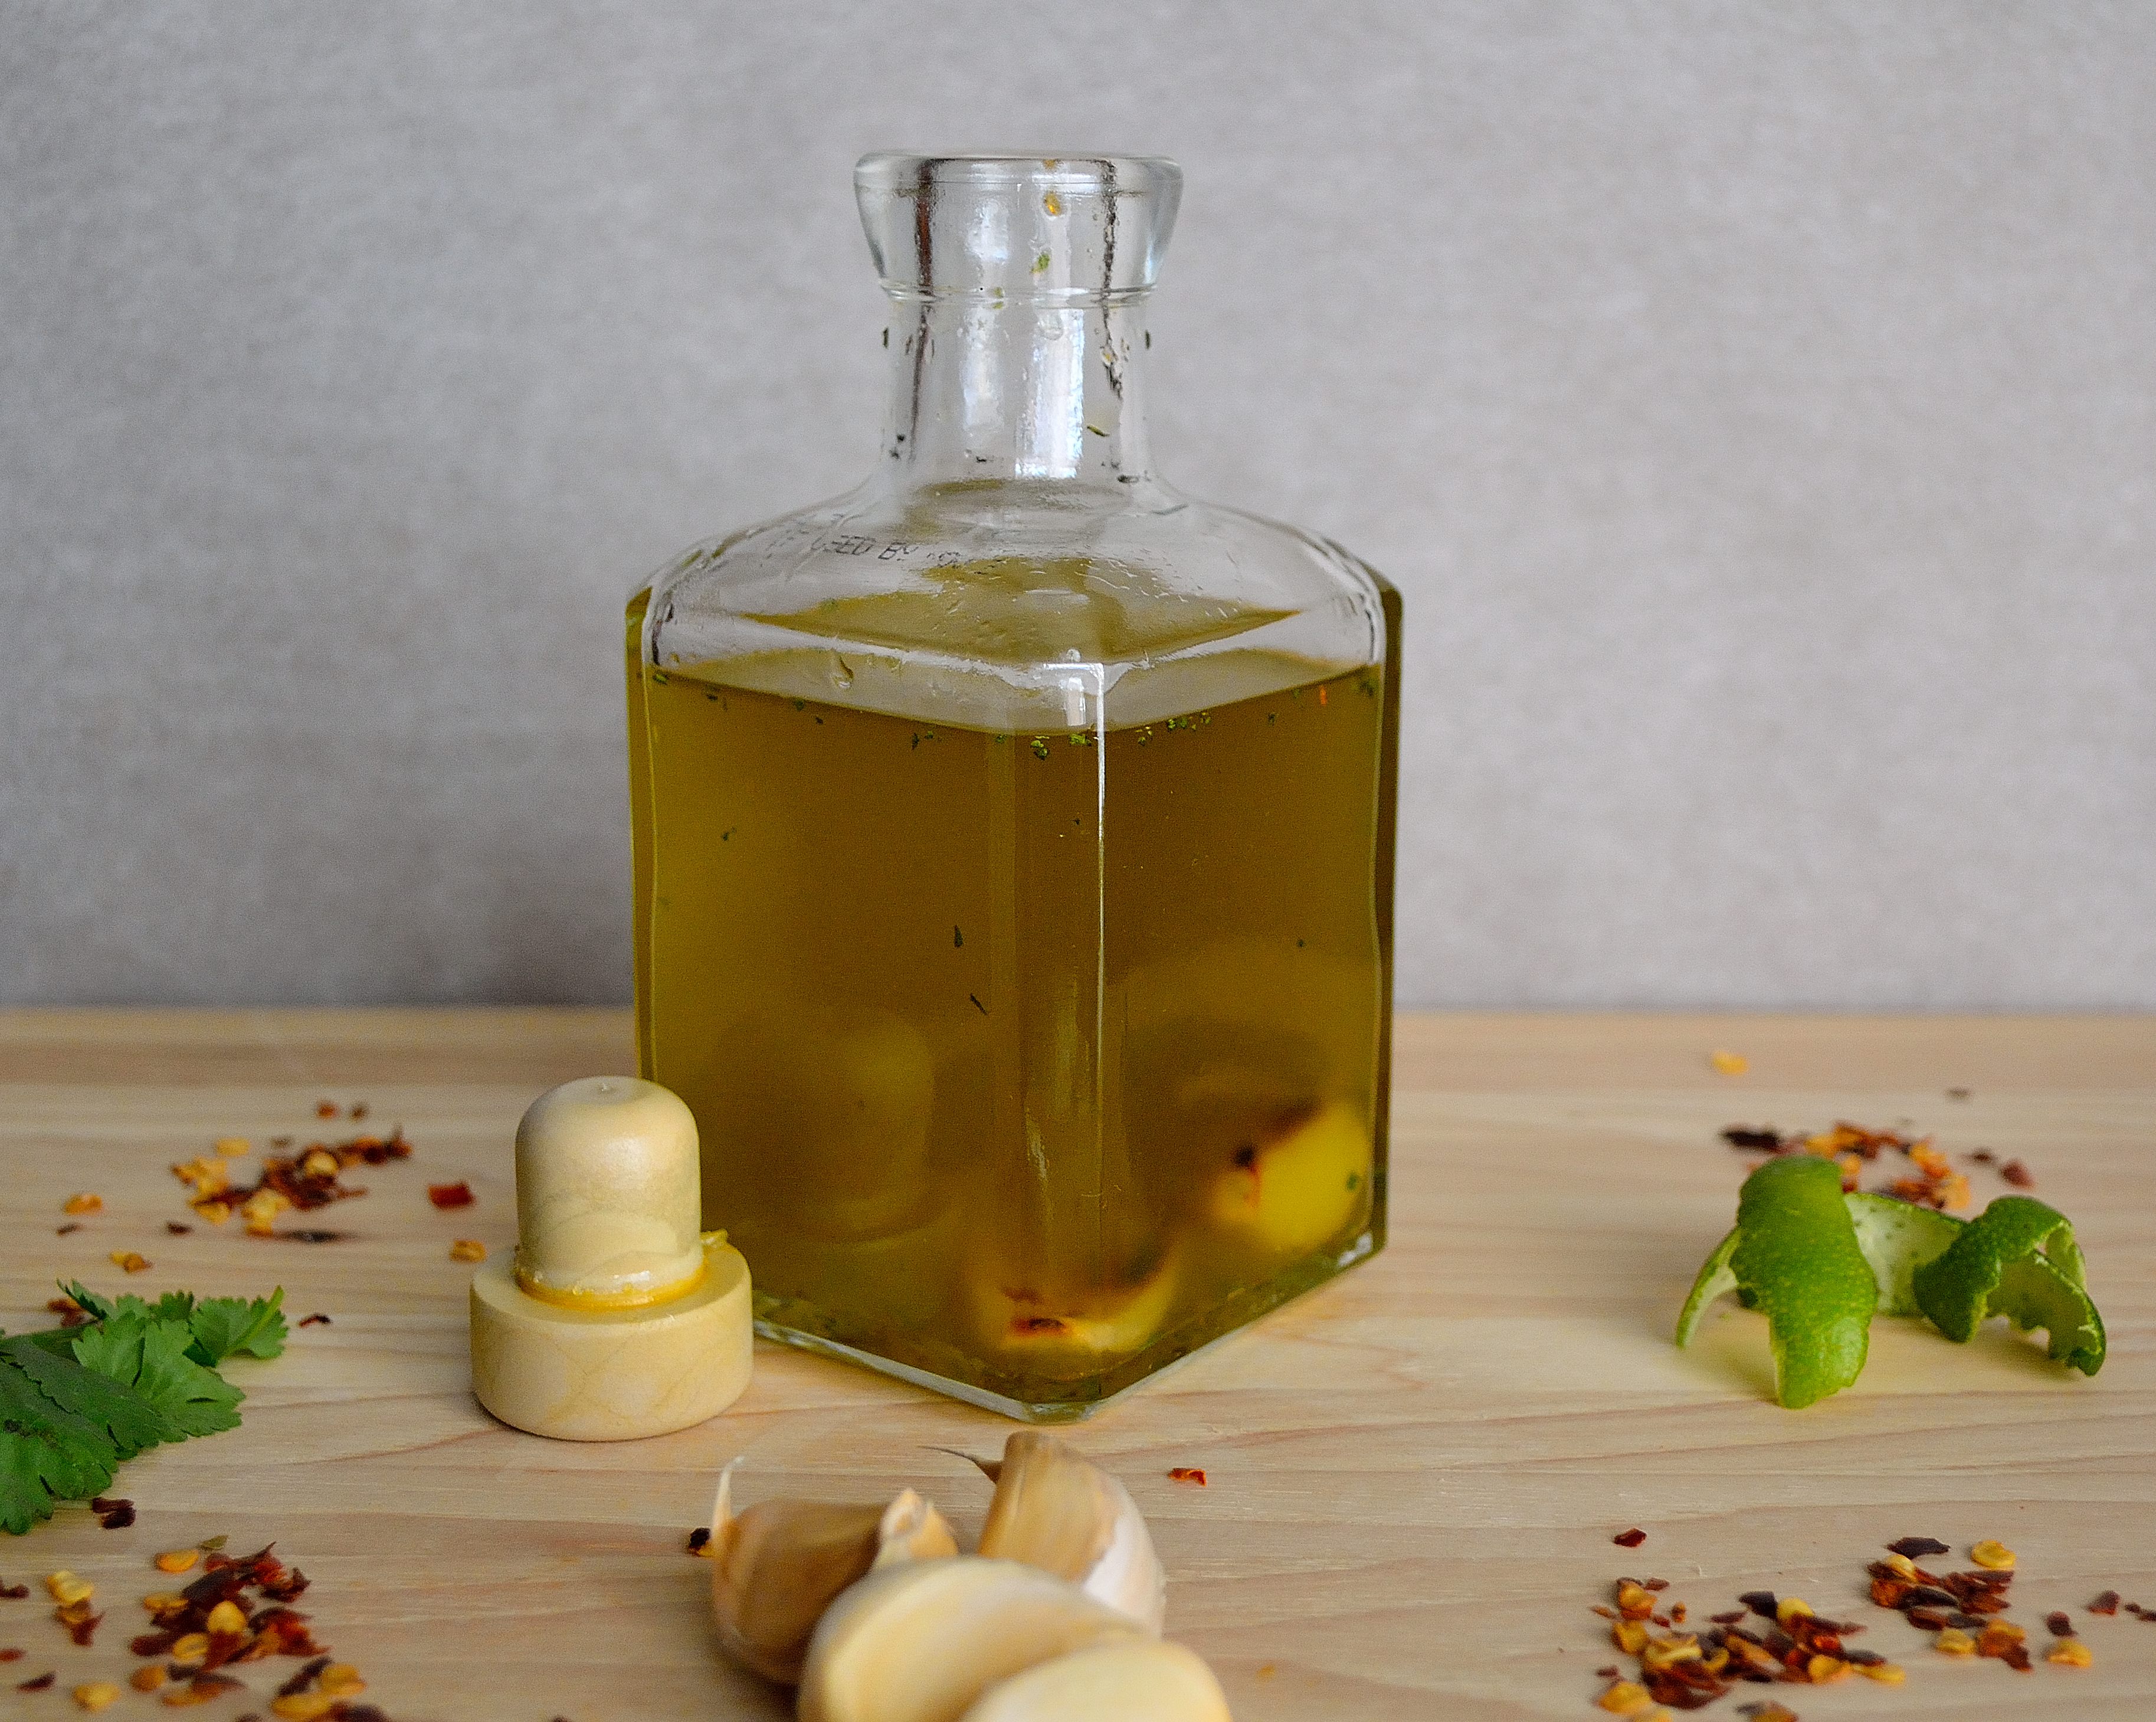
Garlic-Cilantro-Lime Oil

  • 1 cup olive oil
  • 1/2 cup cilantro, washed and stems removed
  • 6 cloves garlic, washed and rinsed (you don’t want dirt in your oil)
  • 4 strips of lime peels, use a vegetable peeler to remove even strips
  • 1 tsp red pepper flakes, optional
  1. If you want you can roast the garlic cloves at 350 for 15 to 20 minutes.  It isn’t necessary, but gives the oil a nice rich garlic flavor
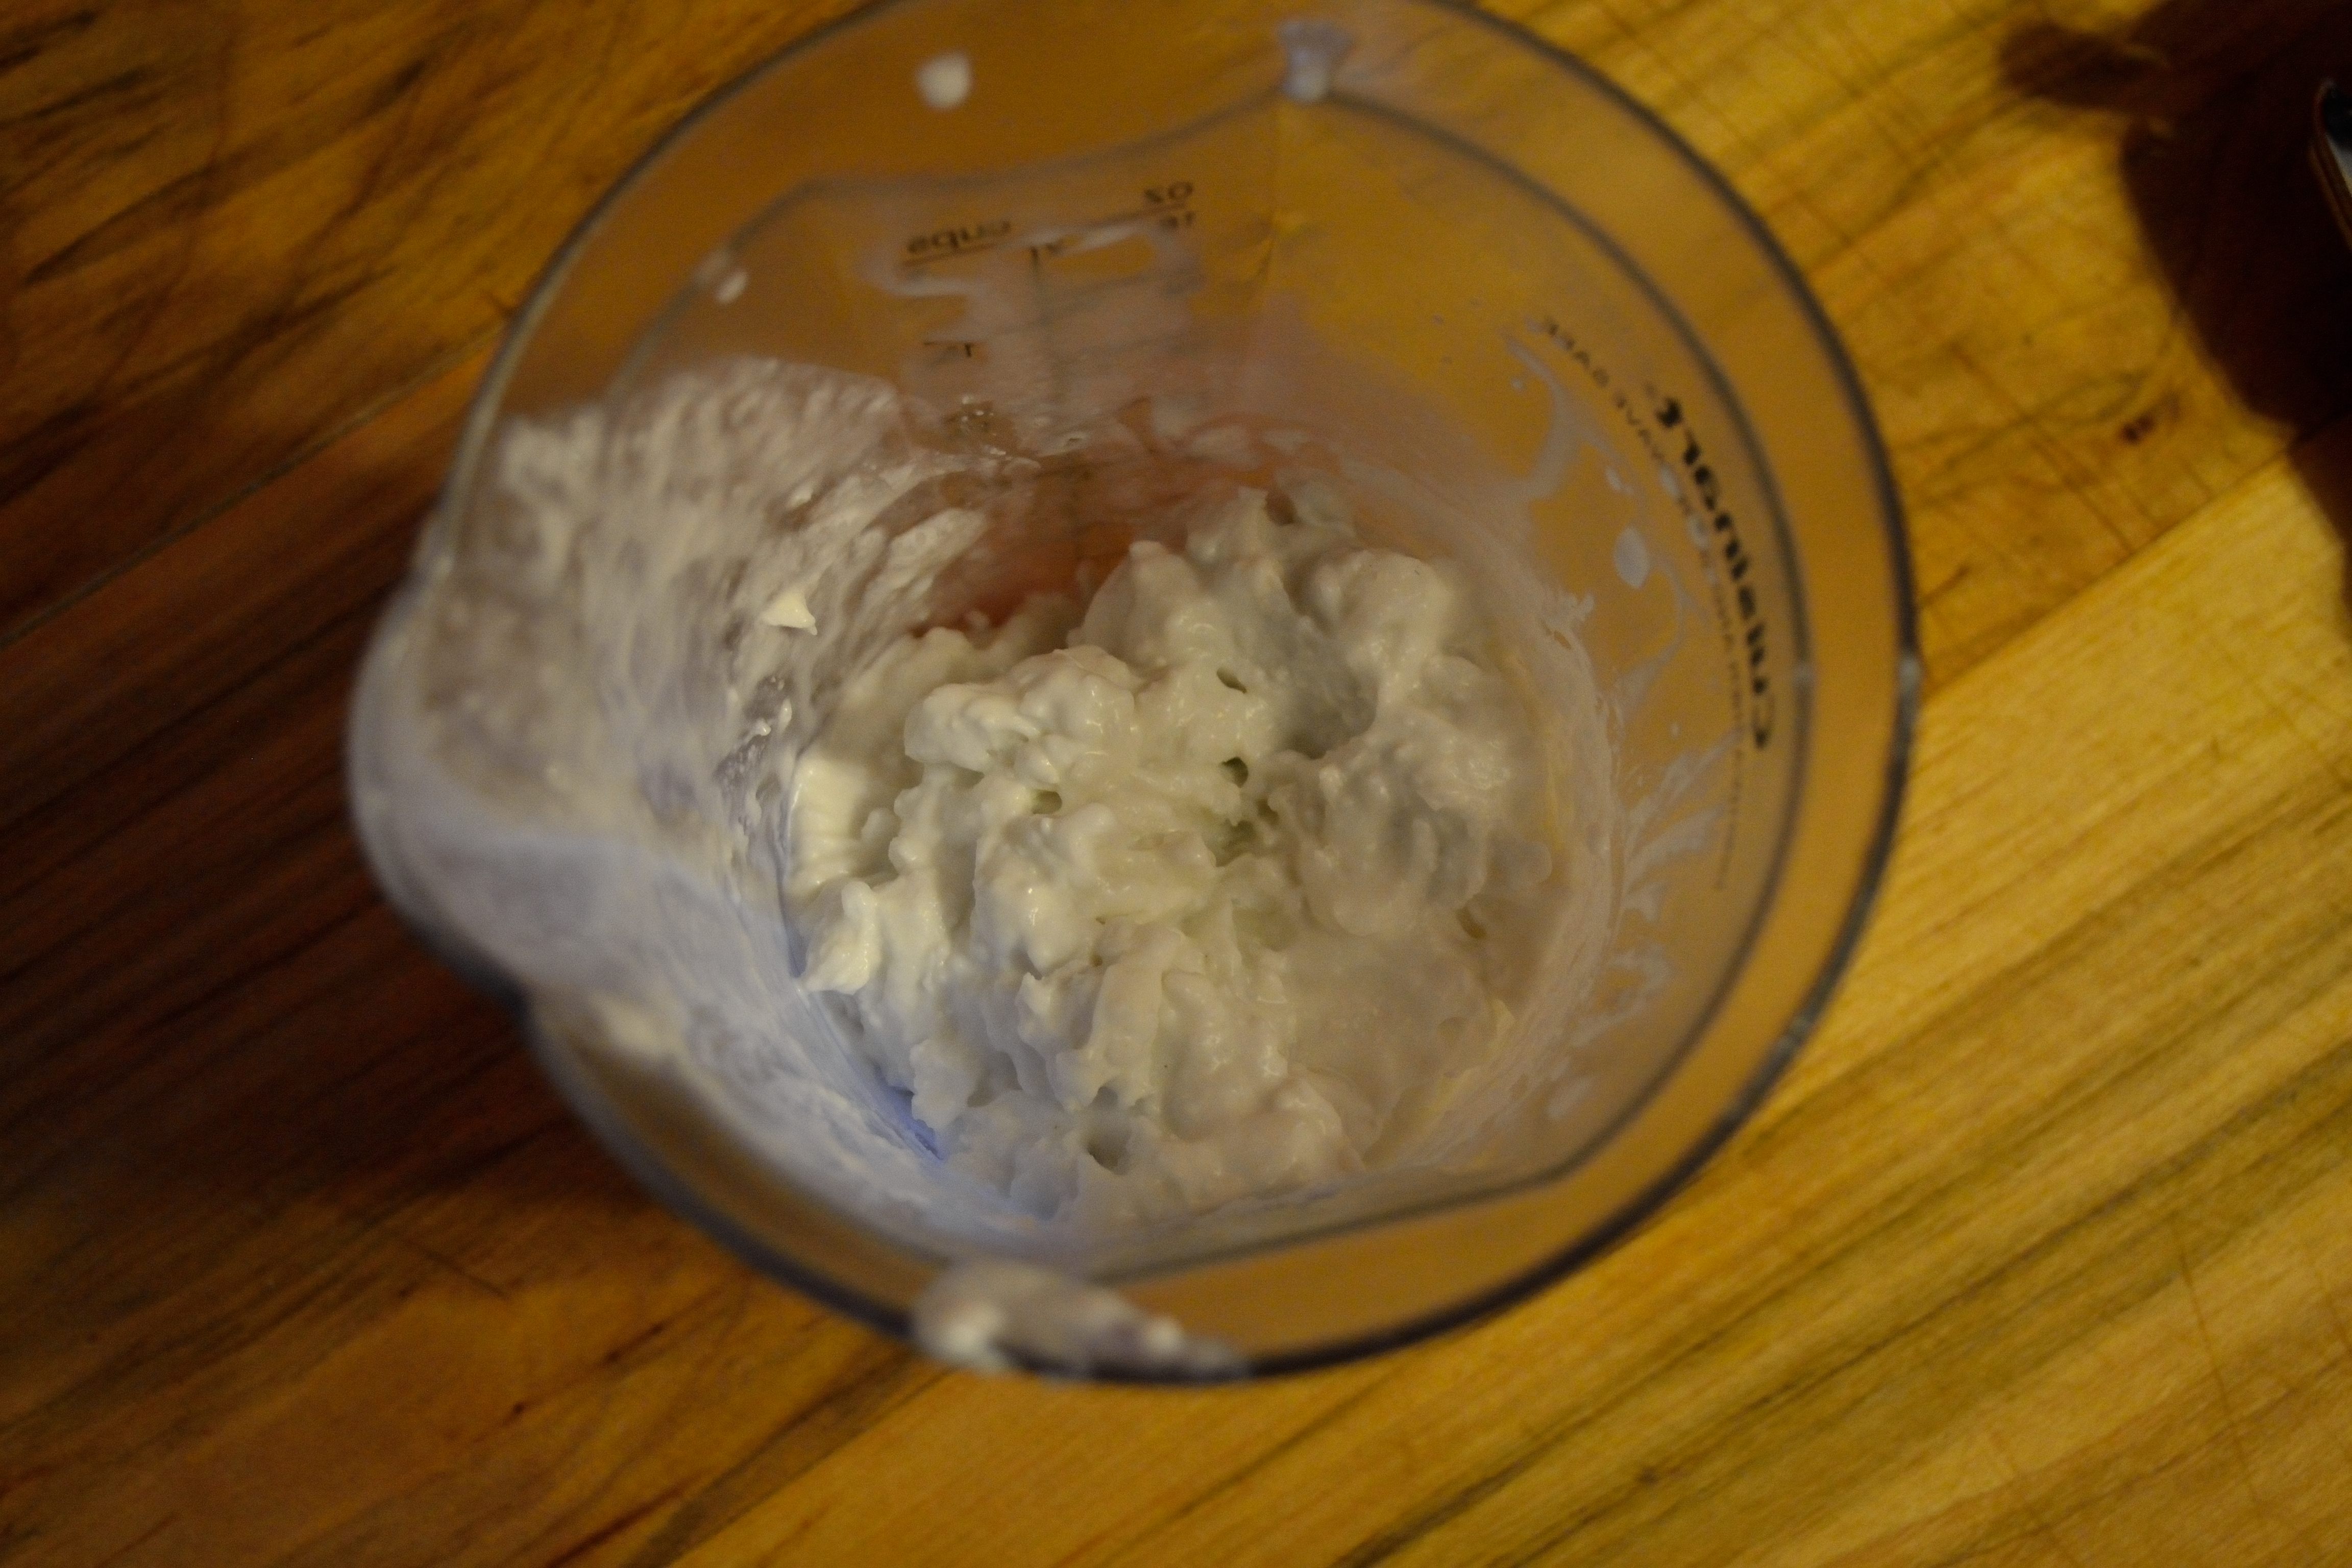
  2. While garlic is roasting, wash and remove the stems from your cilantro.  Blend the one cup of olive oil with the cilantro and pour into a medium saucepan.

    DIY Wednesday: Infused Olive Oil | Life Healthfully Lived

    Blended oil and cilantro with garlic, lime, and red pepper flakes

  3. Add in the roasted (or not) garlic, red pepper flakes, and lime peels.  Heat over medium-low heat until the oil is lightly bubbling, about 5 minutes.
  4. Remove from heat and allow to cool completely.  Once the oil is cool, use a fine mesh sieve or cheese cloth to strain your oil into a glass container.  You can add back in the garlic if you would like to have a more powerful flavor.
  5. Seal tightly and store in the fridge.  The infused oil will keep for up to a month

It might seem like a lot of steps, but once you get the hang of it, it’s really easy.  You can keep it simple and just infuse your oil with one thing like garlic or basil or red pepper or you can get more creative and create blends like star anise, lemongrass, and orange or oregano, basil, and thyme.  Plain old olive oil just isn’t going to cut it anymore once you start infusing it with awesome flavors. DIY Wednesday: Infused Olive Oil | Life Healthfully Lived

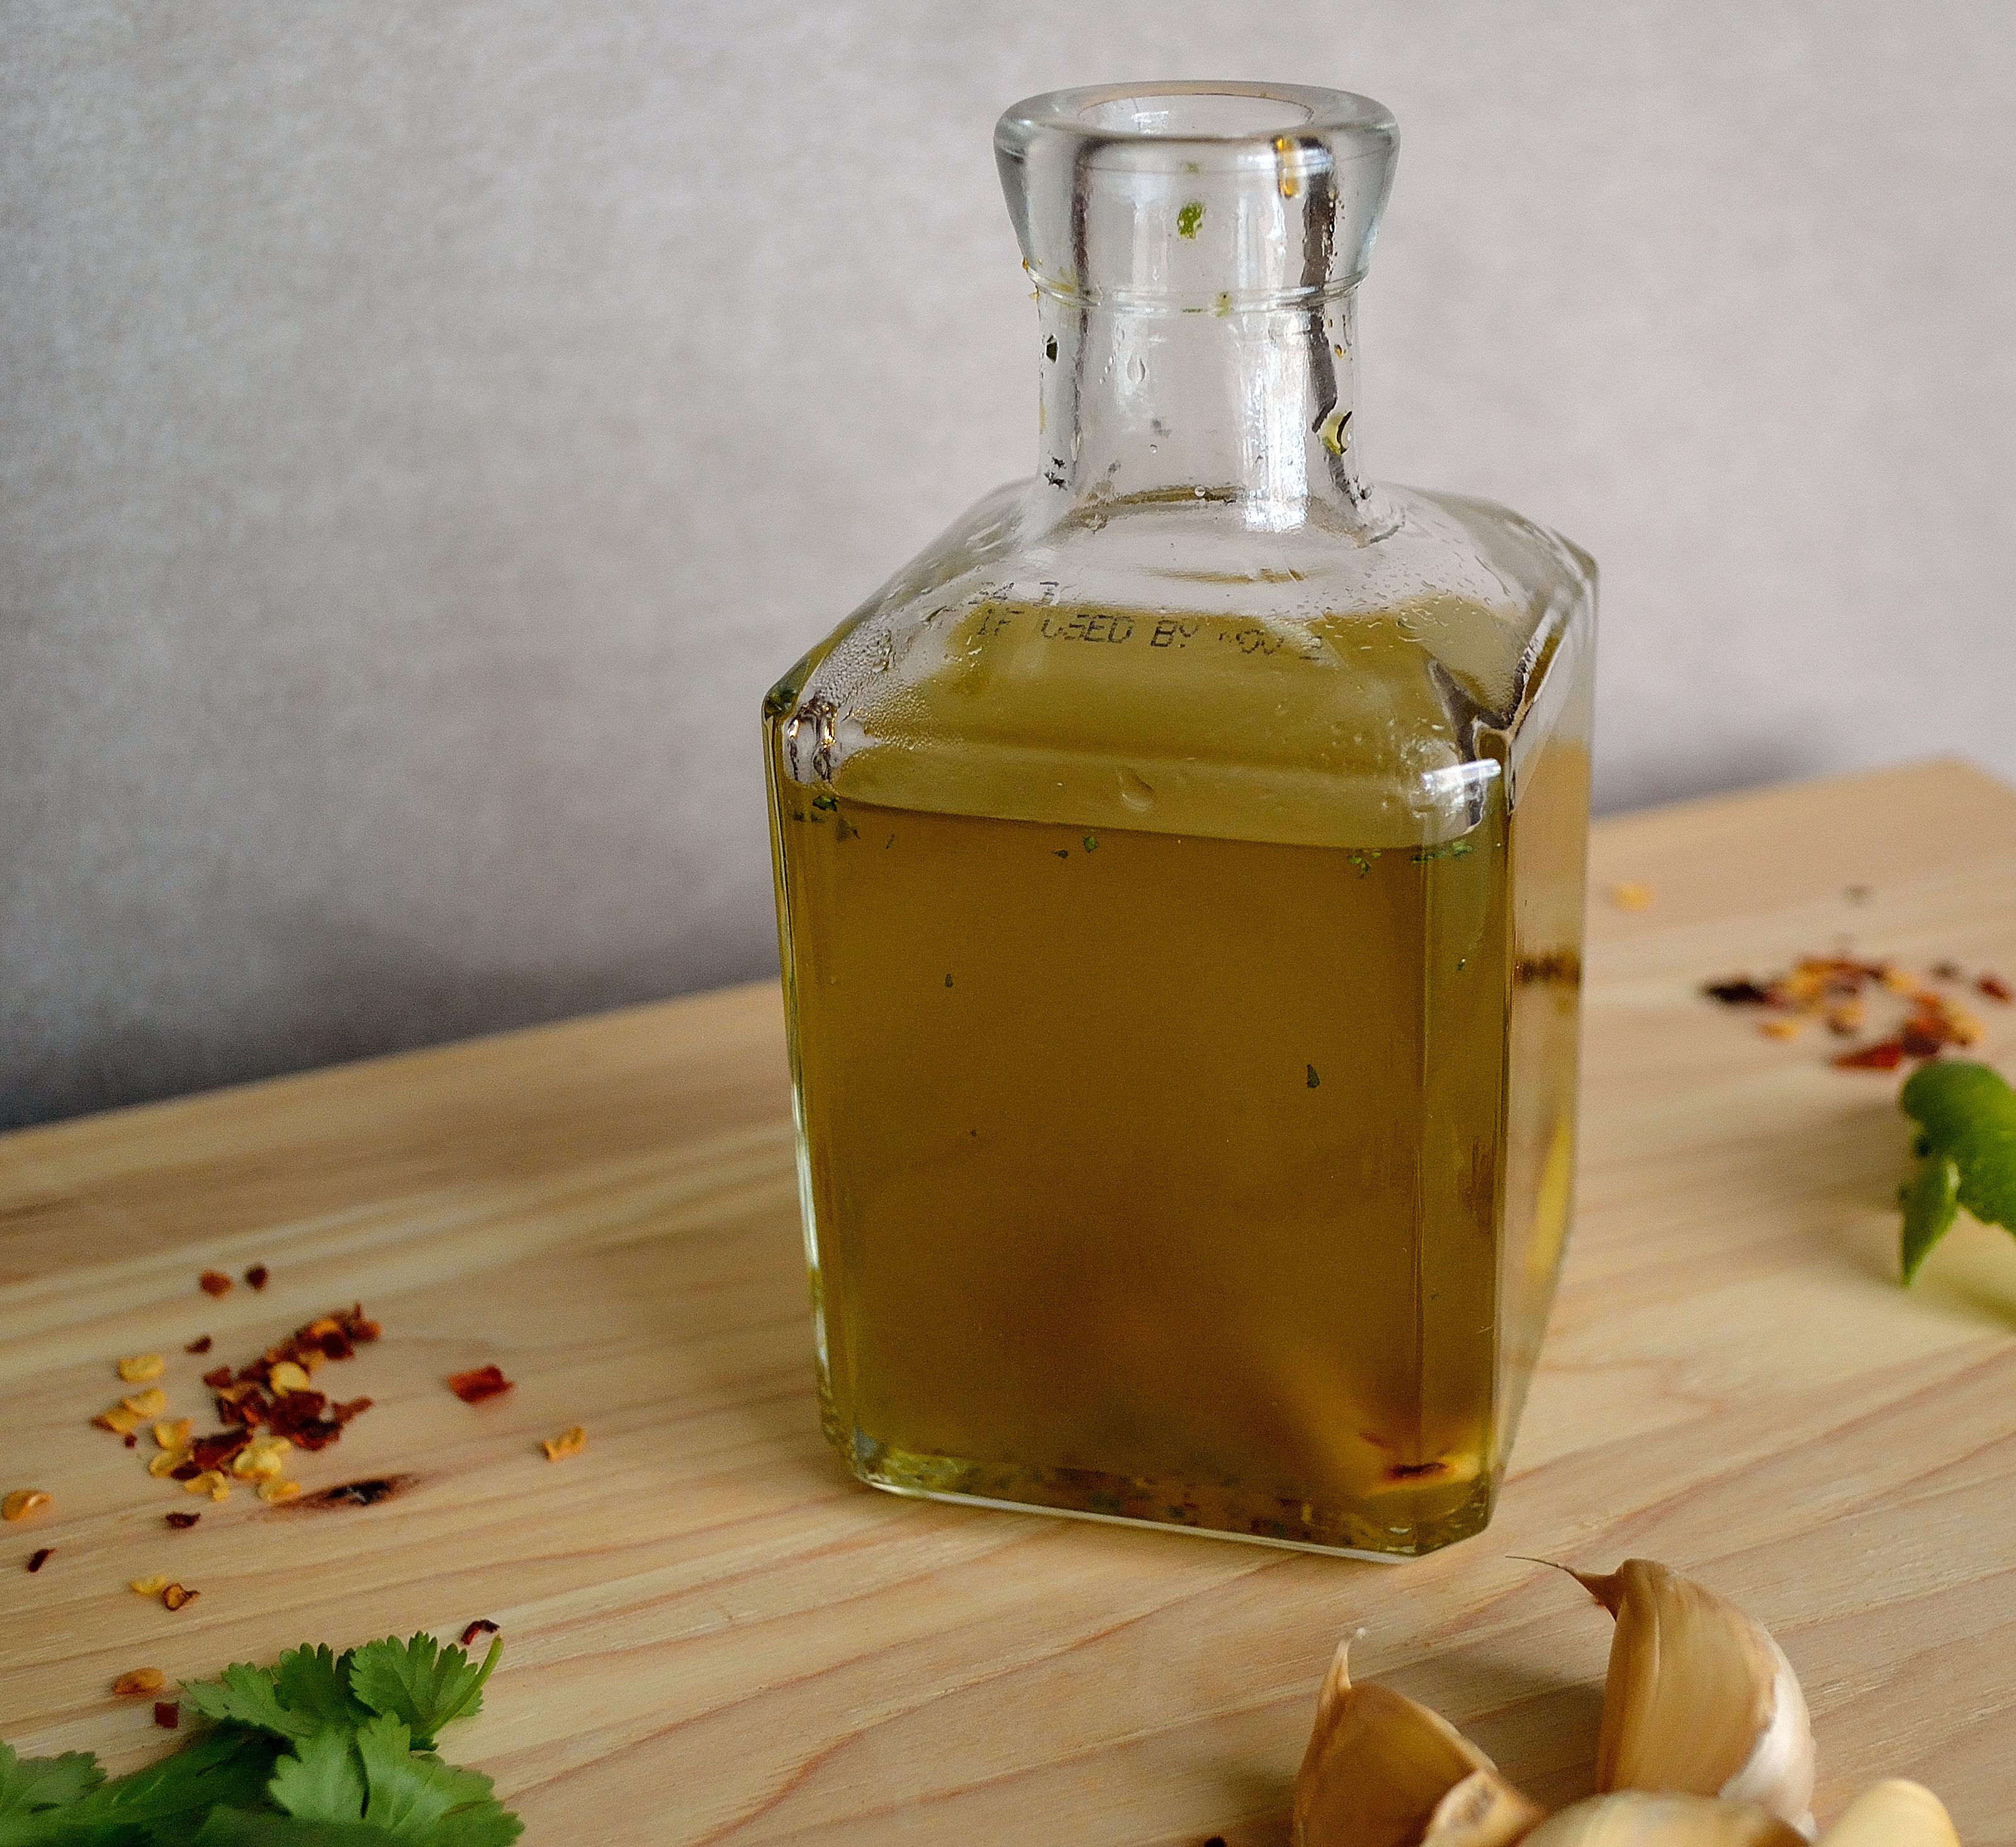
What blend would you make for your oil?

DIY Wednesday: Ketchup

ADIY Wednesday: Ketchup | Life Healthfully Lived few weeks back I did a DIY mustard post, so I thought it was only fair that I did a ketchup one too.

Ketchup is probably one of the most used condiments.  Kids put it on everything, fries seem naked without it, and congress keeps trying to tell us that it counts as a vegetable.  While that last one might take some extra convincing, there is no doubt that we love our tomato based condiment.  And one of the big reasons why?

Sugar

Almost all store bought ketchup has some form of sugar, whether it’s high fructose corn syrup or organic sugar.  Sugar is sugar no matter what and store bought usually has a lot of it.  But the one good thing I did notice about ketchup is that it doesn’t have a lot of other ingredients which make it an excellent candidate for making it yourself.

DIY Wednesday: Ketchup | Life Healthfully Lived

I’m betting that you already have all the ingredients you need to make your own ketchup and once you see how easy, and cheap, it is to make it yourself I’m pretty sure that you will be whipping it up all the time.

The other good thing about making your own ketchup is that you can make it to your taste and jazz it up with different spices.  Get adventurous and make your own flavor combos for your ketchup!

DIY Ketchup

DIY Wednesday: Ketchup | Life Healthfully Lived

  • 1, 6 oz can of tomato paste (pick a brand that has nothing but tomatoes in it.  I used Contadina)
  • 1/2 cup white vinegar
  • 1/4 cup water (more if you want a thinner consistency)
  • 1 tbsp maple syrup or honey
  • 1 tsp molasses
  • 1 tsp onion powder
  • 1 tsp garlic powder
  • 1/2 to 1 tsp salt
  1. Combine all the ingredients into a medium saucepan and whisk until smooth.  Bring the sauce to a boil and then lower to a simmer.
  2. Cook at a simmer for about 20 minutes, stirring often
  3. Remove from heat and allow the ketchup to cool completely before storing in a jar or squeeze bottle in the fridge.

Variations:

Curry Ketchup: Add 1 teaspoon of curry powder

Spicy Ketchup: Add 1-2 teaspoons of red pepper flakes or cayenne pepper

Fiesta Ketchup: Add in 1 tsp chili powder, 1 tsp cumin, and a squeeze of lime juice

DIY Wednesday: Ketchup | Life Healthfully Lived

Behind the scenes: Olaf is less than thrilled with my ketchup photo shoot!

DIY Wednesday: Ketchup | Life Healthfully Lived

DIY Wednesday: Coconut Whip Cream

FullDIY Wednesday: Coconut Whip Cream | Life Healthfully Lived Disclosure:  I do NOT like whip cream.  I know, I know, I’m not American, but it’s a texture thing for me.  For some reason, I don’t like the way whip cream feels in my mouth.  Yes, I’m a weirdo and I’m ok with that.

Second Full Disclosure: I did NOT come up with this recipe.  There are plenty of blogs/websites out there that have this recipe but I wanted to share it with you guys to show you how easy it is to make your own whip cream.

When you think about it, the method to this is right there in the name.  You are just whipping cream.  Fresh whipped cream can be a beautifully simple thing and it’s fun to watch cream turn into something light and fluffy.  Unfortunately, many people rely mostly on cans or tubs of whip cream and that’s where things get messy.

Fresh whip cream is meant to be eaten right away and not stored for a long period of time.  In order to make the whip cream sold in stores have a longer shelf life, chemicals and preservatives are added.  Things like stabilizers, gums, sugar are all used to make sure you can use your whipped cream for a long period of time.  Luckily, it’s really easy to make your own whipped cream and you don’t have to add any questionable ingredients.  This recipe is even better because those of you who have/choose to avoid dairy can still enjoy this dessert topping.

Add it to berries for a simple dessert, try it on top of your favorite cobbler or crisp, put some in your yogurt and create a parfait, or use it on your banana split.  You can use this whip cream just like store bought and feel better about the ingredients and the cost!

DIY Coconut Whip Cream

DIY Wednesday: Coconut Whip Cream | Life Healthfully Lived

  • 1 can full fat unsweetened coconut milk, chilled overnight in the fridge
  • 1 tbsp maple syrup
  •  1 tsp vanilla extract, optional
  1. Place your can of coconut milk in the fridge overnight so it can chill and create the cream.

    DIY Wednesday: Coconut Whip Cream | Life Healthfully Lived

    Pour off that liquid on the top…

  2. Open the can from the bottom and pour out the liquid into a cup or bowl and set aside.  Scoop out the cream and place into a large bowl or into the bowl of your mixer.  Add in the maple syrup and optional vanilla extract.

    DIY Wednesday: Coconut Whip Cream | Life Healthfully Lived

    …and scoop out the cream on the bottom.

  3. Using a hand mixer, immersion blender, or stand mixer, whip the coconut cream until it is light and fluffy.
  4. Use the whipped cream right away. It will last a few hours in the fridge but not much longer than that.DIY Wednesday: Coconut Whip Cream | Life Healthfully Lived

What is your favorite thing to top with whip cream?

DIY Wednesday: Chocolate Caramel Candy

SometimesChocolate Caramel Candy | Life Healthfully Lived you just need something sweet, preferably covered in chocolate.  There are days that a piece of fruit is just not going to satisfy your sweet tooth.  I used to think that I had to fight that sweet craving because it was a sign of my weakness.  I would ignore it and tell myself that I was making my willpower stronger.  I was really just making myself miserable.

Having a craving for sweet stuff doesn’t mean that you are weak, it means that you are human.  Indulging in a sweet treat every once in a while is totally fine and better for your sanity in the long run.  You just have to do it the right way.  If you find yourself reaching for a candy bar multiple times throughout the day, then maybe you need a little sugar detox. But if you’re looking for a little bite every now and then, this DIY is just for you.

Homemade food is always going to trump store bought because you are in control of the ingredients.  That is especially true for this candy.  It’s only two simple ingredients, but will still satisfy that craving for a little something decadent.  You can even add nuts or seeds for a little crunch and texture.  Make a batch and keep them on hand for whenever you need a little bite of chocolatey caramel-y goodness!

Chocolate Caramel Candy

Chocolate Caramel Candy | Life Healthfully Lived

  • 10 Medjool dates, pitted and sliced in half (you could also use prunes)
  • 1 cup dark chocolate chips (read notes for another substitution)
  • 1 tbsp coconut oil
  • pinch of sea salt
  • peanuts, cashews, hazelnuts, almonds (optional)
  1. Place pitted and sliced dates into a bowl and cover with hot water.  Let dates soak for 10 to 15 minutes until very soft
  2. Drain the dates and place them into a blender with the pinch of salt.  Blend until everything is completely smooth.
  3. Spoon about a teaspoon or so of the date caramel mix into a silicone mold.  You could also put them on a parchment lined cookie tray.  If you’re using nuts, press one into each caramel now.  Freeze for 30 to 45 minutes.
  4. Melt the 1/2 cup of dark chocolate chips and 1 tbsp coconut oil.  You can do this in the microwave in 20-second intervals stirring until all the chips are melted and it’s smooth.  Or you could melt the chips in a double broiler.
  5. Line a cookie sheet with parchment paper.  Remove the frozen date caramel and pop them out of the molds.  Using a fork, dip the caramel into the chocolate and place onto the cookie sheet, working quickly. Place the sheet into the freezer once they’re all covered
  6. Freeze for 15 minutes then enjoy!  Keep the candy in a container in the freezer so they don’t melt.

Chocolate Caramel Candy | Life Healthfully Lived

*Note* You can also use baking chocolate for the coating. Use 100% cacao and melt in a double broiler with 1 tablespoon coconut oil and 1 tablespoon of maple syrup or honey.  Stir constantly until completely smooth.

DIY Wednesday: Fruit Chips

DoesDIY Fruit Chips anyone remember the Seneca brand of apple chips?  They came in all these super delicious flavors like granny smith and my absolute favorite, cinnamon.  When I was younger my sister and I only got to eat them once in a blue moon.  My mom considered them a treat and not an everyday snack.  She was smart to do that because those things were loaded with added sugar.

Well, today’s DIY was partly inspired by those chips.  I wanted to make a snack that tasted just as good but didn’t have all the added sugar.  Fruit is naturally sweet and when you dry it out you concentrate those sugars even more.  Fruit chips don’t need to have any added sugar and they can still be a sweet snack.

For those of you who have a dehydrator, fruit chips are simple to make.  You just slice the fruit, place it on the trays, and go about your day.  Hours later you get tasty fruit chips.  If you don’t have a dehydrator, you can still get fruit chips with a few simple steps.  I tried this with apples, bananas, and peaches.  You can use whatever fruit is your favorite.  Strawberries, mangoes, and pears would also be really good.

DIY Fruit Chips 

DIY Fruit Chips

  • 1-2 of your favorite fruit (apples, bananas, pears, strawberries)
  • 1 tsp lemon juice
  • 1 tsp cinnamon, optional
  1. Preheat your oven to its lowest setting, 170-200.  Wash your fruit and dry it thoroughly.  Slice the fruit VERY thin.  The thinner you slice the fruit the crispier your fruit chips will be.DIY Fruit Chips
  2. Line a baking sheet with parchment paper or a Silpat.  Place the fruit slices in a single layer on the baking sheet.  Make sure they don’t touch.DIY Fruit Chips
  3. Sprinkle the lemon juice and cinnamon over the fruit.  Bake the fruit slices in the oven for 2-4 hours, flipping every so often.  The baking time will vary based on the temperature of your oven.  The chips are done when they’re lightly brown, starting to curl, and no longer soft.DIY Fruit Chips
  4. Once the chips are done, let them cool on the sheet until completely cool.  Store in an airtight container for up to a week.