My Favorite DIY Posts

Since I’m still on vacation, I thought that instead of a new DIY post I would share some of my favorites so you can get in on the DIY action.  These are a few of the things that I constantly make so that I always have them on hand.  They’re quick, easy, and most of all save  me money since I don’t have to buy them at the store!

Coconut MilkMy Favorite DIY Posts | Life Healthfully Lived

Seriously, I can’t stop making this and why should I?  It’s cheap, the easiest non-dairy milk to make, and doesn’t have the additives that most store bought coconut milk contains. You also don’t need a high-speed blender and can even use an immersion blender to get awesome results.  My coconut milk has been making its way into curries, my coffee, and my morning smoothie bowl.  Speaking of which….

Smoothie Bowls

Now that it’s starting to get warm, smoothie bowls are hitting the spot.  You can make them with your favorite ingredients and get your daily fruit and vegetables.  Here’s a simple guide to building a smoothie bowl.

Lemon-Ginger TeaMy Favorite DIY Posts | Life Healthfully Lived

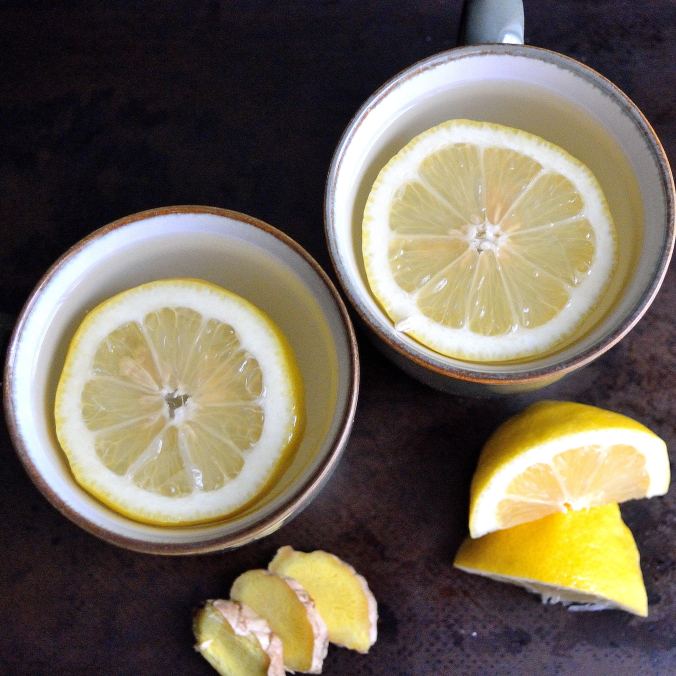
I have this every morning and I love it.  Since I’m not a huge fan of plain water, this is a great way to get some water first thing in the morning without choking down a glass of plain water.  Plus it’s good for your digestion and your skin!

Dairy-Free Ranch and Basil Dressing

Summer means more salads and fresh vegetables and what better way to eat them than with delicious dressing?! As much as I love my vegetables, I love my dressing even more.  Don’t buy dressing at the store because not only is it more expensive but it can quickly turn your healthy salad into a calorie and chemical bomb.  Whip up one of these dressings yourself and thank me later!


Caramelized OnionsMy Favorite DIY Posts | Life Healthfully Lived

This is the definition of an easy recipe.  Your slow cooker does most all of the work and you end up with delicious caramelized onions that you can put in everything.  I freeze the onions in ice cube trays and then just pull out what I need when I’m making dinner.

Coconut ChipsMy Favorite DIY Posts | Life Healthfully Lived

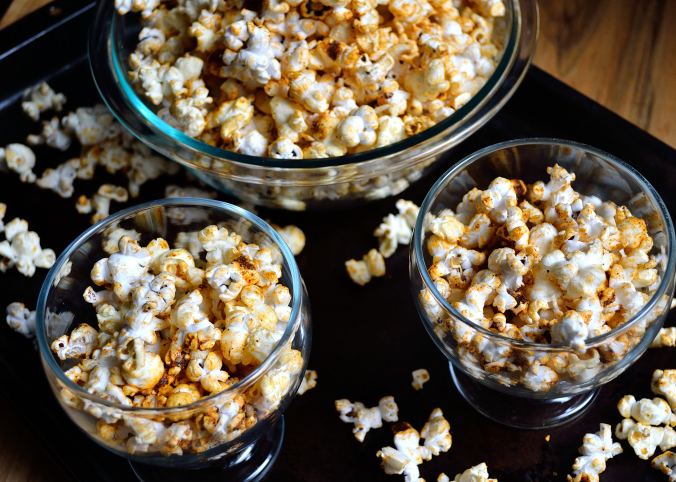
These are the best snack ever.  A little sweet, a little savory, and all delicious.  I actually made a huge batch of these before we left for Michigan because they make a great road trip snacks.  I may have even shared a few with Adam… Maybe.

I have a ton more DIY recipes over on my recipe page so if you’re feeling the DIY vibe check it out!

Asian-Style Green Beans

Are Chinese buffets still a big thing?  I haven’t been to one in many years, but for a while when I was younger my family and I would go often.  It was just easier because everyone could get what they wanted and it was good for my notoriously picky sister because there were always a few things like pizza and chicken nuggets.  Which of course are Chinese.  Asian-Style Green Beans | Life Healthfully Lived

One of my favorite things at the buffet were the green beans.  They were crispy, crunchy, green, sweet, and salty.  They had those huge granules of salt and garlic and they balanced so well with the other flavors.  I would always get numerous helpings and could have easily made a meal of them.

Of course, they were probably SUPER high in sodium and flavorings that might not have been the best but when compared to the other offerings at the buffet (I’m looking at you General Tso’s chicken and crab rangoon) they were a pretty good choice.  The other day I had a hankering for those green beans and decided to make my own healthier version and I’m pleased to say I think I got pretty close!Asian-Style Green Beans | Life Healthfully Lived

Fresh green beans are making their way back into grocery stores so you should be able to find them pretty easily.  But if you can’t don’t worry, you can use frozen green beans too.  Give these green beans a try at your next meal and I guarantee your family will polish them off.  At least, my husband did….

Asian-Style Green BeansAsian-Style Green Beans | Life Healthfully Lived

  • 2 cups fresh green beans, ends trimmed (if using frozen make sure to thaw them first)
  • 3 cloves garlic, minced
  • 2 tsp dried onion flakes
  • 1 tsp powdered ginger
  • 1 to 2 tsp coarse sea salt (if you don’t have coarse that’s fine just adjust the amount so it’s not too salty)
  • 2 tbsp coconut aminos (you can use soy sauce or liquid aminos too)
  1. Heat a little oil in a large saute pan over medium-high heat.  Add the minced garlic and swirl everything around the pan a few times.
  2. Add the green beans to the pan and then add the onion flakes, ginger, and salt.  Stir so everything is mixed together.  Saute for 5 minutes.
  3. Pour the coconut aminos over the green beans, stir everything together, and cover.  Lower the heat to low and cook for another 2 minutes.

Mini BBQ Pizza’s


Mini BBQ Pizza's | Life Healthfully LivedI’m going to tell you a story about pancakes.  Don’t worry it will make sense in the end.

Hopefully.

I can remember one of the first times that I helped my mom make pancakes.  I was very excited because the whole process looked so magical.  We got our mix together, whisked the crap out of it because it was fun, and then started heating up the skillet.  I poured in the right amount and waited until the all-important flip.  After the instructed three minutes, I put the spatula under the pancake and….

Totally destroyed the first pancake.  It stuck to the pan, wasn’t entirely cooked on the bottom, and was just a big mass of half-cooked batter.  I was devastated.  My hopes of being a pancake wizard were dashed.  I started to get a little teary but my mom stepped in and gave some mom advice.Mini BBQ Pizza's | Life Healthfully Lived

“Don’t worry, the first pancake is always like that.  It’s the test pancake.  It lets you test the pan to see if it’s hot enough.  The rest of your pancakes will be better because that first one was messed up.”

And she was right.  The rest of my pancakes turned out just fine.  Now, before you go thinking this was a beautiful teaching moment between mom and daughter, my mom went on to tell me, “Yeah, you’re just like the test pancake.  You were our first baby and we had no clue what we were doing.  We tested everything out on you so when your sister came along we knew what to do.”

I love my mom.

It was all in good fun and it actually was some good advice when it comes to testing out new recipes or new things.  Just because it doesn’t work the very first time doesn’t mean that everything is a total failure.  So what does that have to do with pizza?  I had a bit of trouble making the crust for these tasty treats and my first one (ok, my first like five) turned out like this:

Mini BBQ Pizza's | Life Healthfully Lived

Sad but brave and valiant test pizza crust paving the way for perfection

But I kept at it and was rewarded with this recipe!  I chose to make it with my BBQ sauce and Not Mozzarella, Mozzarella, but you can customize the toppings with what you had on hand!

Thanks mom for teaching me about test pancakes and test babies because without them I couldn’t give the world Mini Pizza’s and that would be a travesty.  Also, you’re welcome for having like the world’s best test baby 😉

Mini BBQ Pizza’sMini BBQ Pizza's | Life Healthfully Lived


  1. Preheat oven to 350 and make sure you have your sauce, cheese, and toppings ready.  Line a large baking sheet or two with a Silpat or parchment paper and set aside.
  2. Place all of the dry ingredients into a large bowl and whisk together.  Pour this into a blender and add the water.  Blend until you have a batter.  It should be more on the thinner side.
  3. Heat up a small skillet with a little olive oil, I used my tiny cast iron skillet, and pour about 1/4 cup batter into the skillet.  Let it cook for a few minutes and then flip it over and cook for another minute before putting it on the prepared baking sheet.  Don’t worry if your first one isn’t perfect 🙂
  4. Keep doing this until all the batter is used up.  Place the baking sheets in the oven and cook for 5 minutes.  Remove and crank the heat up to 400.  While the oven is getting hotter, put the sauce, cheese, and toppings on each pizza.  Pop them back into the oven for another 10 minutes or until the cheese starts to brown.
  5. Remove and let them cool a few minutes before totally devouring!Mini BBQ Pizza's | Life Healthfully Lived


What are your favorite pizza toppings?

DIY Wednesday: Chili Cheese Popcorn

DIY Wednesday: Chili Cheese Popcorn | Life Healthfully LivedPopcorn is one of my favorite snacks because it’s easy to make and you can eat a huge bowl of it without feeling gross.  I’m a huge fan of volume eating because I like food.  Unfortunately, a lot of popcorn that you can buy in the store is NOT so good for you.  Flavored popcorn tends to be full of artificial ingredients, preservatives, oils, and way too much sodium.  That can be a real bummer when you figure that out after you’ve already inhaled a whole bag by yourself.DIY Wednesday: Chili Cheese Popcorn | Life Healthfully Lived

But don’t you worry because I’ve got you covered!  You can make your own flavored popcorn at home with half the bad junk and all the tastiness.  I was surprised by how good these turned out and even Adam who tends to like plain things said these were addictive.  Husband approval means you know it’s good!

You probably have most of these ingredients already and if so you’re only a few minutes away from a healthy snack!

Chili Cheese PopcornDIY Wednesday: Chili Cheese Popcorn | Life Healthfully Lived

  • 3 cups air-popped popcorn (or you can use this method if you don’t have an air-popper)
  • 2 tbsp nutritional yeast flakes
  • 1 tbsp chili powder
  • 1 tsp ground cumin
  • 1 tsp garlic powder
  • 1 tsp dried minced onion
  • 1 tsp sea salt
  • 1/2 tsp smoked paprika
  • 1 1/2 tbsp coconut oil
  1. Mix all the seasonings together and measure out one tablespoon into a small bowl.  Add the melted coconut oil and mix everything together.  You want it to be pourable.  Set this aside.
  2. Pop your popcorn and put it into a large bowl.  Make sure you do this after you get the seasoning mix together.  You want the popcorn to be hot when you mix everything together.
  3. Once the popcorn is popped, pour the spice mix over the popcorn and toss to coat.  It might take a few minutes, but keep tossing and the seasoning will get on all the popcorn.DIY Wednesday: Chili Cheese Popcorn | Life Healthfully Lived


Happy snacking friends and see you on Friday!


DIY Wednesday: Turmeric Paste and Golden Milk

If you have been following my blog for any length of time you know two things.  I like spices and I’m usually talking about the benefits of turmeric.

Any chance that I can slip turmeric into the conversation, I will.  If you’re sore from a really tough lifting session, I’ll probably tell you to use some turmeric in your next meal because it has anti-inflammatory properties.  If you’re at a high risk for heart disease, I might mention that turmeric can help lower your risk.  If you’re feeling depressed, worried about Alzheimers or cancer, I’m going to tell you that turmeric can help with all of those things.

I’m like the annoying friend who goes on a juice cleanse and it fixes everything from her weight to her crippling debt and she just won’t shut up about it.  You’re welcome.

But seriously, turmeric is SO good for you and you should really start including it in your diet.  It isn’t that expensive and you can find it in most grocery stores (if you shop at Whole Foods you can get it in their bulk spice section).  It’s also really easy to use and slip into a bunch of different meals.  But there are a few things you should know to get the most out of your turmeric:

  • Take it with black pepper
  • Take it with a fat

Why do you need to add these two things to your turmeric?  Turmeric’s main component is curcumin (this is what makes it so potent and beneficial) and curcumin is fat soluble.  In simple terms, in order for your body to absorb and use any turmeric you ingest it needs fat to break it down.

Black pepper enhances turmeric’s bioavailability which means it makes it easier for your body to use and distribute.  This is a good thing and what you want your body to do with anything that enters your digestive system.

You can use turmeric in so many different things like soups, curries, stir fry, smoothies, and sprinkled over vegetables or meat.  One of my favorite ways to use it is to toss some broccoli with a little coconut oil (fat), and then sprinkle garlic powder, turmeric, pepper, and a little sea salt over the broccoli and roast at 400 for 20 minutes.

Another great way to enjoy turmeric is to make Golden Milk which sounds expensive and fancy, but it’s really simple and easy to make yourself.  I like to make a turmeric paste and keep it in a jar in my fridge and then scoop out what I need to make the milk.

A few pointers when you’re making your turmeric paste:  Don’t use any utensils, pots, or jars that stain easily.  Turmeric is amazing for your health but can stain plastic bowls, containers, or utensils.  Glass and stainless steel work best and keep your kitchen tools looking nice.  Also, turmeric does have a very earthy smell and taste so it might be off-putting at first.  Use it in ways that you can sort of mask the taste at first and then start to slowly use it more prominently.

Ok, enough talking about turmeric and how good it is for you, time to actually use it!

Turmeric PasteDIY Wednesday: Turmeric Paste and Golden Milk | Life Healthfully Lived

  • 1/2 cup turmeric powder
  • 1 1/2 tsp black pepper (fresh ground if possible)
  • 5 tbsp coconut oil
  • 1 cup water
  1. Place everything in a pot and whisk until it is completely combined.  Heat over medium-low heat for about 10 minutes until you have a thick paste.  Make sure you keep stirring and don’t let it scald.
  2. Pour your paste into a glass jar or container and let it cool completely.  You can keep it in the fridge for up to two weeks.DIY Wednesday: Turmeric Paste and Golden Milk | Life Healthfully Lived

Golden Milk

  • 1 cup coconut milk (or any other non-dairy milk you like)
  • 1/2 tsp turmeric paste
  • 1 tsp cinnamon
  • honey or maple syrup, optionalDIY Wednesday: Turmeric Paste and Golden Milk | Life Healthfully Lived
  1. Place the coconut milk and turmeric paste into a saucepan and heat over low heat, whisking to combine.
  2. Heat until it is just warm and then remove from oven.  Add the cinnamon and honey or maple syrup if you would like it a little sweeter and whisk to combine.
  3. Pour into a mug and let it cool a little before drinking.

You can also use the turmeric paste in other things like soup or curries.  It adds a nice shot of turmeric along with the fat and pepper it needs so you can get the most out of it.  Along with my jar of roasted garlic, I’ve started keeping this paste on hand for whenever I need it!DIY Wednesday: Turmeric Paste and Golden Milk | Life Healthfully Lived