DIY Wednesday: Parsley Cream Zoodles

This is quite possibly the simplest dinner I have ever made.  On Memorial Day, I spent the day with my parents and got back home right around dinner time.  I didn’t have much in the house and really didn’t feel like cooking.  Many people might eat peanut butter straight from the jar and call that a meal full of “good fats” (totally not talking about me…) but I wanted to be somewhat of an adult.  I had a few zucchini’s in my fridge and I had made this sauce earlier when I noticed my parsley was going a little limp.  So I quickly spiralized my zucchini, tossed it with this sauce, and called it dinner. DIY Wednesday: Parsley Cream Zoodles | Life Healthfully Lived

Level: Adulting like a boss.

This is a great dinner for those nights when you don’t feel like cooking, it’s too hot to turn on the oven/stove, or you somehow forgot you need to eat dinner and want food fast.  You don’t even have to use zucchini.  You could use regular noodles, other vegetable noodles, even quinoa or brown rice.  You could get fancy and add some cooked chicken, shrimp, or beef or you could add extra vegetables like cherry tomatoes, carrots, or summer squash.DIY Wednesday: Parsley Cream Zoodles | Life Healthfully Lived

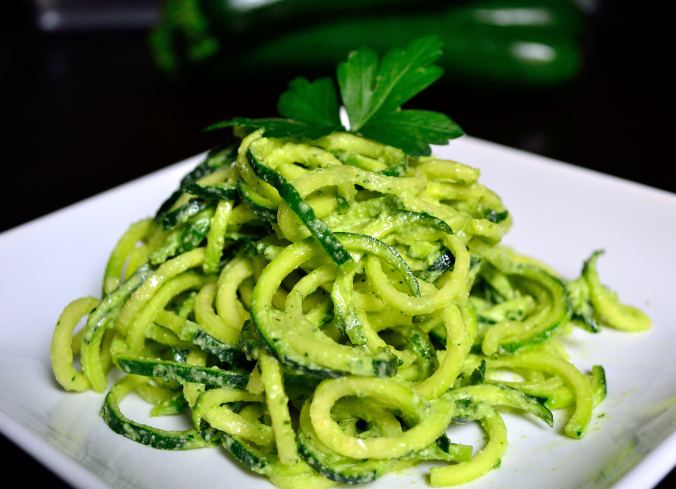
The point is when you need food in your food hole NOW this is the meal you can turn to.  Maybe that will be my new blog motto.  Food for your food hole NOW…. Has a nice ring to it.

Parsley Cream Zoodles

  • 1 cup parsley leaves, stems removed
  • 1/2 cup cashews, soaked overnight or in boiling water for 15 minutes
  • 2 cloves garlic
  • 2 tbsp nutritional yeast
  • 1 tsp dried minced onion
  • 1/2 tsp salt
  • 1/4 tsp pepper
  • juice of one lemon
  • 1/2 cup full-fat coconut milk or 1/3 cup water (coconut milk will make it creamier)
  • 1-2 zucchini, spiralized or cut into thin strips (could also use regular noodles or some other vegetable like cucumber)
  1. Put all the ingredients except the zucchini into a blender and blend until smooth and creamy.  You don’t want any large chunks of cashew.  You can also make this sauce ahead of time and keep it in an airtight container until you’re ready to use it.
  2. Spiralize or cut your zucchini and put it into a large bowl.  Pour in about half the sauce and stir to coat all the zoodles.  Add more sauce if necessary or if you just want to be a rebel and eat all the sauce.  You do you.DIY Wednesday: Parsley Cream Zoodles | Life Healthfully Lived

That’s it.  You could be eating in about 10 minutes, less if you already made the sauce ahead of time.  Don’t ever think you don’t have time for a healthy meal.  That’s just a lie the pizza delivery guy wants you to believe 🙂


BBQ Pulled Carrot Sandwiches

Stick with me on this one even though it sounds weird.  I have a weird affinity for turning vegetables into something other than vegetables.  Like cauliflower.  That vegetable is magic because it can become anything.  I’ve turned it into pizza crust, taquitos, bites, rice…. It’s a very versatile vegetable.  But other vegetables can be just as magical.

I know vegetarians and vegans get a bad rap for trying to turn things that aren’t meat into meat saying, “It tastes just like the real thing!”  Meat eaters, of course,scoff at this, the vegetarians/vegans get mad and no one wins.  Maybe to them the meat alternatives taste just like the real thing or maybe they just want to get more people to try their food.  I think it shouldn’t be important if meat alternatives taste like the real thing they should just taste good.

Like these BBQ pulled carrot sandwiches.BBQ Pulled Carrot Sandwiches | Life Healthfully Lived

I’m not going to tell you they taste like BBQ pulled pork sandwiches, because they don’t.  They do taste delicious and it’s a pretty neat way to make a BBQ pulled sandwich even if it does use only vegetables.  I think the key here is really good BBQ sauce and for me that means homemade.  I did a little variation on my Even Better BBQ Sauce, but you can use the original, or this one, or your own homemade sauce, or store-bought if that floats your boat.  I ain’t gonna judge.BBQ Pulled Carrot Sandwiches | Life Healthfully Lived

I thought this would be the perfect recipe for Memorial Day weekend especially if you’re having a party.  It’s easy to make a whole bunch of these pulled carrots and now you have something that is vegetarian/vegan-friendly, doesn’t have gluten, and you can dazzle your guests by telling them that it’s carrots.

Ok, maybe they won’t be dazzled.  But I’ll bet they’ll find it tasty!  You can make these ahead of time and keep them in a slow cooker on low so you don’t have to heat up your oven and therefore your house.  See?  I think of everything.

BBQ Pulled Carrot Sandwiches BBQ Pulled Carrot Sandwiches | Life Healthfully Lived

BBQ Sauce-

  • 1 can tomato sauce (check the ingredients to make sure it’s just tomatoes)
  • 1 tsp olive or coconut oil
  • juice from one lime
  • 1/3 cup apple cider vinegar
  • 1 tbsp molasses (could also use honey or maple syrup)
  • 2-3 cloves of garlic
  • 1 tsp salt
  • 1/2 tsp pepper
  • 1/1 tsp cumin
  • 1 tsp smoked paprika
  • 1 tsp dried minced onions
  • 2 tbsp fresh chopped cilantro

Pulled Carrots- 

  • 1 large red onion, sliced into strips
  • 1 lb bag of large carrots, shredded
  • salt and pepper
  • olive oil
  1. Make the BBQ sauce:  Place all of the ingredients into a blender and blend until they are well combined.  Pour into a bowl and let the sauce sit in the fridge while you make the carrots.
  2. Slice the onions and shred the carrots.  If you have a food processor, you can use the shredding blade and this goes super quick.
  3. Preheat oven to 375 and line a large rimmed baking sheet with parchment paper or a Silpat.  Place the onions and carrots into a large bowl and toss with olive oil, salt, and pepper.
  4. Lay the carrots and onions out on the baking sheet in an even layer, you might need to use two sheets depending on how big your baking sheet is.  Cover the baking sheet with aluminum foil and put it in the oven for about 20 minutes.
  5. Remove from oven, toss a little, and then put back into the oven without the foil for another 10 minutes.
  6. While the carrots are cooking, pull out a dutch oven or large pot and cook the sauce on medium high heat for about 10 minutes.  When the carrots are done had them to the hot BBQ sauce and stir to combine.  Lower the heat to low, cover, and cook for another 10 to 15 minutes.  Alternatively, you can use your slow cooker at this point and keep it on low until you’re ready to serve.BBQ Pulled Carrot Sandwiches | Life Healthfully Lived

You can serve these on hamburger buns, tortillas, lettuce leaves, or even on arepas like I did here.  It also tastes pretty awesome with a smear of guacamole, but then again, what doesn’t?

I hope you have a great weekend and a Happy Memorial Day!

DIY Wednesday: Dinner Rolls

Follow my blog with Bloglovin

DIY Wednesday: Dinner Rolls | Life Healthfully Lived
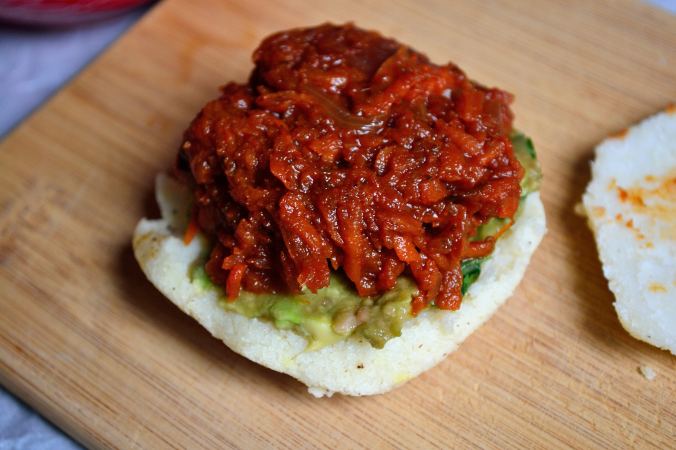
My husband is a bread fiend.  You know the saying “Man cannot live on bread alone”?  Yeah, it doesn’t apply to him.  I could put a hunk of bread down in front of him for every meal and he would be happy.  I wouldn’t even have to change the kind of bread just get the carb-y goodness into his mouth as fast as possible.

He married a woman who doesn’t really eat bread.

Not that I don’t like bread, it just doesn’t like me back very much.  Plus, if I ate as much bread as the man I married does I would probably be 600 pounds.  600 pounds of bread.  DIY Wednesday: Dinner Rolls | Life Healthfully Lived

Over the years, I’ve made various kinds of gluten-free, dairy-free, egg-free bread and while they were good enough for me as a stand in for traditional bread, Adam never really took to them.  Which is fine because while he also likes eating bread he really likes the process of making it too.  But I wanted to make bread that both of us could enjoy and could get as close to real bread as possible.

I think I might have gotten it.  Are these exactly like traditional dinner rolls?  No.  But Adam did eat 5 (or 6) of the 9 rolls I made and I think that’s good enough for me!  You can make these rolls ahead of time and keep them in the fridge until you’re ready to bake them.  You could even freeze a bunch and then just pull them out when you’re ready to use them!

Dinner Rolls- Makes 9-10 rolls depending on how big you make them.  Based off these Honey Biscuits from Against All Grain. DIY Wednesday: Dinner Rolls | Life Healthfully Lived

  • 1 3/4 cups almond flour
  • 2 tbsp coconut flour
  • 2 tsp baking powder
  • 1/2 tsp salt
  • 3 tbsp ground flax seed
  • 6 tbsp water
  • 1/4 cup coconut oil, semi-soft (if your oil is liquid like mine always is, measure it out and then stick it in the fridge for a few minutes).
  • 2 tbsp coconut milk or water
  1. Preheat oven to 350 and line a baking sheet with parchment paper or a Silpat.  Mix the 3 tbsp ground flax seed and 6 tbsp water and set aside to gel.
  2. Combine all of the dry ingredients, and seasonings if you’re using them, and whisk together.
  3. In a separate bowl, combine the gelled flax seed, semi-soft coconut oil, and 2 tbsp coconut milk together.  Mix it really well so that everything is combined.
  4. Make a well in the dry ingredients and pour in the wet.  Use a rubber spatula and mix everything together.  You should get a very stiff dough and be able to form a ball.  If not, add a little more coconut flour one tablespoon at a time.
  5. Take out a little of the dough from the dough ball and roll into a ball.  Place it on the sheet and slightly flatten it with the palm of your hand.  Continue until all the dough is gone.
  6. Bake for 10 to 15 minutes.  Check at 10 minutes and if it’s golden on the edges take it out and let it cool for a few minutes before serving.   DIY Wednesday: Dinner Rolls | Life Healthfully Lived

Sweet Potato Caprese Pizza

Sweet Potato Caprese Pizza | Life Healthfully Lived
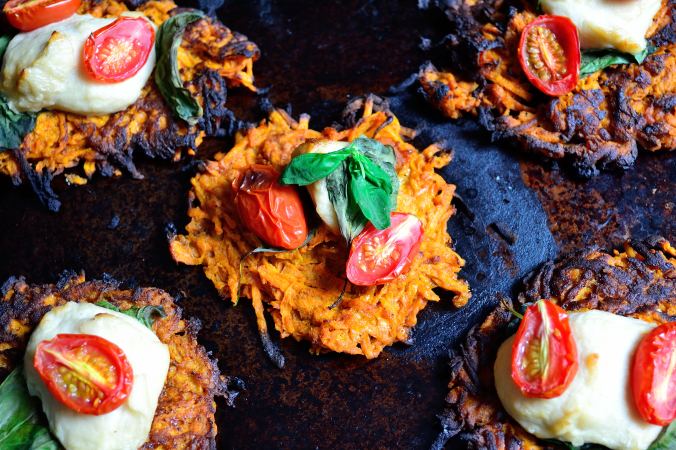
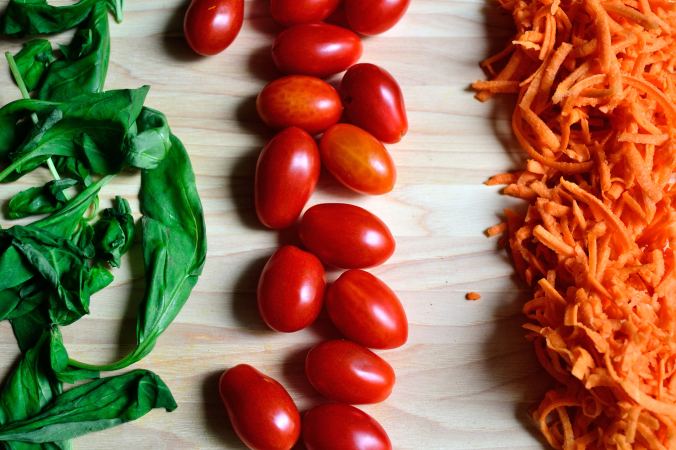
When I was coming up with the recipe for these tasty pizzas I had such a great idea/method.  I was going to make a hashbrown like crust and then broil some delicious melty cheese, tomatoes, and basil on top.  It was going to be awesome because I was going to use my waffle iron to make this wonderfully crispy crust and then pop everything under the broiler for the final touch.

My waffle iron is now in a garbage dump somewhere in Illinois. Sweet Potato Caprese Pizza | Life Healthfully Lived

Long story short, if you have an awesome waffle iron that you love you can still make these the way that I intended.  If you have a waffle iron that is literally the spawn of Satan you can use my alternative method and still have pretty delicious results.

Also, just a quick reminder to myself and anyone around me:  Don’t decide to test a new recipe on a Saturday night when you’ve completely lost track of time, haven’t eaten in like 5 hours and it’s almost 9 p.m.

Yes, this really happened.

Yes, Adam had to deal with a hangry wife.

The things I do for you guys. 🙂

Sweet Potato Caprese PizzaSweet Potato Caprese Pizza | Life Healthfully Lived

  • 2 large sweet potatoes, shredded (I used my food processor and it was super easy but you can also use a box grater)
  • 1 batch of my No Mozzarella Mozzarella 
  • 8 oz cherry or grape tomatoes, sliced in half
  • small bunch of basil, stems removed
  • 2 large eggs, beaten (or 3 tbsp flax seed mixed with 6 tbsp water)
  • 1/2 tsp garlic powder
  • 1/2 tsp oregano
  • 1/2 tsp salt
  • 1/4 tsp pepper
  • olive oil or coconut oil for the pan/waffle ironSweet Potato Caprese Pizza | Life Healthfully Lived
  1. Line a large baking sheet with a Silpat or parchment paper and place the shredded sweet potatoes, eggs, and seasonings into a large bowl and mix together until everything is well combined.
  2. If you are using a waffle iron (lucky duck), grease the iron with a little oil and scoop about 1/4 to 1/2 cup (depending on the size of your iron) of the sweet potato batter into the iron and cook until the edges are crispy.  Or your waffle iron goes ding.  Move the finished crust to the baking sheet and continue until you have used all the batter.
  3. If you don’t have a waffle iron, you can cook this in a skillet (I used this one) or on a stovetop griddle.  Use a little oil, scoop about 1/4 cup batter onto the skillet and let if cook for about 5 minutes on each side or until the edges are crispy and brown. Move to the baking sheet and repeat until you’re out of batter.
  4. Once your crusts are complete, top each pizza with a dollop of mozzarella, a few tomato slices, and basil leaves.  Sprinkle a little salt and pepper on top and then move the pizzas to the broiler for about 5 minutes or until the cheese starts to get a little brown and the tomatoes have crisped.

The fun part about this recipe is it can be dinner or it can be breakfast!  Or lunch.  Or a snack.  Or if you’re a bit odd, dessert!  I guess what I’m saying is eat this whenever the heck you want and don’t let anyone tell you that you can’t.  You don’t need that negativity in your life. Sweet Potato Caprese Pizza | Life Healthfully Lived

Happy Friday friends and enjoy your weekend!

*There are affiliate links in this post.  If you click on them and buy the product through that link, I get a percent of the sale.  Any money I get from affiliate links goes back into the blog to make it better for you, so thanks! 

DIY Wednesday: Homemade Gluten-Free Flours

For those of you that bake and cook with gluten-free flours often, you know that it can be a pricey endeavor.  You can get five pounds of all-purpose flour for like a nickel but 2 ounces of any type of gluten-free flour costs all the gold in China as well as your firstborn child.

Ok, maybe it’s not that dramatic, but you get the idea.

For awhile, I had relegated myself to shelling out the extra dough when it came to gluten-free flour but then I started to think about it.  Most of the flours I bought weren’t blends, they were just straight up one-ingredient flours.  Almond, brown rice, quinoa, oat, buckwheat, corn, coconut… all flours made with just one thing.

I can make things with just one ingredient in my own kitchen.

I have a blender/food processor.

Why am I paying an arm and a leg for these things again?

So I started saving money and making my own flour at home.  If you have a decent blender or food processor you can do the same thing.  Heck, if you have a pretty crappy blender or food processor you can get by making a few of these on your own.  I did until I got a new food processor.

Here are four of my favorite flours to make at home and a few ideas on how to use them!

Oat FlourDIY Wednesday: Gluten-Free Flours | Life Healthfully Lived

This is probably the easiest and cheapest flour to make.  All you need are regular rolled oats and you can make your own oat flour.

  • 1 cup regular rolled oats = a little less than one cup of flour.
  1. Pulse oats in a food processor or blender until you have a fine flour like texture.

Uses: Great for cookies and quick breads. I like to use it as a binder in lentil meatloaf or meatballs too.

Buckwheat FlourDIY Wednesday: Gluten-Free Flours | Life Healthfully Lived

Even though it has the word heat in the name it’s still gluten-free.  You will want to find plain buckwheat groats, not roasted.

  • 1 cup buckwheat groats = about 1 cup of flour
  1. Toast the plain groats in a dry pan over medium-high heat until nutty and fragrant, about 5 minutes.
  2. Pulse the groats and then blend into a fine powder.

Uses:  I like using it to make pancakes, bread, and crackers.  It also makes a nice crispy crust for pork or chicken if you mix it with a few spices, salt, and pepper.

Quinoa FlourDIY Wednesday: Gluten-Free Flours | Life Healthfully Lived

You might need a little bit more powerful blender or food processor to grind up the tiny quinoa seeds.  A smaller bowl or pitcher work better if you have one of those.  You can use any color quinoa you like but I like to use white quinoa because it has a more neutral flavor.

  • 1 cup quinoa = less than 1 cup of flour
  1. Toast the quinoa in a dry pan over medium-high heat until fragrant and golden, about 2 to 3 minutes
  2. Blend in a food processor or blender until you have a flour consistency.  This might take a bit longer than other DIY flours.

Uses:  I have been using this a lot in rolls and breads because it gives a nice nutty flavor, you can also use it for my cauliflower pizza crust!

Coconut FlourDIY Wednesday: Gluten-Free Flours | Life Healthfully Lived

Perhaps the best smelling flour in the bunch, I like this because it lets me use up the leftover coconut from my coconut milk!

  • 1 cup coconut shreds = less than 1 cup of flour
  • If you are using leftover shreds from making milk let them dry out on a pan completely before continuing.
  1. Preheat your oven to the lowest setting (mine is 200 and it worked just fine) and toast the dried coconut shreds until golden.  About 20 to 30 minutes
  2. Let the shreds cool then pulse them in the blender or food processor until you have a flour-like texture.

Uses:  I use coconut flour a lot around here for things like pancakes, avocado fries, and desserts like these chocolate PB bars.


So there you go!  You can make your own gluten-free flour for a fraction of the cost at the store.  Just make sure to store all these flours in an airtight container to maintain freshness.