DIY Wednesday: Turmeric Paste and Golden Milk

If you have been following my blog for any length of time you know two things.  I like spices and I’m usually talking about the benefits of turmeric.

Any chance that I can slip turmeric into the conversation, I will.  If you’re sore from a really tough lifting session, I’ll probably tell you to use some turmeric in your next meal because it has anti-inflammatory properties.  If you’re at a high risk for heart disease, I might mention that turmeric can help lower your risk.  If you’re feeling depressed, worried about Alzheimers or cancer, I’m going to tell you that turmeric can help with all of those things.

I’m like the annoying friend who goes on a juice cleanse and it fixes everything from her weight to her crippling debt and she just won’t shut up about it.  You’re welcome.

But seriously, turmeric is SO good for you and you should really start including it in your diet.  It isn’t that expensive and you can find it in most grocery stores (if you shop at Whole Foods you can get it in their bulk spice section).  It’s also really easy to use and slip into a bunch of different meals.  But there are a few things you should know to get the most out of your turmeric:

  • Take it with black pepper
  • Take it with a fat

Why do you need to add these two things to your turmeric?  Turmeric’s main component is curcumin (this is what makes it so potent and beneficial) and curcumin is fat soluble.  In simple terms, in order for your body to absorb and use any turmeric you ingest it needs fat to break it down.

Black pepper enhances turmeric’s bioavailability which means it makes it easier for your body to use and distribute.  This is a good thing and what you want your body to do with anything that enters your digestive system.

You can use turmeric in so many different things like soups, curries, stir fry, smoothies, and sprinkled over vegetables or meat.  One of my favorite ways to use it is to toss some broccoli with a little coconut oil (fat), and then sprinkle garlic powder, turmeric, pepper, and a little sea salt over the broccoli and roast at 400 for 20 minutes.

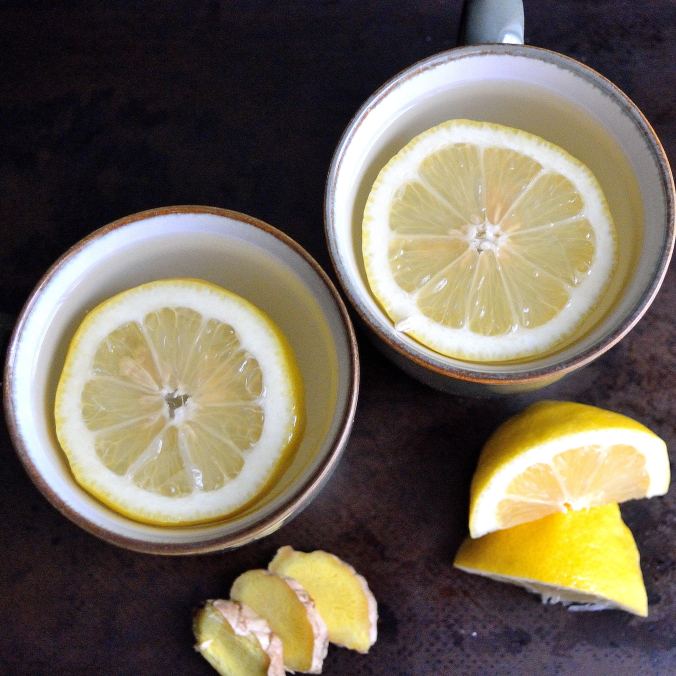
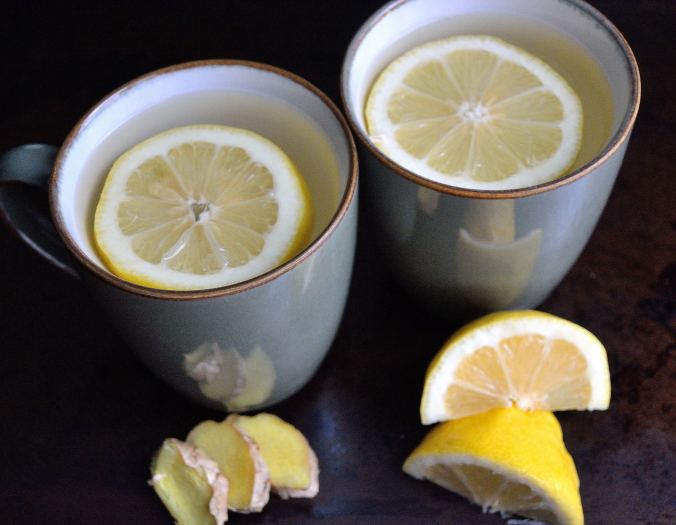
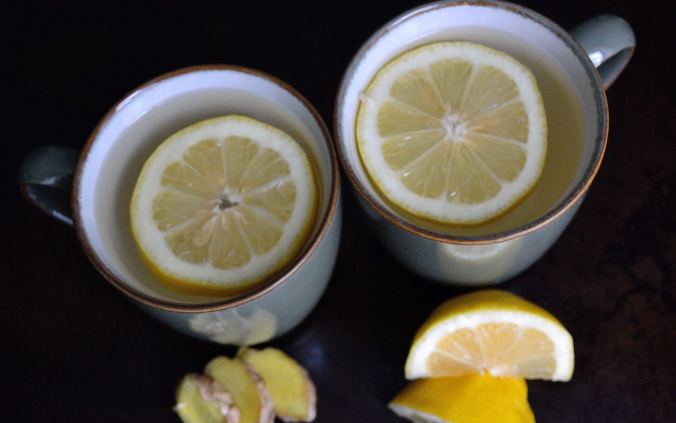
Another great way to enjoy turmeric is to make Golden Milk which sounds expensive and fancy, but it’s really simple and easy to make yourself.  I like to make a turmeric paste and keep it in a jar in my fridge and then scoop out what I need to make the milk.

A few pointers when you’re making your turmeric paste:  Don’t use any utensils, pots, or jars that stain easily.  Turmeric is amazing for your health but can stain plastic bowls, containers, or utensils.  Glass and stainless steel work best and keep your kitchen tools looking nice.  Also, turmeric does have a very earthy smell and taste so it might be off-putting at first.  Use it in ways that you can sort of mask the taste at first and then start to slowly use it more prominently.

Ok, enough talking about turmeric and how good it is for you, time to actually use it!

Turmeric PasteDIY Wednesday: Turmeric Paste and Golden Milk | Life Healthfully Lived

  • 1/2 cup turmeric powder
  • 1 1/2 tsp black pepper (fresh ground if possible)
  • 5 tbsp coconut oil
  • 1 cup water
  1. Place everything in a pot and whisk until it is completely combined.  Heat over medium-low heat for about 10 minutes until you have a thick paste.  Make sure you keep stirring and don’t let it scald.
  2. Pour your paste into a glass jar or container and let it cool completely.  You can keep it in the fridge for up to two weeks.DIY Wednesday: Turmeric Paste and Golden Milk | Life Healthfully Lived

Golden Milk

  • 1 cup coconut milk (or any other non-dairy milk you like)
  • 1/2 tsp turmeric paste
  • 1 tsp cinnamon
  • honey or maple syrup, optionalDIY Wednesday: Turmeric Paste and Golden Milk | Life Healthfully Lived
  1. Place the coconut milk and turmeric paste into a saucepan and heat over low heat, whisking to combine.
  2. Heat until it is just warm and then remove from oven.  Add the cinnamon and honey or maple syrup if you would like it a little sweeter and whisk to combine.
  3. Pour into a mug and let it cool a little before drinking.

You can also use the turmeric paste in other things like soup or curries.  It adds a nice shot of turmeric along with the fat and pepper it needs so you can get the most out of it.  Along with my jar of roasted garlic, I’ve started keeping this paste on hand for whenever I need it!DIY Wednesday: Turmeric Paste and Golden Milk | Life Healthfully Lived


Chocolate PB Bars and Superbowl Snacks

Chocolate PB Bars and Superbowl Snacks | Life Healthfully LivedWhile I don’t take a HUGE interest in football, kind of hard when your team is the Bears…. but I do enjoy watching games and I really like watching the big game.  Ok, ok, I’m mostly watching for the commercials and the halftime performance, BUT I still like to watch.

I’m also in it for the food.  Come on, does that one shock you?  Chips and dip, pizza, wings, snacks of all shapes and size, the Superbowl isn’t just super because of the football players.  The Superbowl comes right at a time when you have been working hard to make eating healthy a habit.  It feels like it’s there to test your willpower and you’re a horrible human being if you slip up and eat a chicken wing…. or fifty.Chocolate PB Bars and Superbowl Snacks | Life Healthfully Lived

You should never feel guilty for eating food, even if it isn’t the healthiest.  You made a choice and that’s fine.  Eat the food and move on.  To help yourself feel a little better of eating a super bowl during the Superbowl (see what I did there?), try making real food snacks and appetizers for your party.  Instead of buying your chips and dip, make your own.  Create a build your own pizza bar and provide plenty of fresh vegetables for toppings.  Or do a taco bar!  Mmmmmm tacos….. There are plenty of ways that you can make your party food taste indulgent and healthy.

Which is why I made this treat for you guys!  I love my salted caramel chocolate swirl bars from Christmas and I wanted to see if I could make something with my favorite combo: chocolate and peanut butter.  I mean really, is there anything better than chocolate and peanut butter?  No.  The answer is no.  Chocolate PB Bars and Superbowl Snacks | Life Healthfully Lived

These are gluten, dairy, and egg free so they can cover a variety of diets, allergies, and intolerances.  If you can’t or don’t do peanut butter just sub in your favorite nut or seed butter, crunchy almond butter works really well!  You can also make these a few days in advance and that is one less thing you have to prepare.

So make these and be the hit of the party and enjoy the comm… I mean the game!

Chocolate PB BarsChocolate PB Bars and Superbowl Snacks | Life Healthfully Lived

Chocolate Cookie Crust

  • 1/2 cup coconut flour
  • 1/4 cup almond flour
  • 1/4 cup cocoa powder
  • 1/4 tsp sea salt
  • 2 1/2 tbsp coconut sugar
  • 6 tbsp solid coconut oil
  1. Preheat oven to 350.  If your coconut oil isn’t solid, measure it out and then stick it in the freezer for a few minutes.  Meanwhile, combine the rest of the ingredients in a blender and pulse until fully combined.
  2. Add in the coconut oil and pulse until the mixture is all crumbly.  Lightly oil an 8 x 8 pan with some coconut oil and line with parchment paper with a little hanging over the sides.  Press the cookie crust into the bottom of the pan and bake for 10 minutes.  It will look like it isn’t set, but don’t freak out. It will all be ok!
  3. Once it’s done let it cool for a few minutes and then place it in the freezer to harden while you get the filling together.

Peanut Butter Filling

  • 1 flax egg (1 tbsp ground flax seed and 3 tbsp water mixed together)
  • 1 tsp baking soda combined with 1 tbsp white vinegar
  • 2 tbsp chunky peanut butter or almond butter
  • 1 tsp vanilla extract
  • 3 tbsp coconut sugar
  • 1/4 cup unsweetened coconut shreds
  • 1/4 cup dark chocolate chips/chunks
  1. In a medium bowl, mix flax egg, baking soda mixture, peanut butter, vanilla, and coconut sugar together.  Make sure it is really well combined.
  2. Stir in the coconut shreds and spread the filling on the cookie crust.  Bake for about 8 minutes.
  3. Pull it out and sprinkle the chocolate chips on top and then bake for another 2 to 3 minutes.
  4. Remove from oven and let it cool completely before you cut them into bars.  The bars may seem a little gooey, but they will firm up as they cool.  Keep them stored in the fridge or the freezer until you’re ready to eat them.  Chocolate PB Bars and Superbowl Snacks | Life Healthfully Lived

DIY: Lemon-Ginger Tea

We almost escaped the holidays without getting sick.  Almost.  It’s tough because during the holidays you’re around so many people and eating foods that might not be the healthiest and not sticking to your normal exercise routine.  It’s almost like inviting germs to take up residence in your body.DIY: Lemon-Ginger Tea | Life Healthfully Lived

The Monday after Christmas, Adam started feeling a little funny and by Tuesday was knocked out with a cough and cold.  He had the works, stuffed nose, sore throat, nasty cough, and achy all over.  The doctor said it was a virus, but not the flu, and only gave him a nose spray to relieve congestion.  So he pretty much had to ride it out on the couch for a week.

While taking care of him and seeing his misery, I knew that I had to take action to make sure I wasn’t the next visitor to the sick couch.  I upped my intake of vitamin C with oranges and lemons, made sure I got turmeric in as many dishes as possible, and tried my best to exercise and eat well to make sure that I stayed healthy.DIY: Lemon-Ginger Tea | Life Healthfully Lived

I have a little congestion, but I think I missed the worst of the virus and I’m going to chalk that up to the steps I took to ward it off.  One of the things that I did was down this tea every morning first thing.  You can buy lemon-ginger tea at the store, but it is so easy to make and I think that fresher ingredients make a bigger impact on your immune system.

So if you’re looking to make sure you don’t get sick this winter, try this tea in the morning and if you do feel something coming on, up your self-care routine.  Take extra rest, don’t go run a marathon, but do move a little, and try to eat as much real food as possible.  Your body will thank you!

Lemon-Ginger Tea- if it’s available and you can afford it, try to get organic ingredients.  If not, don’t stress too much over it, this tea is still better than no tea. DIY: Lemon-Ginger Tea | Life Healthfully Lived

  • One-quarter of a lemon (half of a half)
  • 3 thick slices of ginger
  • 8 oz hot water
  • Optional add-ins- honey, sprinkle of cayenne, fresh or powdered turmeric (fresh tastes a little better if you can find it because powdered might not dissolve as much and leave a gritty feeling)
  1. Boil the water.  While the water is heating up, slice and peel the ginger and put into the bottom of your mug.  Slice the lemon and get any add-ins that you want.
  2. Once the water has boiled, let it sit for a few minutes.  Then, pour it over the ginger slice and squeeze in the lemon juice.  I like to put the whole lemon wedge in the water after I’ve squeezed it.  Add in the honey, cayenne, or turmeric if you want and stir everything together.
  3. Let it steep for a few minutes and cool down before you drink it/

Last Minute Christmas

Two more sleeps!  Two more sleeps!  We are almost to the big day and I hope you are as excited as I am!

I do have to admit, though, I was a little grinchy earlier.  I know, I know but I was getting bogged down under my Christmas to-do list on top of my regular to-do list and it felt like they were both growing no matter how hard I was working.  Everything was starting to make me grouchy and less than Christmas-y. Last Minute Christmas | Life Healthfully Lived

Then I took these pictures for last minute Christmas recipes, and I started to feel that Christmas spirit again.  I may have also been watching Elf and other Christmas movies to help put me in the mood.  Either way, I’m glad I snapped myself out of it.  I know this time of year can be stressful, especially if you’re the one planning everything.  You want everyone else to feel the cheer of the season while you’re slowly going crazy with baking cookies, planning feasts, wrapping presents, and making hot chocolate.

While I can’t do everything on your list, I can help out with a few last minute recipes.  Both these recipes take minimal effort and can be made beforehand and then brought out when your guests arrive.  One is sweet and one is savory and both are delicious.  So if you need a quick dessert or appetizer, try one of these out.

And remember, Christmas comes without ribbons, it comes without tags.  It comes without packages, boxes or bags.  Christmas doesn’t come from a store.  Christmas means just a little bit more….

Creamy Cranberry DipLast Minute Christmas | Life Healthfully Lived

  1. Make both the cranberry sauce and no mozzarella, mozzarella.  You can do this a few days before you plan on serving the dip.  Just store them in the fridge.
  2. Preheat the oven to 375.  Oil a small glass casserole dish or another oven safe dish with a little olive oil.  Pour in the mozzarella and bake for 10 minutes.
  3. Pull out the mozzarella and pour the cranberry sauce on top.  Place the dish back in the oven and bake for another 5 minutes.
  4. Remove from oven and serve warm with whatever dipping device you have.

Christmas BlondiesLast Minute Christmas | Life Healthfully Lived

  • 1 can chickpeas, drained, rinsed, and skins removed (don’t skip this last step!)
  • 1/4 cup oat bran
  • 2/3 cup date sugar
  • 2 tbsp cinnamon
  • 1/2 tsp baking powder
  • 1/4 tsp baking soda
  • 1/4 tsp sea salt
  • 1/2 cup tahini
  • 1/2 cup molasses
  • 1 tsp vanilla extract Last Minute Christmas | Life Healthfully Lived
  1. Preheat oven to 350 and oil a brownie pan with a little coconut oil.
  2. Place all of the ingredients into a food processor or blender and blend until smooth.
  3. Pour the batter into the dish, scooping out the last bits with a spatula.  Bake in the oven for 20 minutes.  Pull out the pan and check the middle.  If it is still gooey, bake for another 10 minutes.
  4. Let the blondies cool on a rack completely before cutting and serving.  You can also sprinkle a little powdered sugar on top.  It is Christmas after all!

Last Minute Christmas | Life Healthfully Lived

Italian Pasta Bake

MozzarellaItalian Pasta Bake | Life Healthfully Lived 
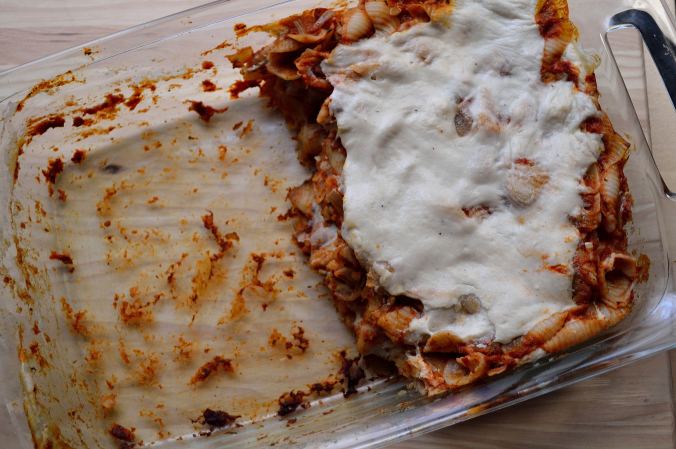
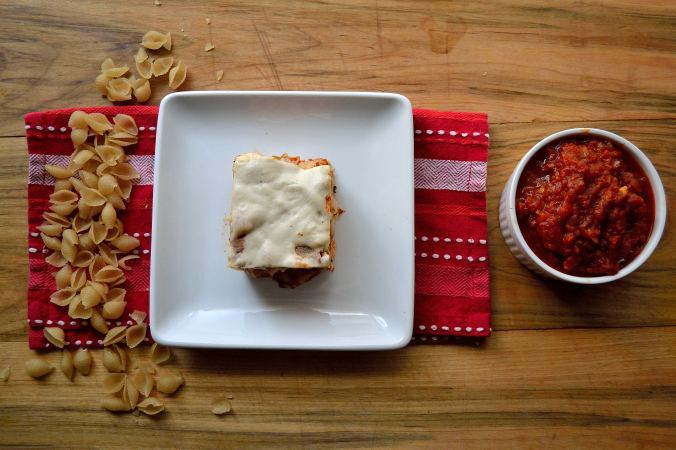
that isn’t really mozzarella.  Confusing I know, but totally awesome.  There are tons of recipes out there for fake cheese as well as plenty of products that you can buy.  My issue with store bought “cheese” is that it’s usually full of ingredients that I would rather not ingest.

I’ve made cheese sauce before for my Fusilli N’ Cheeze, but I wanted to make a cheese that was a little thicker.  My goal?  To try and recreate the mostaccioli that Adam made for me when we first started dating.Italian Pasta Bake | Life Healthfully Lived

About a month or so into our relationship, Adam decided he was going to cook for me.  He made me his mom’s mostaccioli and it was delicious.  It was super simple, but watching him make that meal for me was one of the first times that I started to fall in love with him.  When I stopped eating gluten and dairy, mostaccioli kind of went out the window. But not anymore!

Don’t be freaked out by making “cheese” that isn’t really cheese.  It isn’t difficult and there really aren’t any weird ingredients unless you think tapioca starch is weird. It isn’t.  It’s just a thickener and helps make this cheese stretchy.  You could also use potato starch, but I like tapioca better.  Once you make the cheese, this is a really fast meal and a great one to prep early and pull out for a quick weeknight meal.

Not-Mozzarella, Mozzarella Italian Pasta Bake | Life Healthfully Lived

  • 1/2 cup raw cashews, soaked in warm water overnight
  • 1 tsp apple cider vinegar
  • 1 tsp roasted garlic
  • 1/2 tsp salt
  • 1 tsp olive oil
  • 2 1/2 tbsp tapioca starch (or potato starch)
  • 1 cup hot water
  1. Add everything to a blender and blend for 2 to 3 minutes until it is completely smooth.
  2. Pour the mixture into a medium saucepan and heat over medium-high heat.  Cook while constantly stirring.  After a few minutes, the mixture will start to thicken.
  3. Turn the heat to low and keep stirring it until it is very thick and stretchy.  You can use it right away or keep it in an airtight container in the fridge for 2 to 3 days.

Italian Pasta BakeItalian Pasta Bake | Life Healthfully Lived

  • 1 batch of Not-Mozzarella, Mozzarella
  • 1 batch of my tomato sauce
  • 1 package of gluten-free pasta, I used brown rice shells
  1. Preheat oven to 350.  Cook your pasta according to the directions on the package.  Drain and set aside.
  2. Get a 9 x 13 casserole dish and spoon a thin layer of tomato sauce on the bottom.  Next, put a layer of pasta and then top with tomato sauce.  Spread some of the cheese on top of that.
  3. Keep layering the pasta, sauce, and cheese until it’s gone.  Cover the dish with aluminum foil and bake for 25 minutes.
  4. Remove from oven and take off the foil.  Cook for another 5 minutes until the cheese on top is starting to brown on the edges.
  5. Take out of the oven and let it cool for 10 minutes before you serve it.Italian Pasta Bake | Life Healthfully Lived