BBQ Pulled Carrot Sandwiches

Stick with me on this one even though it sounds weird.  I have a weird affinity for turning vegetables into something other than vegetables.  Like cauliflower.  That vegetable is magic because it can become anything.  I’ve turned it into pizza crust, taquitos, bites, rice…. It’s a very versatile vegetable.  But other vegetables can be just as magical.

I know vegetarians and vegans get a bad rap for trying to turn things that aren’t meat into meat saying, “It tastes just like the real thing!”  Meat eaters, of course,scoff at this, the vegetarians/vegans get mad and no one wins.  Maybe to them the meat alternatives taste just like the real thing or maybe they just want to get more people to try their food.  I think it shouldn’t be important if meat alternatives taste like the real thing they should just taste good.

Like these BBQ pulled carrot sandwiches.BBQ Pulled Carrot Sandwiches | Life Healthfully Lived

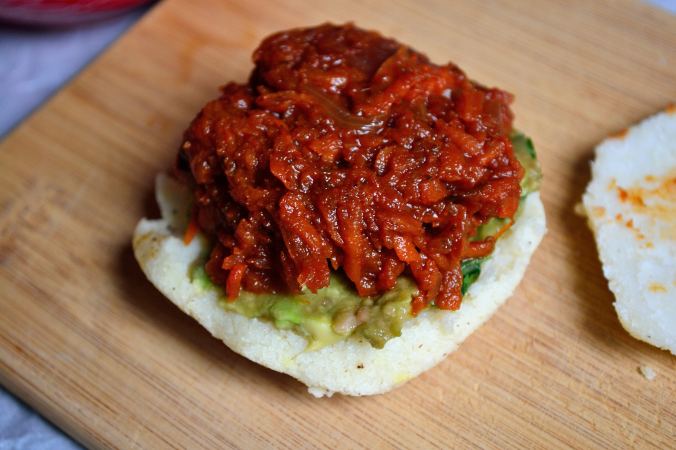
I’m not going to tell you they taste like BBQ pulled pork sandwiches, because they don’t.  They do taste delicious and it’s a pretty neat way to make a BBQ pulled sandwich even if it does use only vegetables.  I think the key here is really good BBQ sauce and for me that means homemade.  I did a little variation on my Even Better BBQ Sauce, but you can use the original, or this one, or your own homemade sauce, or store-bought if that floats your boat.  I ain’t gonna judge.BBQ Pulled Carrot Sandwiches | Life Healthfully Lived

I thought this would be the perfect recipe for Memorial Day weekend especially if you’re having a party.  It’s easy to make a whole bunch of these pulled carrots and now you have something that is vegetarian/vegan-friendly, doesn’t have gluten, and you can dazzle your guests by telling them that it’s carrots.

Ok, maybe they won’t be dazzled.  But I’ll bet they’ll find it tasty!  You can make these ahead of time and keep them in a slow cooker on low so you don’t have to heat up your oven and therefore your house.  See?  I think of everything.

BBQ Pulled Carrot Sandwiches BBQ Pulled Carrot Sandwiches | Life Healthfully Lived

BBQ Sauce-

  • 1 can tomato sauce (check the ingredients to make sure it’s just tomatoes)
  • 1 tsp olive or coconut oil
  • juice from one lime
  • 1/3 cup apple cider vinegar
  • 1 tbsp molasses (could also use honey or maple syrup)
  • 2-3 cloves of garlic
  • 1 tsp salt
  • 1/2 tsp pepper
  • 1/1 tsp cumin
  • 1 tsp smoked paprika
  • 1 tsp dried minced onions
  • 2 tbsp fresh chopped cilantro

Pulled Carrots- 

  • 1 large red onion, sliced into strips
  • 1 lb bag of large carrots, shredded
  • salt and pepper
  • olive oil
  1. Make the BBQ sauce:  Place all of the ingredients into a blender and blend until they are well combined.  Pour into a bowl and let the sauce sit in the fridge while you make the carrots.
  2. Slice the onions and shred the carrots.  If you have a food processor, you can use the shredding blade and this goes super quick.
  3. Preheat oven to 375 and line a large rimmed baking sheet with parchment paper or a Silpat.  Place the onions and carrots into a large bowl and toss with olive oil, salt, and pepper.
  4. Lay the carrots and onions out on the baking sheet in an even layer, you might need to use two sheets depending on how big your baking sheet is.  Cover the baking sheet with aluminum foil and put it in the oven for about 20 minutes.
  5. Remove from oven, toss a little, and then put back into the oven without the foil for another 10 minutes.
  6. While the carrots are cooking, pull out a dutch oven or large pot and cook the sauce on medium high heat for about 10 minutes.  When the carrots are done had them to the hot BBQ sauce and stir to combine.  Lower the heat to low, cover, and cook for another 10 to 15 minutes.  Alternatively, you can use your slow cooker at this point and keep it on low until you’re ready to serve.BBQ Pulled Carrot Sandwiches | Life Healthfully Lived

You can serve these on hamburger buns, tortillas, lettuce leaves, or even on arepas like I did here.  It also tastes pretty awesome with a smear of guacamole, but then again, what doesn’t?

I hope you have a great weekend and a Happy Memorial Day!

DIY Wednesday: Dinner Rolls

Follow my blog with Bloglovin

DIY Wednesday: Dinner Rolls | Life Healthfully LivedMy husband is a bread fiend.  You know the saying “Man cannot live on bread alone”?  Yeah, it doesn’t apply to him.  I could put a hunk of bread down in front of him for every meal and he would be happy.  I wouldn’t even have to change the kind of bread just get the carb-y goodness into his mouth as fast as possible.

He married a woman who doesn’t really eat bread.

Not that I don’t like bread, it just doesn’t like me back very much.  Plus, if I ate as much bread as the man I married does I would probably be 600 pounds.  600 pounds of bread.  DIY Wednesday: Dinner Rolls | Life Healthfully Lived

Over the years, I’ve made various kinds of gluten-free, dairy-free, egg-free bread and while they were good enough for me as a stand in for traditional bread, Adam never really took to them.  Which is fine because while he also likes eating bread he really likes the process of making it too.  But I wanted to make bread that both of us could enjoy and could get as close to real bread as possible.

I think I might have gotten it.  Are these exactly like traditional dinner rolls?  No.  But Adam did eat 5 (or 6) of the 9 rolls I made and I think that’s good enough for me!  You can make these rolls ahead of time and keep them in the fridge until you’re ready to bake them.  You could even freeze a bunch and then just pull them out when you’re ready to use them!

Dinner Rolls- Makes 9-10 rolls depending on how big you make them.  Based off these Honey Biscuits from Against All Grain. DIY Wednesday: Dinner Rolls | Life Healthfully Lived

  • 1 3/4 cups almond flour
  • 2 tbsp coconut flour
  • 2 tsp baking powder
  • 1/2 tsp salt
  • 3 tbsp ground flax seed
  • 6 tbsp water
  • 1/4 cup coconut oil, semi-soft (if your oil is liquid like mine always is, measure it out and then stick it in the fridge for a few minutes).
  • 2 tbsp coconut milk or water
  1. Preheat oven to 350 and line a baking sheet with parchment paper or a Silpat.  Mix the 3 tbsp ground flax seed and 6 tbsp water and set aside to gel.
  2. Combine all of the dry ingredients, and seasonings if you’re using them, and whisk together.
  3. In a separate bowl, combine the gelled flax seed, semi-soft coconut oil, and 2 tbsp coconut milk together.  Mix it really well so that everything is combined.
  4. Make a well in the dry ingredients and pour in the wet.  Use a rubber spatula and mix everything together.  You should get a very stiff dough and be able to form a ball.  If not, add a little more coconut flour one tablespoon at a time.
  5. Take out a little of the dough from the dough ball and roll into a ball.  Place it on the sheet and slightly flatten it with the palm of your hand.  Continue until all the dough is gone.
  6. Bake for 10 to 15 minutes.  Check at 10 minutes and if it’s golden on the edges take it out and let it cool for a few minutes before serving.   DIY Wednesday: Dinner Rolls | Life Healthfully Lived

Sweet Potato Caprese Pizza

Sweet Potato Caprese Pizza | Life Healthfully LivedWhen I was coming up with the recipe for these tasty pizzas I had such a great idea/method.  I was going to make a hashbrown like crust and then broil some delicious melty cheese, tomatoes, and basil on top.  It was going to be awesome because I was going to use my waffle iron to make this wonderfully crispy crust and then pop everything under the broiler for the final touch.

My waffle iron is now in a garbage dump somewhere in Illinois. Sweet Potato Caprese Pizza | Life Healthfully Lived

Long story short, if you have an awesome waffle iron that you love you can still make these the way that I intended.  If you have a waffle iron that is literally the spawn of Satan you can use my alternative method and still have pretty delicious results.

Also, just a quick reminder to myself and anyone around me:  Don’t decide to test a new recipe on a Saturday night when you’ve completely lost track of time, haven’t eaten in like 5 hours and it’s almost 9 p.m.

Yes, this really happened.

Yes, Adam had to deal with a hangry wife.

The things I do for you guys. 🙂

Sweet Potato Caprese PizzaSweet Potato Caprese Pizza | Life Healthfully Lived

  • 2 large sweet potatoes, shredded (I used my food processor and it was super easy but you can also use a box grater)
  • 1 batch of my No Mozzarella Mozzarella 
  • 8 oz cherry or grape tomatoes, sliced in half
  • small bunch of basil, stems removed
  • 2 large eggs, beaten (or 3 tbsp flax seed mixed with 6 tbsp water)
  • 1/2 tsp garlic powder
  • 1/2 tsp oregano
  • 1/2 tsp salt
  • 1/4 tsp pepper
  • olive oil or coconut oil for the pan/waffle ironSweet Potato Caprese Pizza | Life Healthfully Lived
  1. Line a large baking sheet with a Silpat or parchment paper and place the shredded sweet potatoes, eggs, and seasonings into a large bowl and mix together until everything is well combined.
  2. If you are using a waffle iron (lucky duck), grease the iron with a little oil and scoop about 1/4 to 1/2 cup (depending on the size of your iron) of the sweet potato batter into the iron and cook until the edges are crispy.  Or your waffle iron goes ding.  Move the finished crust to the baking sheet and continue until you have used all the batter.
  3. If you don’t have a waffle iron, you can cook this in a skillet (I used this one) or on a stovetop griddle.  Use a little oil, scoop about 1/4 cup batter onto the skillet and let if cook for about 5 minutes on each side or until the edges are crispy and brown. Move to the baking sheet and repeat until you’re out of batter.
  4. Once your crusts are complete, top each pizza with a dollop of mozzarella, a few tomato slices, and basil leaves.  Sprinkle a little salt and pepper on top and then move the pizzas to the broiler for about 5 minutes or until the cheese starts to get a little brown and the tomatoes have crisped.

The fun part about this recipe is it can be dinner or it can be breakfast!  Or lunch.  Or a snack.  Or if you’re a bit odd, dessert!  I guess what I’m saying is eat this whenever the heck you want and don’t let anyone tell you that you can’t.  You don’t need that negativity in your life. Sweet Potato Caprese Pizza | Life Healthfully Lived

Happy Friday friends and enjoy your weekend!

*There are affiliate links in this post.  If you click on them and buy the product through that link, I get a percent of the sale.  Any money I get from affiliate links goes back into the blog to make it better for you, so thanks! 

Homemade Banana Pudding

Homemade Banana Pudding | Life Healthfully LivedOk, so I learned some new things while making this recipe.  First, I have to tell you about my inspiration for this one because it’s weird and who doesn’t like weird stuff? No one.  That’s who.

I was making a loaf of my gluten-free banana bread (which you should make immediately because it’s the bomb.  Side note: I’m bringing back “the bomb”) and as I was blending the banana and avocado together I thought to myself, “Antoinette, (I call myself Antoinette NBD) that kind of looks like pudding.  I wonder if it would be any good as pudding?  I wonder if there is banana pudding?” So I set about to research banana pudding.

This is my life people.Homemade Banana Pudding | Life Healthfully Lived

I remember pudding snack packs used to have a banana flavor but I doubt that there was any actual banana in that pudding.  My google searches told me that banana pudding was indeed a thing.  A southern thing.  Which means it’s delicious because it has all the fat and sugar.  All delicious things have fat and sugar.  Most recipes called for making a vanilla custard type deal and adding sliced bananas, vanilla wafers, and in one case merengue.  While it wasn’t a difficult process, it was more steps than I wanted for my pudding. And by more, I mean this is pretty much just one step.

There are no eggs in this so you don’t have to cook anything but because of the addition of avocado, stick with me, it is creamy and delicious without the eggs.  And depending on how ripe your bananas are, it’s pretty sweet too.  You can add maple syrup if it isn’t sweet enough but mine was totally delicious without it.  See?  Fat and sugar.  Just a better version of fat and sugar.

I know you’re probably getting tired of me putting avocado in things but I’m not, so get over it 🙂  It’s delicious and I can’t stop, won’t stop.  You can get creative with toppings like coconut whip cream, pecans or walnuts, crumbled up graham crackers, or in my case cacao nibs because, chocolate.

Banana PuddingHomemade Banana Pudding | Life Healthfully Lived

As I was making this I started singing the part about figgy pudding from We Wish You A Merry Christmas.  Adam asked me if I was singing a Christmas song and I said no, I was singing a pudding song because how do you make pudding without singing about it?  So feel free to sing about pudding while making this because I think it enhances the flavor.  

  • 2 very ripe bananas, sliced (about 2 cups)
  • 1/2 avocado, diced (about 1/2 cup)
  • 1/2 cup coconut cream (you can buy coconut cream from Trader Joes or just put a can of full-fat coconut milk in the fridge overnight and scoop off the solid cream)
  • 1 tbsp maple syrup, optional if your bananas aren’t super ripe.  I didn’t need any extra sweetener for mine
  • 2 tsp cinnamon
  • pinch of salt
  • 1 1/2 tsp maca powder, optional but adds a nice caramel-y flavor

Toppings (optional)

  • chocolate chips or cacao nibs
  • pecans or walnuts or almonds
  • sliced banana
  • coconut whip cream
  • graham crackers
  • nilla wafers if you’re rebellious or Southern 😉
  1. Ready for this?  Put all the pudding ingredients into a blender and blend until super smooth.  Dish it out and put on all the toppings.

Told you it was one step 😀 Happy Friday friends! Have a great weekend!Homemade Banana Pudding | Life Healthfully Lived

Zucchini and Pea Cauliflower Risotto

Zucchini and Pea Cauliflower Risotto | Life Healthfully LivedYup. Cauliflower is back.  I know you’re probably getting a little tired of seeing it featured in my dishes but you know what?  You’re wrong.  Cauliflower is the magical unicorn of the vegetable world and I love turning it into all sorts of things from taquitos to sauce to sweet and sour bites to mac n’ cheese.  It’s awesome and you’re going to have to deal with it.

Which should be easy if you’re stuffing your face with this tasty meal.  Most people tend to shy away from risotto because it takes a really long time to cook and even if you follow all the steps it somehow still tastes like you didn’t do something right.  Or is it just me chomping away and still uncooked rice?  Just me? Ok.  Zucchini and Pea Cauliflower Risotto | Life Healthfully Lived

Moving on.  If you think risotto is too fussy or you’ve never made it before then you need to try this cauliflower risotto because it is the exact opposite of fussy.  It doesn’t take long to make and you don’t have to stand over the stove stirring until your arm falls off like with regular risotto.  Again, just me?  This risotto is still creamy and rich like regular risotto but it’s also nice and light with all the fresh spring-y vegetables.

One other note about this meal, I really think that what gave this dish the depth of flavor I was going for was the Sherry I used to deglaze the pan.  I know some people don’t like to use alcohol in their cooking (to each their own) and you can use water or broth instead but I don’t think it will have the same taste.  Other than that, this risotto is straight forward and will have you licking your plate clean.  Still just me?

Zucchini and Pea Cauliflower RisottoZucchini and Pea Cauliflower Risotto | Life Healthfully Lived

  • 1 large head of cauliflower, riced (you can grate it for bigger pieces which I did or run it through your food processor for smaller pieces)
  • 2 medium zucchini’s, sliced into half moons
  • 1 cup peas, if frozen make sure they’re thawed
  • 3 cloves garlic, minced
  • 3/4 cup onions, diced
  • 2-3 tbsp nutritional yeast or parmesan cheese
  • 1/4 cup sherry (I used this one) or other dry white wine or water/broth
  • 1/2 cup water/broth
  • 1/2-2/3 cup full-fat coconut milk
  • 1/2 cup toasted slivered almonds (or pine nuts if you can shell out the small fortune a 1 oz bag costs)
  • zest from one lemon
  • 1/4 cup fresh parsley, chopped
  • salt and pepper
  1. Heat a little olive oil in a large skillet or saucepan over medium-high heat.  Saute the onions until they’re soft then add in the garlic.  Season this with a little salt and pepper and cook for about 2 minutes.
  2. Add in the riced cauliflower, adding a little more oil if needed, and season again with salt and pepper.  Cook for another five minutes until cauliflower is soft and just starting to get a little brown. Sprinkle the nutritional yeast or parmesan cheese over top.
  3. Pour in the 1/4 cup sherry and deglaze the pan.  Cook and stir everything until most of the liquid as evaporated.  Add the zucchini and peas and pour in the water/broth and coconut milk.  Stir everything together and cook until the liquid has reduced by about half.
  4. Remove from the heat and stir in the lemon zest and parsley.  Top with the toasted almonds and taste to adjust the salt and pepper.  Zucchini and Pea Cauliflower Risotto | Life Healthfully Lived