The Last Summer Pasta Salad

SummerThe Last Summer Salad with Herb Sauce | Life Healthfully Lived is having its last hurrah.  Half of this week has been ridiculously hot and humid.  I’m talking two showers-a-day hot and humid.  But that humidity finally broke a few days ago and now you can feel a touch of fall in the air.

While I absolutely love fall, I’m not quite ready to give up my summer just yet.  My farmer’s market still has plenty of end of the summer vegetables like corn and tomatoes and there are still a few 80 degree days in the forecast.  Warm days like that beg for a meal that doesn’t require you to turn on the oven. The Last Summer Salad with Herb Sauce | Life Healthfully Lived

I came up with this pasta salad last Sunday when even thinking about turning on the oven made me sweat, and I was already sweating buckets.  This meal comes together fast and tastes amazing served up cold.  It also packs in a lot of vegetables and herbs and can be customized to whatever produce you have lying around.

So if you’re like me and aren’t ready to say goodbye to summer, whip up this salad and enjoy these last few days.

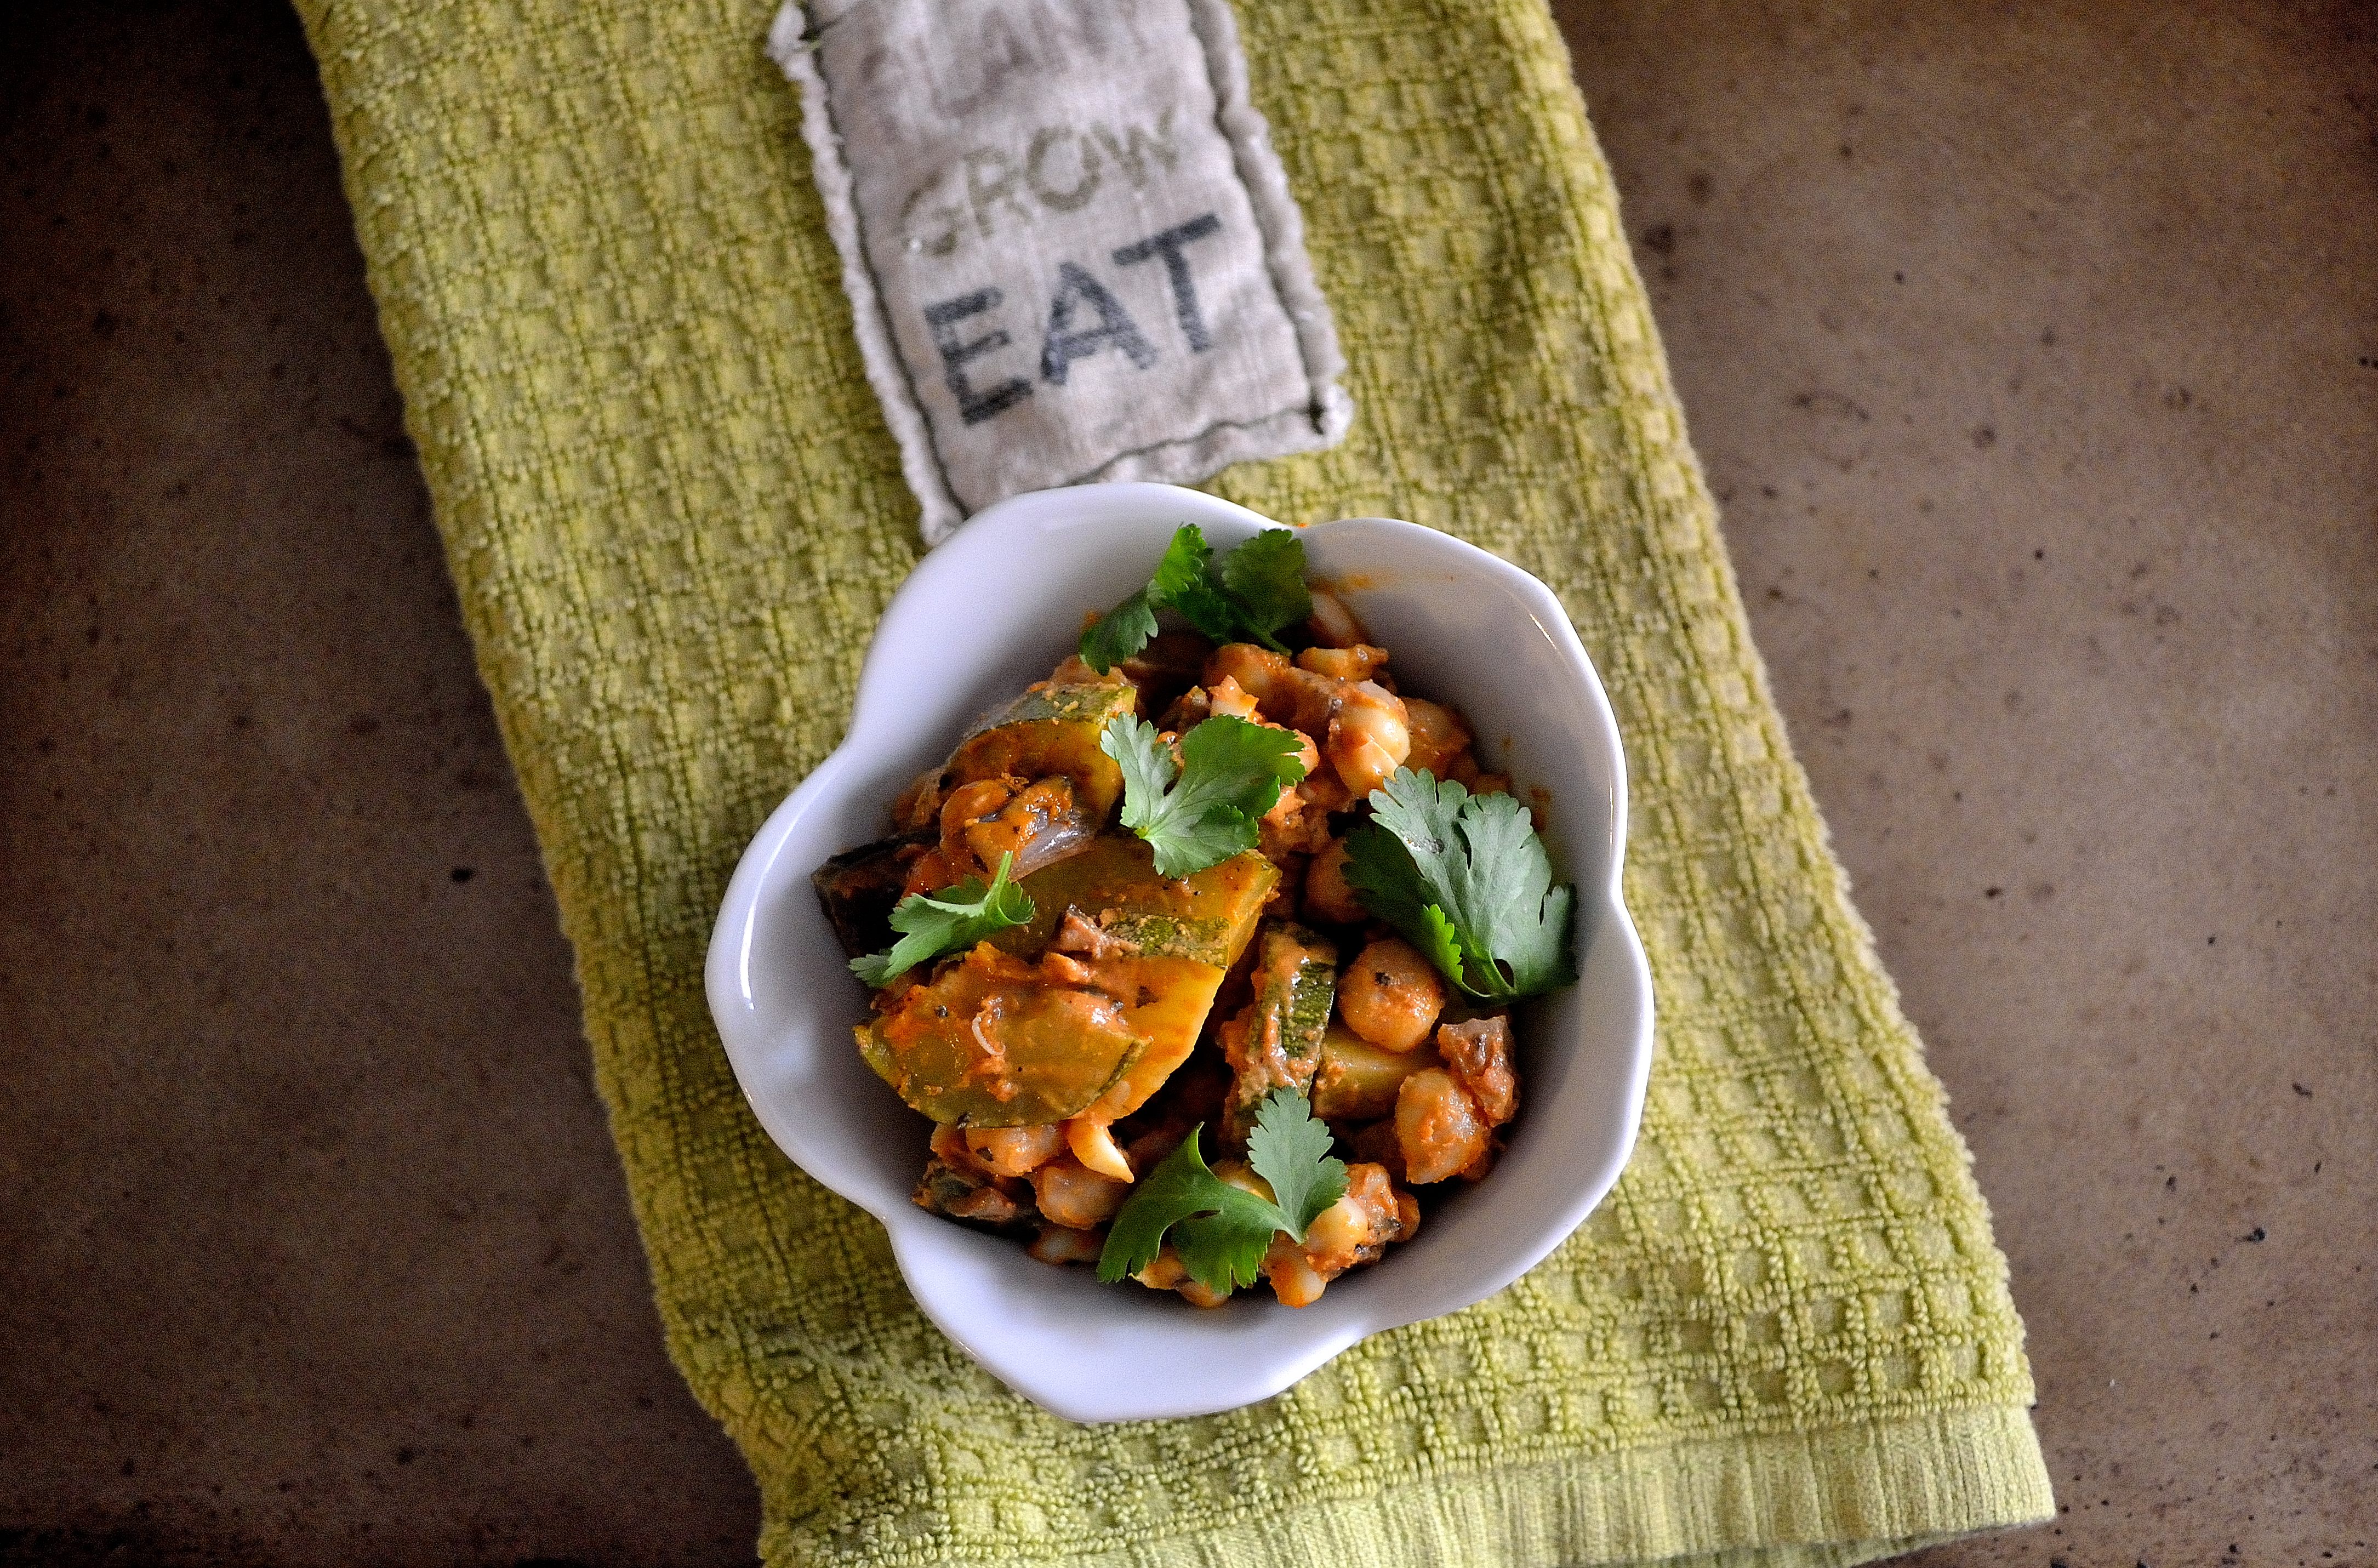
The Last Summer Pasta Salad with Herb SauceThe Last Summer Salad with Herb Sauce | Life Healthfully Lived

  • 2 cups cooked pasta, I used brown rice rotini
  • 1 cup cooked quinoa
  • 2 ears of corn, kernels removed (you can also use frozen kernels, thawed)
  • 1 cup cherry tomatoes, sliced in half
  • 1 cup bell peppers, I used a mix of yellow, green, and red
  • 1 cup zucchini, diced
  • 1/2 cup onion, diced
  • 3-4 cloves garlic minced

Herb Sauce

  • 1 small bunch of basil leaves, about 1/2 cup tightly packed
  • 1 small bunch of cilantro
  • 2 cloves garlic
  • 1/3 cup full-fat coconut milk
  • juice of half a lime
  • salt and pepper to tasteThe Last Summer Salad with Herb Sauce | Life Healthfully Lived
  1. Combine all sauce ingredients in a blender and set aside.
  2. Heat a little olive oil in a large skillet over medium-high heat.  Saute the onions until softened and then add in the peppers, tomatoes, zucchini, and corn.  Cook until the edges are slightly brown.  Add in the garlic at the very end and saute for one more minute.
  3. Remove the vegetables from heat and let them cool.  In a large bowl combine the pasta and quinoa and the cooled vegetables.  Mix everything well.
  4. Pour the herb sauce over everything and stir to combine so everything is coated.  Taste and adjust the seasonings.  You can serve it right away or put it in the fridge to cool completely.

Butternut Squash & Black Bean Enchiladas

LastButternut Squash & Black Bean Enchiladas | Life Healthfully Lived Friday, I posted a picture of these enchiladas on Instagram and people went nuts.  Ok, maybe not nuts.  BUT this picture did get 55 likes which is like way more than I ever get.  Plus 9 people commented on it.  Watch out folks.  I’m gonna be an Instagram star!

I get it though.  These enchiladas are fabulous and they are really easy to make.  When I posted these pictures, one of the things that I said was that I loved that I could make them ahead of time and then just throw them in the oven at dinner time.  Meals like that make me happy.

Butternut Squash & Black Bean Enchiladas | Life Healthfully Lived

Little side story about why I went with the butternut squash filling.  A few weeks ago, Adam went on an Alaskan fishing trip.  It was a boys trip with his stepdad and other boys in the family and they spent two days out on a boat in Homer, Alaska fishing for halibut, rockfish, and salmon.  They all caught a ridiculous amount of fish and Adam came home with about 35 pounds of frozen fish.  Now, I have a VERY tiny freezer and it is well stocked.  So when he came back with all that fish I had no idea how it was going to fit.  Butternut Squash & Black Bean Enchiladas | Life Healthfully Lived

It turns out, my husband can Macgyver about 20 lbs of fish into an already full freezer.  When I opened my freezer, I was met with a wall of frozen fish.  Literally.  Just one wall of fish.  So in order to create a little space, I started going through the freezer to see what I could use up.  I found some cubed frozen butternut squash from last fall and decided it was time to put it to good use.  Butternut Squash & Black Bean Enchiladas | Life Healthfully Lived

Long story short:  Alaska + fishing + tiny freezer = delicious enchiladas.

Butternut Squash & Black Bean EnchiladasButternut Squash & Black Bean Enchiladas | Life Healthfully Lived

  • 6 to 8 corn tortillas
  • 2 to 3 cups peeled and cubed butternut squash
  • 1 can black beans, drained and rinsed
  • 3 tbsp fresh cilantro, chopped
  • 1 tsp cumin
  • 1 tsp chili powder
  • 1 tsp garlic powder
  • 1/2 tsp salt
  • 1 can fire roasted tomatoes
  • 3/4 cup water
  • juice of 1/2 a lime
  • 2 1/2 tsp chili powder
  • 2 tsp cumin
  • 1 tsp salt
  • 2 tsp oregano
  • 2 tsp roasted garlic or 2 to 3 cloves garlic, minced
  1. Preheat oven to 400 and line a large baking sheet with parchment paper or a Silpat.
  2. Place the cubed squash into a bowl and drizzle with a little olive oil, 1 tsp cumin, 1 tsp garlic powder, 1 tsp chili powder, and 1/2 tsp salt.  Toss to coat and spread evenly on the baking sheet.  Roast in the oven for 10 minutes and then flip and roast for 10 more minutes.
  3. While the squash is roasting, make the enchilada sauce.  Place the fire roasted tomatoes and 3/4 cup water into a blender.  Pulse a few times and then add in lime, garlic, and rest of the seasonings.  Blend everything until you have a smooth sauce.
  4. Once the squash is done put it back into the large bowl, add in the drained and rinsed beans, and mash things up a bit.  You want a few chunks left in the filling.  Stir in the fresh cilantro.
  5. Get a 9 x 13 casserole dish and pour a thin layer of enchilada sauce on the bottom.  Warm the corn tortillas a little so they are pliable and then fill with 1/4 cup of the filling.  Roll the tortillas and place into the casserole dish, seam side done.  Complete until the filling is gone and dish is full.
  6. Pour the rest of the sauce over the top of the tortillas and then cover with aluminum foil.  At this point, you can keep them in the fridge until you’re ready to cook.  When you’re ready to cook them, preheat oven to 350 and cook for 25 minutes.
  7. Remove from the oven and take off the aluminum foil.  Let the enchiladas cool for at least 5 minutes before serving.  Top with more fresh cilantro if you want. Butternut Squash & Black Bean Enchiladas | Life Healthfully Lived

Ok, it might look like there are a lot of ingredients and a lot of steps but I promise you this meal is not complicated.  You can also make substitutions to fit your dietary needs.  You can use sweet potatoes or pumpkin instead of the squash or you can use shredded chicken, pork, or beef if you want to have meat.  You can top it with cheese if you want and serve it with sour cream, guacamole, or cashew sour cream.  These also make phenomenal leftovers and once they are cooled completely, freeze really well.  So go make some enchiladas and love life!  Butternut Squash & Black Bean Enchiladas | Life Healthfully Lived

What is your favorite make-ahead meal?

P.S. Did you know you can follow all my healthy cooking adventures on Instagram, Twitter, and Facebook?  I know.  Life is good again 🙂

Roasted Red Pepper Sauce

IRoasted Red Pepper Sauce | Life Healthfully Lived am the queen of roasted things.  It’s pretty much my answer to everything.  Broccoli? Roast it.  Zucchini?  Roast it.  Almonds/cashews/hazelnuts? Roast it. Sweet potatoes.  Roast it.  Annoying relatives that randomly drop in for the weekend without calling?  Roast it.

Ok, maybe not the last one but still.  Whenever I have food that can be roasted, I’m gonna roast it.  So I was shocked that I had never roasted peppers before.  It’s not like it’s a hard process.  It couldn’t be simpler.  I just never looked at a pepper and felt the need to roast it.  Well, that time is over because roasted peppers are delicious.  They add a wonderfully smoky flavor to whatever you use them for and smoky is always good.

I put this sauce over gluten free linguine and it was fantastic.  You could use this over zoodles, in lasagna, over vegetables (roasted of course), or you know just eat it straight out of the pot.  I won’t judge.

Roasted Red Pepper Sauce- slightly adapted from Minimalist Baker’s Vegan Roasted Red Pepper PastaRoasted Red Pepper Sauce | Life Healthfully Lived

  • 2 large red bell peppers
  • 1/2 cup caramelized onions (or regular onion), diced
  • 4 cloves garlic, minced
  • 1/2 to 1 cup coconut milk
  • 3 tbsp nutritional yeast
  • salt and pepper to taste
  1. Preheat oven to 400.  Line a baking sheet with aluminum foil and place the peppers on the sheet.  Roast the peppers for 20 minutes and then flip them over and roast for another 20 minutes.  The pepper should have a little char on it once it’s done.
  2. Remove the peppers from the oven and place a glass bowl over them to allow the steam to loosen the skins.  Let them sit for about 15 minutes.
  3. While the peppers are steaming, heat a little oil in a medium pan over medium-high heat.  Saute the onions and garlic until soft and translucent, about 5 to 7 minutes.  Remove from heat and place in a blender.
  4. Take the peppers out from under the bowl and remove the skins.  The skins should slip off pretty easily.  You can leave a little bit of the char on for a more intense smoky flavor.
  5. Add the peppers, nutritional yeast, salt, and pepper to the blender.  Pulse a few times to break everything up and then add in 1/2 cup of the coconut milk.  Blend until smooth.  If the sauce is still really thick add in more coconut milk, up to 1 cup.
  6. Pour the sauce into a saucepan and heat through, about 5 minutes.  Serve over pasta, vegetables, or even rice.

At first glance, it looks like there are a lot of complicated steps but you’re really just roasting peppers and then blending everything together.  You could even roast the peppers ahead of time and then when you’re ready for dinner you can just throw everything into the blender and you have dinner in no time!  You can also roast the peppers in a few different ways, I just like the oven because it doesn’t take a lot of effort.  Roasted Red Pepper Sauce | Life Healthfully Lived

Anyone have any fun weekend plans besides making this awesome and simple dinner?  I’m looking forward to spending some time with Adam since we haven’t been able to do that for over two weeks!  Have a great weekend everyone!

Tahini BBQ Summer Vegetable Bake

ITahini BBQ Summer Vegetable Bake | Life Healthfully Lived have been all about the tahini lately.  I have been finding ways to put it on everything and I have not been disappointed.  Most of us only know tahini as an ingredient in hummus.  It helps give it that nice creamy, earthy flavor.  While hummus is delicious, tahini deserves to be more than just an ingredient in a popular dip.

It is awesome in baked goods, drizzled over pancakes or roasted plantains, and it turns any homemade dressing into creamy delicious lick the bottom of the bowl good.  The fact that it turns things creamy is one of my favorite things.

I like creamy, creamy is good, but sadly people only associate creamy with cheese or other dairy products.    I’m going to change your mind one tahini filled recipe at a time. Tahini BBQ Summer Vegetable Bake | Life Healthfully Lived

This one is really easy to make and is a great way to use up the surplus of zucchini and other summer vegetables I’m sure are crowding your fridge.  I also like this one because it can be made the night before and then just popped into the oven and it’s done.  That’s actually what I did when I made this last weekend and it worked beautifully.

The sauce I made for this vegetable bake would also be awesome as a dip or slathered on wings or ribs or burgers or a spoon…. You get the idea.  Go grab all the summer vegetables you have, whip up this sauce, and throw together this yummy dish!

Tahini BBQ Summer Vegetable Bake

Tahini BBQ Summer Vegetable Bake | Life Healthfully Lived

Tahini BBQ Sauce-

  • 1/4 cup tahini
  • 2 tbsp homemade ketchup (or the best you can find/afford at the store)
  • 1 tsp molasses
  • 2 tsp apple cider vinegar
  • 1 tsp garlic powder
  • 2 tsp smoked paprika (make sure it’s smoked)
  • 1/2 tsp chili powder
  • 1/2 tsp salt
  1. Blend all ingredients together until smooth and well combined

Vegetable Bake-

  • 1 batch of tahini BBQ sauce
  • 1 zucchini, sliced and diced
  • 1 summer squash, sliced and diced
  • 1 cup corn kernels, fresh or frozen
  • 1 cup red onion, diced
  • 1 1/2 cup cooked garbanzo beans (or whatever bean you have on hand)
  • 2 tsp Italian seasoning
  • salt and pepper
  1. If you want/have the time, roast the zucchini and summer squash.  You don’t have to, but it adds a nice flavor to the dish.  Drizzle with a little olive oil and salt and pepper and roast at 400 for 15 minutes.
  2. Remove the zucchini and squash, turn the oven to 375 and place the roasted vegetables into a large bowl.
  3. Add the corn, onion, garbanzo beans, and stir everything to combine.  Sprinkle with Italian seasoning and salt and pepper and stir again.
  4. Add in all the tahini BBQ sauce and stir everything making sure the sauce is coating all of the vegetables and beans.
  5. Transfer everything to a large casserole dish.  Cover with aluminum foil and bake for 20 minutes.  Take off the aluminum foil and bake for another 5 minutes.
  6. Remove from oven and let it cool for at least 5 minutes before serving. Tahini BBQ Summer Vegetable Bake | Life Healthfully Lived

DIY Wednesday: Fruit Chips

DoesDIY Fruit Chips anyone remember the Seneca brand of apple chips?  They came in all these super delicious flavors like granny smith and my absolute favorite, cinnamon.  When I was younger my sister and I only got to eat them once in a blue moon.  My mom considered them a treat and not an everyday snack.  She was smart to do that because those things were loaded with added sugar.

Well, today’s DIY was partly inspired by those chips.  I wanted to make a snack that tasted just as good but didn’t have all the added sugar.  Fruit is naturally sweet and when you dry it out you concentrate those sugars even more.  Fruit chips don’t need to have any added sugar and they can still be a sweet snack.

For those of you who have a dehydrator, fruit chips are simple to make.  You just slice the fruit, place it on the trays, and go about your day.  Hours later you get tasty fruit chips.  If you don’t have a dehydrator, you can still get fruit chips with a few simple steps.  I tried this with apples, bananas, and peaches.  You can use whatever fruit is your favorite.  Strawberries, mangoes, and pears would also be really good.

DIY Fruit Chips 

DIY Fruit Chips

  • 1-2 of your favorite fruit (apples, bananas, pears, strawberries)
  • 1 tsp lemon juice
  • 1 tsp cinnamon, optional
  1. Preheat your oven to its lowest setting, 170-200.  Wash your fruit and dry it thoroughly.  Slice the fruit VERY thin.  The thinner you slice the fruit the crispier your fruit chips will be.DIY Fruit Chips
  2. Line a baking sheet with parchment paper or a Silpat.  Place the fruit slices in a single layer on the baking sheet.  Make sure they don’t touch.DIY Fruit Chips
  3. Sprinkle the lemon juice and cinnamon over the fruit.  Bake the fruit slices in the oven for 2-4 hours, flipping every so often.  The baking time will vary based on the temperature of your oven.  The chips are done when they’re lightly brown, starting to curl, and no longer soft.DIY Fruit Chips
  4. Once the chips are done, let them cool on the sheet until completely cool.  Store in an airtight container for up to a week.