Balsamic Roasted Broccoli Rabe

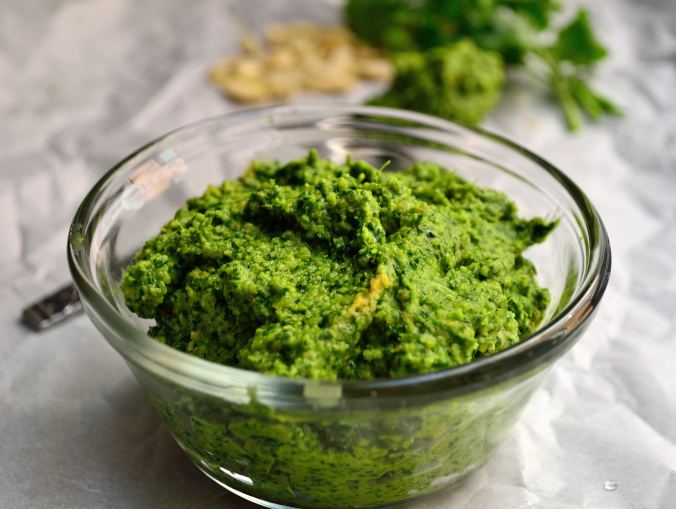
Broccoli rabe is having a moment in the Dawson household right now.  Every time I go to the grocery store I just can’t pass up those bright green bunches.  I like the bitterness of the leaves and the slightly sweet broccoli, kind of like if kale and broccoli had a baby.Balsamic Roasted Broccoli Rabe | Life Healthfully Lived

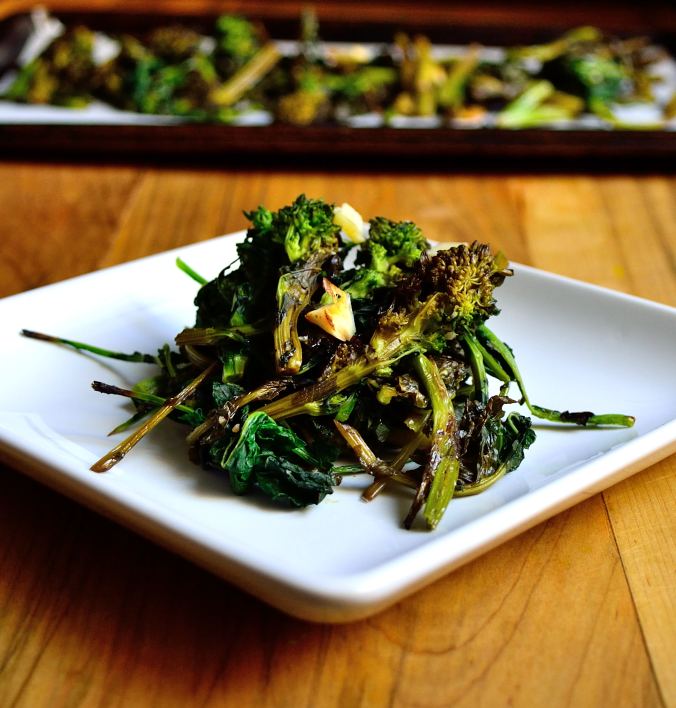
That’s weird to imagine, so let’s move on.  I usually just blanch and saute broccoli rabe because I don’t mind the bitter but some people are turned off by that taste.  More rabe for me!  But in an effort to be a little less selfish with my food (a very tough feat, just ask my husband) I decided to try preparing it a little different.

Roasted.Balsamic Roasted Broccoli Rabe | Life Healthfully Lived

If you follow me on Instagram, you probably know that #roastallthethings is pretty much my favorite hashtag because I really do roast all the things.  Roasting brings out the natural sugars in food and in turn makes things like broccoli rabe more palatable for everyone.  The balsamic vinegar just ups the ante even more and adds a nice tang.

This is a simple side dish and after blanching it doesn’t take that much time.  In fact, you could blanch the broccoli rabe a few days in advance so all you have to do is throw the rabe into the oven when you’re ready to eat.  Easy peasy!

Balsamic Roasted Broccoli RabeBalsamic Roasted Broccoli Rabe | Life Healthfully Lived

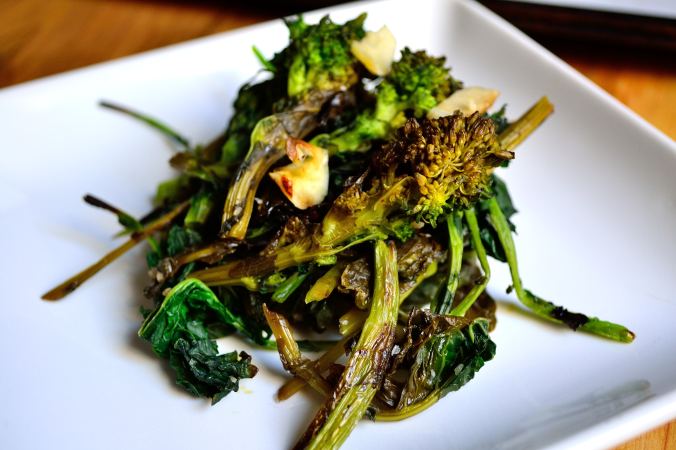
  • 1 bunch broccoli rabe
  • 2 cloves garlic, thinly sliced
  • 1-2 shallots, finely diced
  • 1 tbsp coconut oil
  • 2 tbsp balsamic vinegar
  1. The first thing you need to do is blanch and shock the broccoli rabe.  This helps it keep it’s color and tames a little bit of the bitterness.  Separate the leaves from the broccoli stems, but don’t throw them away, and chop the broccoli part into bite size pieces.
  2. Bring a large pot of salted water to a boil.  Fill a large bowl with cold water and add a few ice cubes.  Have a colander ready.
  3. Once the water is boiling, dump the chopped broccoli pieces and stir around.  Cook for about 30 seconds to 1 minute until the water starts to come to a boil again.  With a slotted spoon, transfer the broccoli to the cold water bath and then drain in the strainer.  Repeat this process with the leaves.
  4. Once the broccoli rabe is blanched and shocked you can roast it right away or store it in the fridge for about 2 days before you’re ready to cook it.
  5. Preheat the oven to 400 and line a large tray with a Silpat or parchment paper.  Toss the broccoli and leaves in the coconut oil and then lay them out in an even layer on the baking sheet.  Sprinkle the shallots and garlic slices over them and then drizzle everything with the balsamic vinegar.  You can add a pinch of salt as well at this point.
  6. Roast for about 10 to 15 minutes, keeping a close eye so the broccoli rabe doesn’t burn.  Remove from the oven let cool slightly before serving.Balsamic Roasted Broccoli Rabe | Life Healthfully Lived


DIY Wednesday: Coconut Milk

I use coconut milk a lot.  In curries, creamy sauces, my daily smoothie bowl, for baking, in dressings, in my coffee…. You get the picture.  There are plenty of options for coconut milk in the store and some of them are actually a pretty good deal.  I can get a 1-quart carton of So Delicious unsweetened coconut milk at my Wal-mart for $1.98.  But the price isn’t what’s driving this DIY post.   DIY Wednesday: Coconut Milk | Life Healthfully Lived

Pretty much every brand of coconut milk has some type of thickener or “gum” added to make it that thick and creamy milk we all enjoy.  Some brands have even worse things added but I avoid those.  While the So Delicious brand is good, it still has guar gum added and while in small doses guar gum isn’t horrible, too much can cause some gastrointestinal issues.

Since I use coconut milk pretty much every day, I decided to try making my own.  You guys, this is like the easiest homemade alternative milk that I have ever done.  Nut milks aren’t super hard to make, but if you don’t have a fancy blender it can be time-consuming.  Coconut milk is quick, simple, and pretty much any blender can handle it.  Even an immersion blender.  Oh yes, I tried it.  DIY Wednesday: Coconut Milk | Life Healthfully Lived

Even better, it’s also a cheap way to make coconut milk especially if you can buy your coconut shreds in bulk.  So if you’re looking for a simple way to make coconut milk, look no further!

Just a heads up, though, you will need a nut milk bag or cheese cloth but that’s the only “special” equipment required for this milk.  You could even get away with using a mesh sieve or strainer.

Homemade Coconut MilkDIY Wednesday: Coconut Milk | Life Healthfully Lived

  • 1 package unsweetened coconut shreds, 8 oz
  • 4 cups boiling water
  • 1-2 tsp sweetener of choice, optional (I left it unsweetened)


  1. Get out a large bowl and layer your cheese cloth or nut milk bag over it.  Boil the 4 cups of water.
  2. Meanwhile, measure out 8 oz of coconut shreds and put them into your blender.  Pour the boiling water over the coconut and let it sit for 5 to 10 minutes to soften up.
  3. Blend everything together.  If you have a high-speed blender (jealous) this will take you literally 30 seconds maybe a minute.  My blender took about 2 minutes.  It won’t be completely smooth but you want a thick consistency.
  4. Pour the milk into the bowl with the bag or cheese cloth.  Squeeze out all of the milk (careful if it’s still hot from the boiling water part) and transfer the milk to a pitcher or other container.  It will keep in your fridge for 3 to 4 days.

Two things to note, DON’T throw away the coconut pulp! You can dry it out and use it in baking or cooking.  Also, the milk will get a hard crust on it while it’s in the fridge.  That’s totally fine.  Just break it up and stir or shake the milk and it will be good to go! DIY Wednesday: Coconut Milk | Life Healthfully Lived

Gluten-Free Banana Bread with Avocado

Don’t turn away in disgust.  You can, and totally should, bake with avocado.  They are good for you and replace a lot of the less than healthy fats you normally find in baked goods. Gluten-Free Banana Bread with Avocado | Life Healthfully Lived

A few weeks back Liz from I Heart Vegetables posted this recipe for chocolate muffins made with avocado and that got my wheel turning.  I started thinking of other things I could make with avocado and then I saw a recipe for banana bread and the baking heavens opened. Gluten-Free Banana Bread with Avocado | Life Healthfully Lived

Banana bread is awesome, but regular banana bread is usually a little too sweet for me so I toned it down in this recipe.  Feel free to add maple syrup if you want, but try it without first.  The avocado keeps this bread moist and full of healthy fats and DOESN’T taste like banana guacamole.  That wouldn’t be so good. Interesting…. but not tasty.

So if you have some super ripe bananas, an avocado, and a hankering for something delicious try this quick gluten-free bread!

Avocado Banana BreadGluten-Free Banana Bread with Avocado | Life Healthfully Lived

  • 1 medium avocado, about 1 cup diced up
  • 2 medium ripe bananas
  • 1 tbsp coconut oil
  • 1 large egg or 1 flax egg (3 tbsp ground flaxseed and 6 tbsp water combined)
  • 1 and 1/2 cup almond flour
  • 2 tsp cinnamon
  • 1 tsp baking powder
  • 1/4 tsp baking soda
  • 1/2 tsp salt
  • 3-5 tbsp maple syrup, optional
  • 1/4 cup pecans, optional
  • 1/2 cup dried bananas, optional (but really delicious even if it sounds odd)
  1. Preheat oven to 350 and oil a bread pan with a little coconut oil and line with parchment paper.
  2. Put the avocado, bananas, and coconut oil into a blender and blend until it’s smooth.  Add the egg or flax egg, maple syrup if you’re using, and blend again.
  3.  Combine all the dry ingredients in a large bowl and then pour in the wet.  Use a spatula and stir to combine.  If you’re adding nuts or dried bananas stir those in now.
  4. Pour the batter into the bread pan and bake for 45 minutes.  Pull out the bread and check to see if the middle is still wobbly.  If it is, cook for another 5 to 10 minutes.
  5. When the bread is done, pull it out and let it cool in the pan for 5 minutes then take it out and let it cool on a rack completely.   Gluten-Free Banana Bread with Avocado | Life Healthfully Lived

DIY Wednesday: Sun-Dried Tomatoes

The other day, I wanted to recreate one of my favorite breakfast dishes from a restaurant back in Sycamore, Eggsclusive Cafe.  It’s an omelette that has fresh basil, sun-dried tomatoes, and avocado slices on top.  So simple but so good.

To the store I went to grab the things I needed that I didn’t already have, one of which was the sun-dried tomatoes.  I didn’t want to get the ones packed in olive oil because they tend to make everything else oily and the ones at my store always have some other flavoring like jalapeno added.  So I picked up one of the packages, despite the $5 price tag, and flipped it over to read the ingredient list.  That’s where I was met with sulfates and sulfites and other preservatives to keep “freshness and color retention”.DIY Wednesday: Sun-Dried Tomatoes | Life Healthfully LivedDIY Wednesday: Sun-Dried Tomatoes | Life Healthfully Lived

No brand at my store had sun dried tomatoes without some kind of chemical or preservative and I didn’t want to spend $5 or more on something that I didn’t want in my body.  I almost resigned myself to the oil packed tomatoes when I thought to myself, “Self, can’t you just make your own sun dried tomatoes?  I mean obviously not in the sun, that would take too long and you don’t have a sunny spot in the apartment, but in the oven? And wouldn’t it be like way less expensive?”

Yes, my self was correct.  I can make sun dried tomatoes in my oven and have fresh, preservative free toppings for my omelettes and whatever else my heart desires.  If you have a food dehydrator you probably already know that you can make your own sun-dried tomatoes and it’s fairly simple.  If you don’t, you can do like me and make them in your oven!

Sun Dried TomatoesDIY Wednesday: Sun-Dried Tomatoes | Life Healthfully Lived

  • One 8 oz. package of grape or cherry tomatoes
  • olive oil, optional
  • salt, optional

* I made mine without oil or salt but you can, it just may take a little longer to dry out.

  1. Preheat your oven to the lowest setting.  If it’s 150-170 lucky you, the rest of us will have to make due with 200.
  2. Wash and dry the tomatoes and then slice in half.  Arrange the tomatoes on a baking sheet lined with parchment paper or a Silpat.  If you want to add olive oil and salt, toss the tomatoes in a bowl and make sure they’re covered then arrange on your baking sheet.
  3. Place the sheet in the oven to dry out.  Now, if your oven only goes to 200 you’re going to have to keep an eye on things to make sure the tomatoes don’t burn.  I opened my oven every 10 minutes or so to let out some of the heat.
  4. Turn over the tomatoes every so often.  Remember you’re just trying to dry them out, not roast them.  They’re done when they look shriveled like red raisins.  Take them out of the oven and let them cool completely before storing in an airtight container.

* Make sure the tomatoes are completely cool and dry before you store them because any moisture in the container will make them mushy and spoil sooner.DIY Wednesday: Sun-Dried Tomatoes | Life Healthfully Lived

Oil-Free Cilantro Lime Pesto

One of the things I hope this blog proves is just because you have a certain dietary restriction/need/preference doesn’t mean you have to sacrifice flavor or some of your favorite things.  There is usually always a way to meet your cravings based on your food needs.  Now, that being said, that doesn’t mean I’m magic and can fix all your dietary woes with a healthy substitution.  Some things just cannot be recreated and more often than not it’s better that we can’t turn all junk food into healthy food.  Who wants to eat a healthy Twinkie anyway?  Or a real one for that matter….

I digress.  Today’s recipe was created because of two things.  1.  While I love fat, it’s super easy to go overboard with it especially when it comes to liquid oil like olive oil, avocado oil, or coconut oil.  Unless you’re measuring everything out, oil can add up pretty quick.  I started to realize I was buying big jugs of olive oil more and more frequently and running out of them fast.  Which leads me to my second reason… 2. I was out of olive oil and I wanted pesto.Oil-Free Cilantro Lime Pesto | Life Healthfully Lived

I want to stress I don’t think good fats are bad.  In fact, they’re awesome and I try to get them in at every meal.  But too much of a good thing can be bad and when you use an entire 1.5-liter bottle of olive oil in less than a week and a half, you might need to evaluate your food situation.  I’ll still use olive oil to make my spinach pesto, broccoli rabe pesto, and all other delicious things that require olive oil but it’s nice to have an option that is oil-free and just as delicious.

I used this last night on Adam’s fish and he deemed it “pretty tasty”, which is husband speak for good.  It has a nice light flavor from the cilantro and even though there is no oil, it’s still creamy.  You can use any green herb or vegetable you would like, I just happened to have a bunch of cilantro I needed to use so that’s what I went with.  This would also be great on pasta or zoodles or panini’s or chicken/pork or crackers or your finger….

Oil-Free Cilantro Lime PestoOil-Free Cilantro Lime Pesto | Life Healthfully Lived

  • 1 bunch of fresh cilantro, rinsed and dried and ends trimmed
  • 1/2 cup slivered almonds, toasted
  • juice of 1 to 2 limes, depending on how lime-y you want it
  • 2 cloves garlic
  • 2 tsp roasted garlic
  • 1/4 tsp salt
  • 2-3 tbsp nutritional yeast (or freshly grated parmesan if you do cheese)
  1. To toast almonds: Add almonds to a medium skillet over medium-high heat.  Shake the pan back and forth every so often and dry toast the almonds until golden brown.  Let them cool while you get everything else together.
  2. Place the rest of the ingredients into a blender or food processor, starting with the garlic, then cilantro, then seasonings, and finally lime juice.  Pulse a few times then add the cooled slivered almonds.
  3. Blend until you have a relatively smooth and creamy sauce.  If it’s a little too thick you can add more lime juice or water 1 tablespoon at a time to thin it out.  Taste and adjust the salt then store in your fridge in an airtight container for about a week. Oil-Free Cilantro Lime Pesto | Life Healthfully Lived