DIY Wednesday: Homemade Gluten-Free Flours

For those of you that bake and cook with gluten-free flours often, you know that it can be a pricey endeavor.  You can get five pounds of all-purpose flour for like a nickel but 2 ounces of any type of gluten-free flour costs all the gold in China as well as your firstborn child.

Ok, maybe it’s not that dramatic, but you get the idea.

For awhile, I had relegated myself to shelling out the extra dough when it came to gluten-free flour but then I started to think about it.  Most of the flours I bought weren’t blends, they were just straight up one-ingredient flours.  Almond, brown rice, quinoa, oat, buckwheat, corn, coconut… all flours made with just one thing.

I can make things with just one ingredient in my own kitchen.

I have a blender/food processor.

Why am I paying an arm and a leg for these things again?

So I started saving money and making my own flour at home.  If you have a decent blender or food processor you can do the same thing.  Heck, if you have a pretty crappy blender or food processor you can get by making a few of these on your own.  I did until I got a new food processor.

Here are four of my favorite flours to make at home and a few ideas on how to use them!

Oat FlourDIY Wednesday: Gluten-Free Flours | Life Healthfully Lived

This is probably the easiest and cheapest flour to make.  All you need are regular rolled oats and you can make your own oat flour.

  • 1 cup regular rolled oats = a little less than one cup of flour.
  1. Pulse oats in a food processor or blender until you have a fine flour like texture.

Uses: Great for cookies and quick breads. I like to use it as a binder in lentil meatloaf or meatballs too.

Buckwheat FlourDIY Wednesday: Gluten-Free Flours | Life Healthfully Lived

Even though it has the word heat in the name it’s still gluten-free.  You will want to find plain buckwheat groats, not roasted.

  • 1 cup buckwheat groats = about 1 cup of flour
  1. Toast the plain groats in a dry pan over medium-high heat until nutty and fragrant, about 5 minutes.
  2. Pulse the groats and then blend into a fine powder.

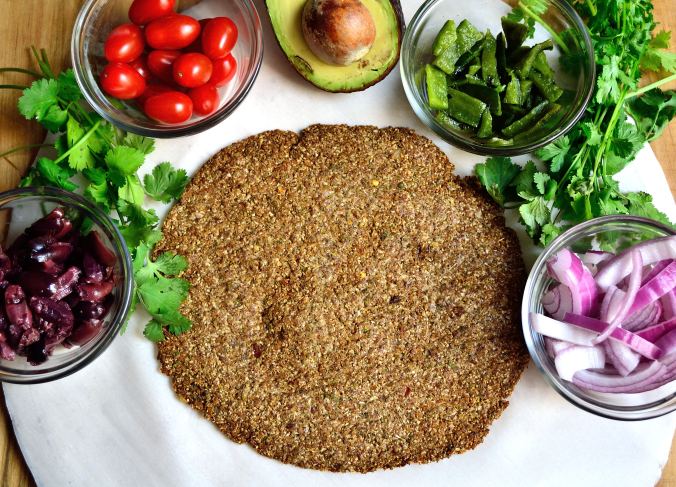
Uses:  I like using it to make pancakes, bread, and crackers.  It also makes a nice crispy crust for pork or chicken if you mix it with a few spices, salt, and pepper.

Quinoa FlourDIY Wednesday: Gluten-Free Flours | Life Healthfully Lived

You might need a little bit more powerful blender or food processor to grind up the tiny quinoa seeds.  A smaller bowl or pitcher work better if you have one of those.  You can use any color quinoa you like but I like to use white quinoa because it has a more neutral flavor.

  • 1 cup quinoa = less than 1 cup of flour
  1. Toast the quinoa in a dry pan over medium-high heat until fragrant and golden, about 2 to 3 minutes
  2. Blend in a food processor or blender until you have a flour consistency.  This might take a bit longer than other DIY flours.

Uses:  I have been using this a lot in rolls and breads because it gives a nice nutty flavor, you can also use it for my cauliflower pizza crust!

Coconut FlourDIY Wednesday: Gluten-Free Flours | Life Healthfully Lived

Perhaps the best smelling flour in the bunch, I like this because it lets me use up the leftover coconut from my coconut milk!

  • 1 cup coconut shreds = less than 1 cup of flour
  • If you are using leftover shreds from making milk let them dry out on a pan completely before continuing.
  1. Preheat your oven to the lowest setting (mine is 200 and it worked just fine) and toast the dried coconut shreds until golden.  About 20 to 30 minutes
  2. Let the shreds cool then pulse them in the blender or food processor until you have a flour-like texture.

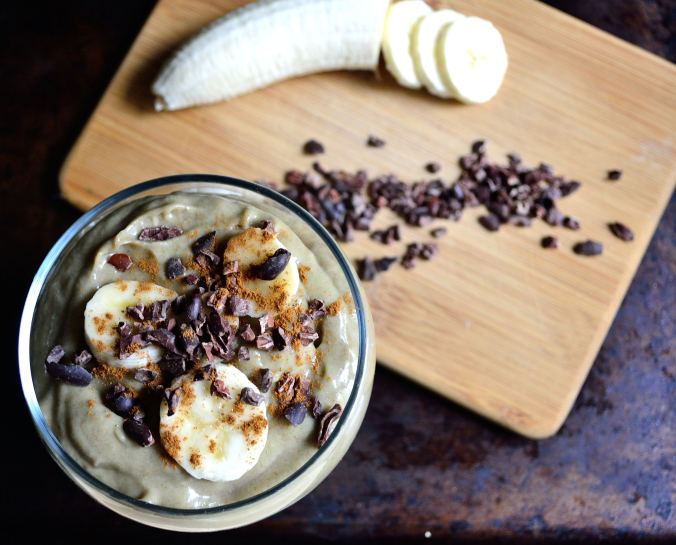
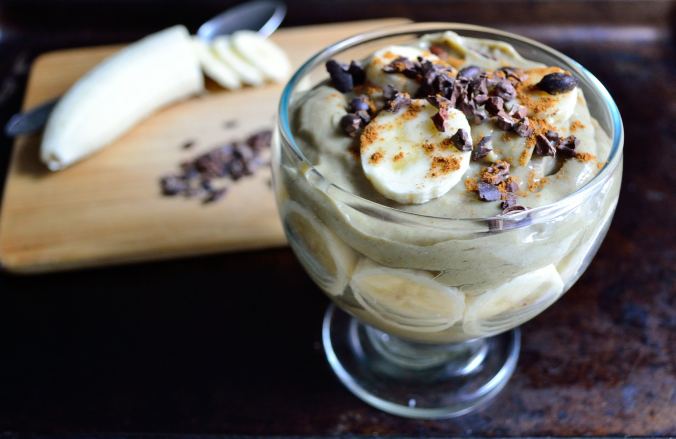
Uses:  I use coconut flour a lot around here for things like pancakes, avocado fries, and desserts like these chocolate PB bars.


So there you go!  You can make your own gluten-free flour for a fraction of the cost at the store.  Just make sure to store all these flours in an airtight container to maintain freshness.

Homemade Banana Pudding

Homemade Banana Pudding | Life Healthfully LivedOk, so I learned some new things while making this recipe.  First, I have to tell you about my inspiration for this one because it’s weird and who doesn’t like weird stuff? No one.  That’s who.

I was making a loaf of my gluten-free banana bread (which you should make immediately because it’s the bomb.  Side note: I’m bringing back “the bomb”) and as I was blending the banana and avocado together I thought to myself, “Antoinette, (I call myself Antoinette NBD) that kind of looks like pudding.  I wonder if it would be any good as pudding?  I wonder if there is banana pudding?” So I set about to research banana pudding.

This is my life people.Homemade Banana Pudding | Life Healthfully Lived

I remember pudding snack packs used to have a banana flavor but I doubt that there was any actual banana in that pudding.  My google searches told me that banana pudding was indeed a thing.  A southern thing.  Which means it’s delicious because it has all the fat and sugar.  All delicious things have fat and sugar.  Most recipes called for making a vanilla custard type deal and adding sliced bananas, vanilla wafers, and in one case merengue.  While it wasn’t a difficult process, it was more steps than I wanted for my pudding. And by more, I mean this is pretty much just one step.

There are no eggs in this so you don’t have to cook anything but because of the addition of avocado, stick with me, it is creamy and delicious without the eggs.  And depending on how ripe your bananas are, it’s pretty sweet too.  You can add maple syrup if it isn’t sweet enough but mine was totally delicious without it.  See?  Fat and sugar.  Just a better version of fat and sugar.

I know you’re probably getting tired of me putting avocado in things but I’m not, so get over it 🙂  It’s delicious and I can’t stop, won’t stop.  You can get creative with toppings like coconut whip cream, pecans or walnuts, crumbled up graham crackers, or in my case cacao nibs because, chocolate.

Banana PuddingHomemade Banana Pudding | Life Healthfully Lived

As I was making this I started singing the part about figgy pudding from We Wish You A Merry Christmas.  Adam asked me if I was singing a Christmas song and I said no, I was singing a pudding song because how do you make pudding without singing about it?  So feel free to sing about pudding while making this because I think it enhances the flavor.  

  • 2 very ripe bananas, sliced (about 2 cups)
  • 1/2 avocado, diced (about 1/2 cup)
  • 1/2 cup coconut cream (you can buy coconut cream from Trader Joes or just put a can of full-fat coconut milk in the fridge overnight and scoop off the solid cream)
  • 1 tbsp maple syrup, optional if your bananas aren’t super ripe.  I didn’t need any extra sweetener for mine
  • 2 tsp cinnamon
  • pinch of salt
  • 1 1/2 tsp maca powder, optional but adds a nice caramel-y flavor

Toppings (optional)

  • chocolate chips or cacao nibs
  • pecans or walnuts or almonds
  • sliced banana
  • coconut whip cream
  • graham crackers
  • nilla wafers if you’re rebellious or Southern 😉
  1. Ready for this?  Put all the pudding ingredients into a blender and blend until super smooth.  Dish it out and put on all the toppings.

Told you it was one step 😀 Happy Friday friends! Have a great weekend!Homemade Banana Pudding | Life Healthfully Lived

DIY Wednesday: Cauliflower Pizza Crust

DIY Wednesday: Cauliflower Crust Pizza | Life Healthfully LivedThe cauliflower pizza crust.  For many, it is an elusive dream.  You see recipes on Pinterest and they claim that it is the best crust ever (just like real pizza) and that will fulfill all your gluten-free pizza dreams.

And then you make it.

And it turns into a soggy wet pile.

Or it has five pounds of cheese and eggs holding it together.

I’ve tried a lot of cauliflower pizza crusts and while some were good, none were great.  Most of them had to be eaten with a fork and a knife and that’s ok if you’re eating a deep dish pizza but not ok when you want to pick up a slice and feel like you’re eating pizza.  That’s what I wanted.

Then I stumbled across Sprint 2 The Table’s quinoa flour crust pizza and it sounded simple enough and didn’t have the cheese that most crust recipes use to keep everything together.  So I gave it a shot and EUREKA!  It worked.  I could actually pick it up and while I won’t go as far as saying it tastes exactly like real pizza it was the closest I had ever come.

I kept playing with the crust and swapping out a few things and came up with one that doesn’t use eggs or grains as the flour.  If you’re totally fine with eating quinoa flour and eggs then go ahead and try Sprint 2 The Table’s pizza crust.  If you want an eggless and grain-free version try this one below.

I’ll give you a step-by-step tutorial (along with pictures) so you can get the best pizza crust possible then you can go crazy with toppings.  And I may have gone crazy with my toppings aka the whole refrigerator on my pizza.

Cauliflower Crust Pizza- Based on this one by Sprint 2 The TableDIY Wednesday: Cauliflower Crust Pizza | Life Healthfully Lived

  • 1 cup of cauliflower with as much of the stems removed as possible
  • 1/4 cup coconut flour
  • 3 tbsp ground flaxseed
  • 6 tbsp water
  • 1 tsp oregano
  • 1 tsp basil
  • 1/4 tsp red pepper flakes
  • 1/2 tsp salt
  1. Preheat your oven to 425 and get out a pizza stone/pan or regular baking sheet.  Line whatever you’re going to use with parchment paper (I used a pizza stone and cut my parchment paper into circles) and then cut another piece of parchment paper to match the first.
  2. In a small bowl, combine the ground flaxseed and water and let it sit and gel for a few minutes.
  3. In a blender or food processor, pulse the cauliflower a few times until it’s in small rice-like pieces and then dump it into a large bowl.  Add the flour and seasonings and whisk to combine everything.  It’s ok if it’s a little clumpy.
  4. Add in the flaxseed and water mixture and start stirring everything together with a spatula.  It should start to form a big dough ball.  If it’s too dry, add a little water a tablespoon at a time.  Remember that coconut flour likes to soak up water like a sponge so as you add water wait just a few minutes to see if it needs more.

    DIY Wednesday: Cauliflower Crust Pizza | Life Healthfully Lived

    Nice dough ball. Not too dry or too soggy.

  5. Once you have your dough ball place it on your stone or pan that’s lined with parchment paper.  Slightly flatten the dough with your hand and then using a rubber spatula start pressing the dough out into a pizza shape.

    DIY Wednesday: Cauliflower Crust Pizza | Life Healthfully Lived

    Spreading out the dough. It takes awhile so don’t rush it

  6. Work from the middle pressing out and keep going until you have about a 10 to 12-inch circle.  You want it to be fairly thin so the crust will cook all the way through and not end up soggy.  As you press the dough out the edges might crack a little but that’s ok just press them back together.

    DIY Wednesday: Cauliflower Crust Pizza | Life Healthfully Lived

    About how thick you want your crust. You could even go a little thinner for a crispier crust.

  7. Place the other piece of parchment paper on top of the crust and bake for about 20 to 25 minutes.  Remove it from the oven.
  8. Ok, this is the slightly tricky part.  You’re going to flip the whole crust over.  What worked for me was putting on an oven mitt and then using the parchment paper to slide the middle part of the crust onto my hand and then flipping it over in a quick motion.  The crust should be mostly cooked at this point and if you rolled it out thin enough won’t break apart on you.  Don’t freak out, I’ve made this crust a dozen times and even if I totally botched the flip it hasn’t broken or ruined the crust.
  9. Once it’s flipped remove the parchment paper from the top of the crust and top with your favorite pizza toppings! Bake for another 5 minutes and enjoy!

    DIY Wednesday: Cauliflower Crust Pizza | Life Healthfully Lived

    Ready for toppings!

A few other tips:

  • Don’t use a crazy amount of sauce because that is just going to turn the pizza to mush.  Trust me.  My favorite sauce so far has been a light layer of my spinach or cilantro pesto.
  • If you put on a lot of heavy toppings your pizza may fall a little bit as you pick it up.  If you don’t care and want all of the toppings go for it!
  • You can make this crust in advance and keep it in the fridge or freezer until you’re ready to use it.  I’ve only done it a few hours in advance so I can’t vouch for the quality after it’s been frozen and thawed but I will update this if I try it.
  • If you put onions or peppers on your pizza and you want them cooked a little more than the five minutes at the end, saute them before you top your pizza.  If not, they might be a little less done than some would prefer.

Zucchini and Pea Cauliflower Risotto

Zucchini and Pea Cauliflower Risotto | Life Healthfully LivedYup. Cauliflower is back.  I know you’re probably getting a little tired of seeing it featured in my dishes but you know what?  You’re wrong.  Cauliflower is the magical unicorn of the vegetable world and I love turning it into all sorts of things from taquitos to sauce to sweet and sour bites to mac n’ cheese.  It’s awesome and you’re going to have to deal with it.

Which should be easy if you’re stuffing your face with this tasty meal.  Most people tend to shy away from risotto because it takes a really long time to cook and even if you follow all the steps it somehow still tastes like you didn’t do something right.  Or is it just me chomping away and still uncooked rice?  Just me? Ok.  Zucchini and Pea Cauliflower Risotto | Life Healthfully Lived

Moving on.  If you think risotto is too fussy or you’ve never made it before then you need to try this cauliflower risotto because it is the exact opposite of fussy.  It doesn’t take long to make and you don’t have to stand over the stove stirring until your arm falls off like with regular risotto.  Again, just me?  This risotto is still creamy and rich like regular risotto but it’s also nice and light with all the fresh spring-y vegetables.

One other note about this meal, I really think that what gave this dish the depth of flavor I was going for was the Sherry I used to deglaze the pan.  I know some people don’t like to use alcohol in their cooking (to each their own) and you can use water or broth instead but I don’t think it will have the same taste.  Other than that, this risotto is straight forward and will have you licking your plate clean.  Still just me?

Zucchini and Pea Cauliflower RisottoZucchini and Pea Cauliflower Risotto | Life Healthfully Lived

  • 1 large head of cauliflower, riced (you can grate it for bigger pieces which I did or run it through your food processor for smaller pieces)
  • 2 medium zucchini’s, sliced into half moons
  • 1 cup peas, if frozen make sure they’re thawed
  • 3 cloves garlic, minced
  • 3/4 cup onions, diced
  • 2-3 tbsp nutritional yeast or parmesan cheese
  • 1/4 cup sherry (I used this one) or other dry white wine or water/broth
  • 1/2 cup water/broth
  • 1/2-2/3 cup full-fat coconut milk
  • 1/2 cup toasted slivered almonds (or pine nuts if you can shell out the small fortune a 1 oz bag costs)
  • zest from one lemon
  • 1/4 cup fresh parsley, chopped
  • salt and pepper
  1. Heat a little olive oil in a large skillet or saucepan over medium-high heat.  Saute the onions until they’re soft then add in the garlic.  Season this with a little salt and pepper and cook for about 2 minutes.
  2. Add in the riced cauliflower, adding a little more oil if needed, and season again with salt and pepper.  Cook for another five minutes until cauliflower is soft and just starting to get a little brown. Sprinkle the nutritional yeast or parmesan cheese over top.
  3. Pour in the 1/4 cup sherry and deglaze the pan.  Cook and stir everything until most of the liquid as evaporated.  Add the zucchini and peas and pour in the water/broth and coconut milk.  Stir everything together and cook until the liquid has reduced by about half.
  4. Remove from the heat and stir in the lemon zest and parsley.  Top with the toasted almonds and taste to adjust the salt and pepper.  Zucchini and Pea Cauliflower Risotto | Life Healthfully Lived

DIY Wednesday: Everything Bagel Spice Mix

I used to eat a lot of bagels.  Like a lot.  In high school, our cafeteria was mostly a la carte and you could go in and choose from a variety of things.  There were the hot food entrees that would rotate each day but you could also get things like candy, chips, soda, snacks, cookies, and bagels.  Oh, the bagels.  They were huge and fluffy and a perfect vehicle for cramming more cream cheese into my mouth.  Because I didn’t spread my cream cheese onto my bagel like a normal person.  Oh no.  I would rip chunks off my bagel and dip them into my tub of cream cheese and eat it that way.

I have no idea how I didn’t weigh over 500 lbs in high school.

Anyways, I mostly stuck to plain bagels and got fancy with my cream cheese.  Strawberry one day, veggie the next, and sometimes they had a sour cream and chive version that was to die for.  Plus the cafeteria didn’t really have a ton of choices when it came to the bagels.  And then one of my friends introduced me to Panera bagels and it was game on.  Asiago cheese, cinnamon crunch, french toast…. and just as many amazing cream cheese spreads to go along.  But the one bagel that won my heart was the everything bagel.  I could almost (almost) eat that one without any cream cheese.DIY Wednesday: Everything Bagel Spice Mix | Life Healthfully Lived

I can’t remember that last time I had a bagel or cream cheese for that matter, but I love the flavor of those everything bagels so I make my own spice mix and put it on everything (see what I did there?).  You can put it on homemade bread (it tastes great pressed onto the top of rolls), sprinkle it over vegetables or stir-fry, and chicken and pork taste great if you use it as a crust while pan-searing.

So if you’re an everything bagel fanatic and want to add more of that flavor to your life or you don’t eat bagels anymore but still want that flavor try this simple everything bagel spice mix!

Everything Bagel Spice MixDIY Wednesday: Everything Bagel Spice Mix | Life Healthfully Lived

  • 2 tbsp poppyseeds
  • 2 tbsp toasted sesame seeds (place in a pan over medium heat and shake until golden)
  • 2 tbsp dried minced onion
  • 2 tbsp dried minced garlic
  • 2 tsp course sea salt (use less if you have a finer grain salt)
  1. Place everything into a small bowl or mason jar and shake to combine.  Make sure to keep it stored in a sealed container so it doesn’t go staleDIY Wednesday: Everything Bagel Spice Mix | Life Healthfully Lived