5 Things That Have Found Their Way Into My Kitchen

It might come as a shock to you, but sometimes I get stuck in food ruts.  I usually make the same thing for dinner during the week so that I can keep Adam and I on track with healthy meals and I can keep our food costs down.  But the other reason is that I can get lazy.  Sometimes the idea of coming up with something new and delicious just makes me tired.  So it’s easy to rely on the same old favorites in the kitchen and not venture into new territory.

While there is nothing wrong with preparing the same food that you know you like and you know is healthy and works for your body, it does get a little boring after awhile.  Boredom, as least for me, only leads to bad things in the area of food.  Soon I start eating more and more to feel satisfied because the meals I’m eating are the same old same old.  When that happens I know it’s time to switch things up and throw some new tricks into my old routine.

Here are some things that I have added to my kitchen and pantry in hopes of shaking things up and keeping my meals healthy and fun!

P.A.N- Pre-cooked White Corn Meal5 Things That Have Found Their Way Into My Kitchen | Life Healthfully Lived

If you follow me on Instagram (which you should, I’m fun), then you have heard me rave about this.  Actually you have heard me rave about arepas which are made from pre-cooked corn meal.  I have seen arepas on other bloggers feeds and seen them on shows like Diners, Drive-ins, and Dives.  Every time I see them being made, I’m like, “Those look amazing, I need to try them myself.”  So I finally got this flour to make my own arepas.  Yes, you have to use pre-cooked corn meal not regular corn meal.  This was the brand that was recommended everywhere I looked, and I found it on Amazon for like $2.  Expect an arepa recipe soon because not only is it delicious, it is way easier to make than you would think.

Figs

5 Things That Have Found Their Way Into My Kitchen | Life Healthfully Lived

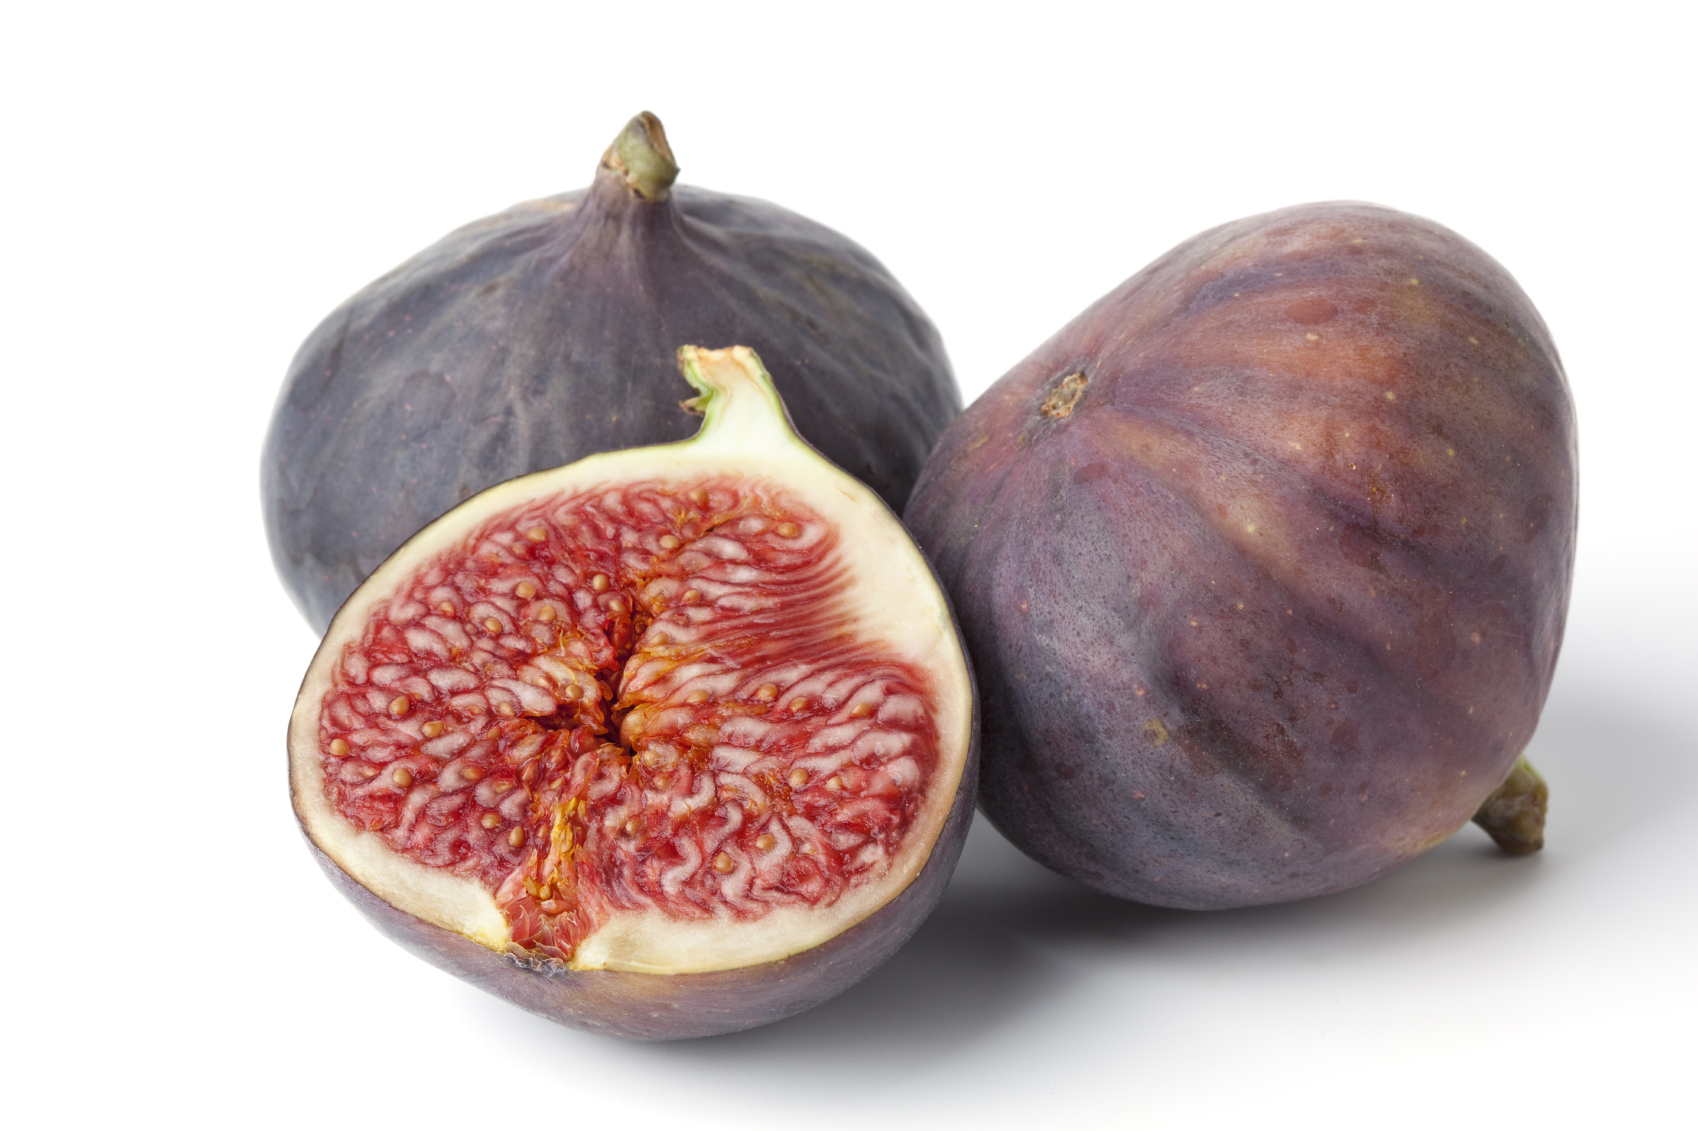
This is another thing that I constantly see on social media and yet I have never tried them.  Well, I have never tried fresh figs.  I have had dried figs and fig newtons if you can count those as actual figs.  But the fresh version was never on my radar. They have a very short season and I just happened to see them on sale at my Jewel so I picked some up on a whim.  They are really good!  I think I might have to try making some fig jam with them so I can enjoy them just a little bit longer.

Canned Coconut Milk5 Things That Have Found Their Way Into My Kitchen | Life Healthfully Lived

Ok, this isn’t a new one for me, but I had forgotten about it for awhile.  I used to get a couple of cans of coconut milk a week and use them in soups and stews and oatmeal and baked goods.  It’s really nice and creamy, so it works great as a substitute for things like heavy cream or whole milk.  My favorite thing to do with it lately is make creamy herb dressings/sauces, which I used on my pasta salad recipe last week and which leads me to the next thing….

Fresh Herbs5 Things That Have Found Their Way Into My Kitchen | Life Healthfully Lived

Another one that isn’t new, but that I had put on the back burner.  I usually pick up a bunch of cilantro each week, but one stand at my farmer’s market sells every fresh herb known to man.  I have started getting fresh basil, dill, parsley, cilantro, and lemon grass and using them in all the things.  Seriously, go get some fresh herbs and put them in your meals.  They enhance the flavor and bring a wonderful freshness to boring old dishes.  Throw some basil into a frittata or blend in some parsley with meat/lentil loaf.  It will up your dinner game and everyone will think you’re a culinary whiz.  You can also freeze, turn them into oil, or sauces to have them on hand for the winter months.

Trader Joes5 Things That Have Found Their Way Into My Kitchen | Life Healthfully Lived

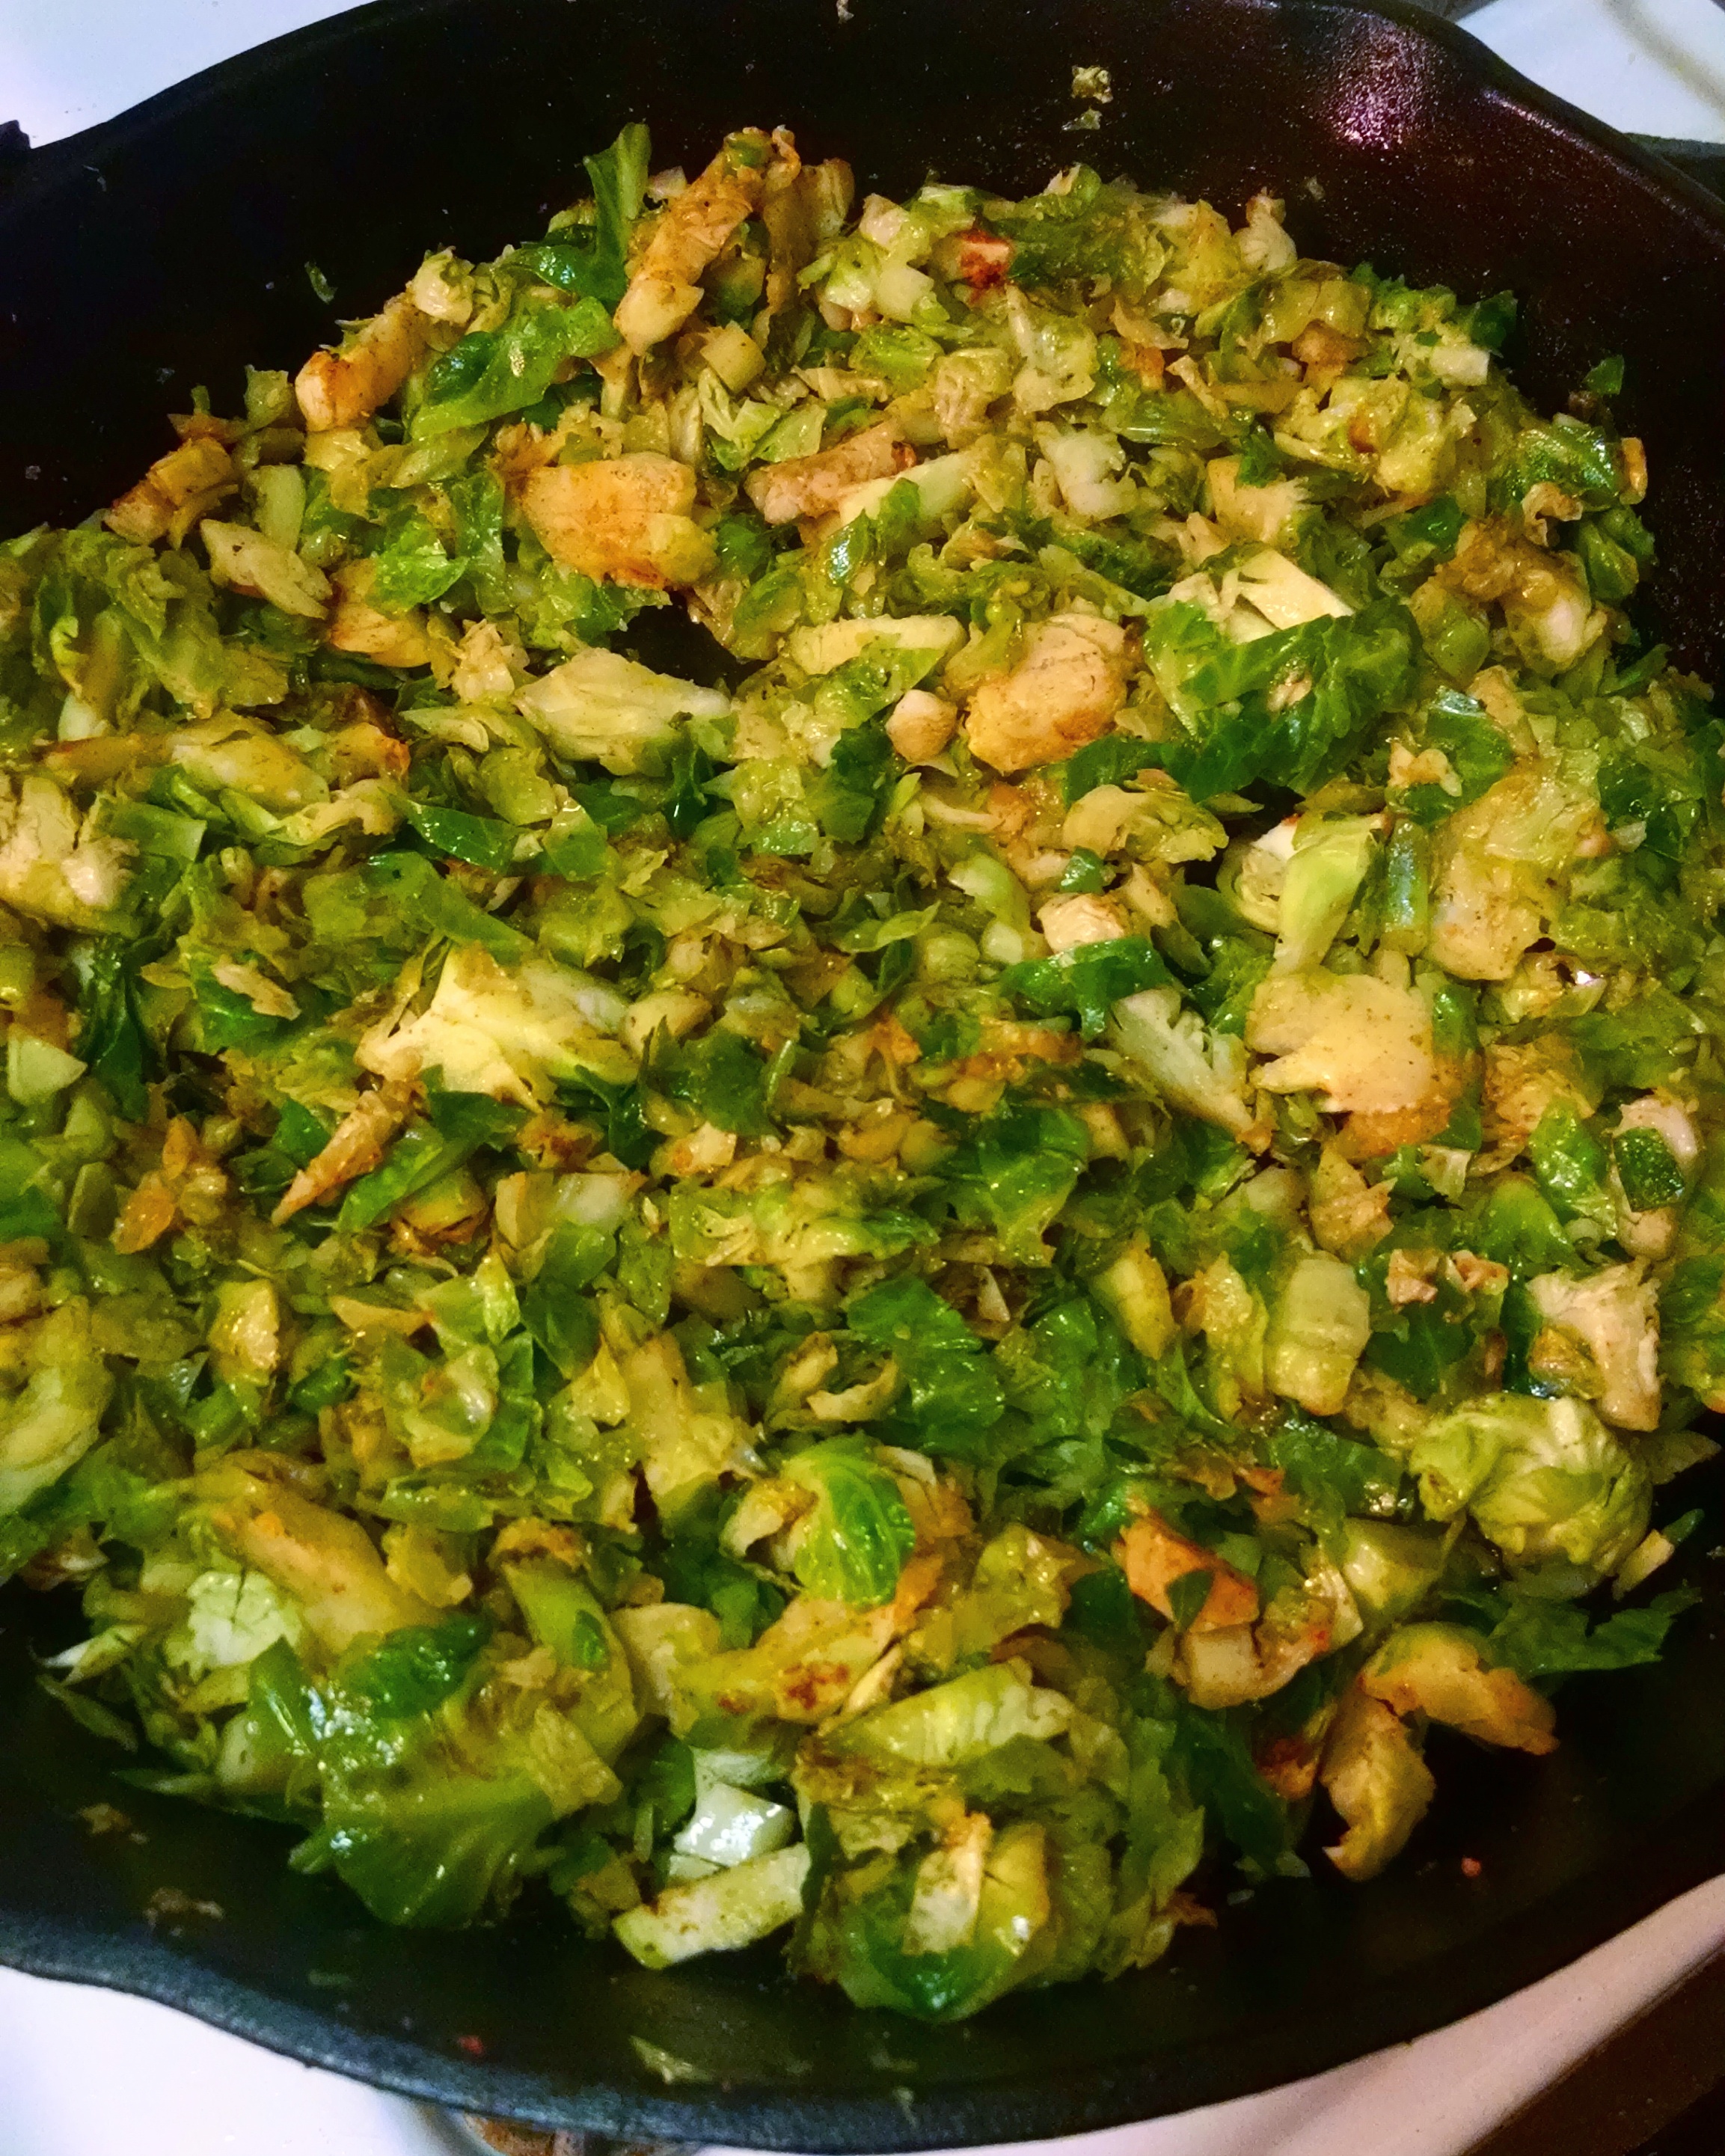
We have a Trader Joes in our neighborhood, but I always forget about it because it isn’t in my usual rotation of grocery stores.  That needs to change because I went there on Friday to find shaved brussels sprouts (another Instagram phenom) and remembered why I love Trader Joes.  They have good food for a decent price.  Plus I found these dark chocolate covered espresso beans for Adam that he has become obsessed with at work.  Brussels sprouts and chocolate.  Yup, good combo.5 Things That Have Found Their Way Into My Kitchen | Life Healthfully Lived

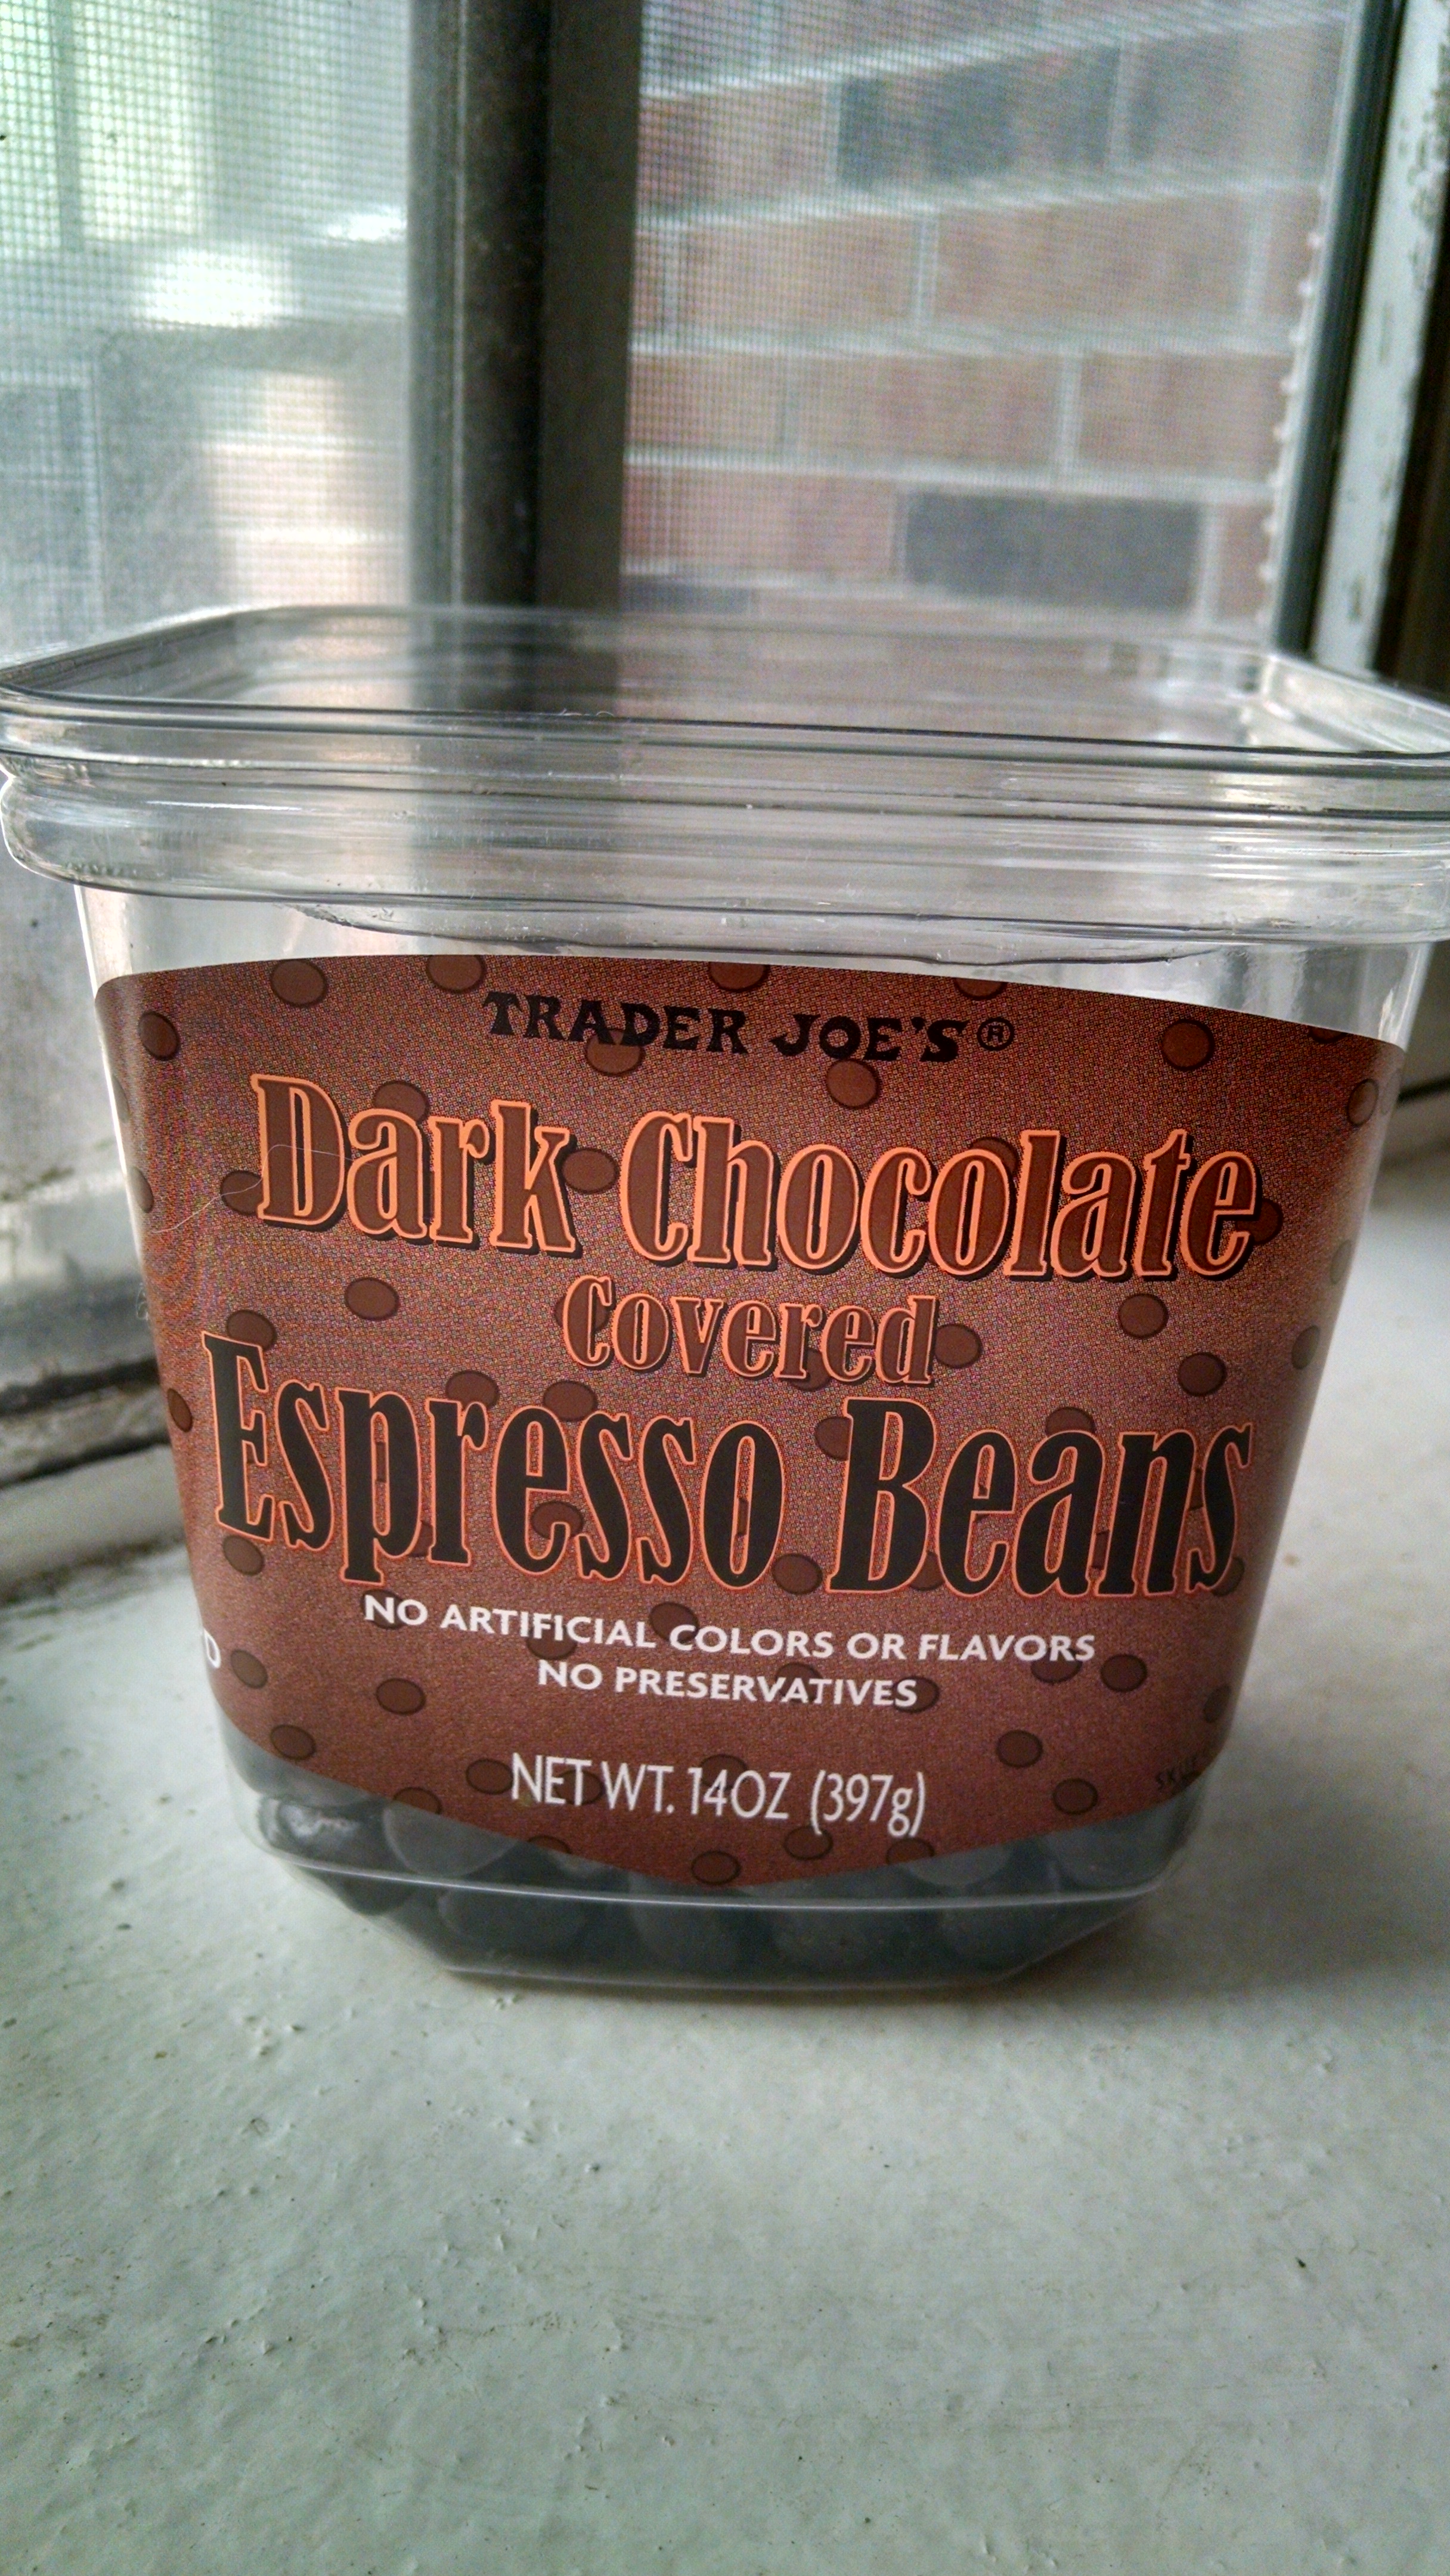
Long story short, don’t be afraid to branch out of your food comfort zone.  It can get so easy to make the same things over and over and over… but even just a little change can add some pizzazz and flavor back into your meals.  Plus there are plenty of healthy options out there to make dinnertime tasty and nutritious.

What are some things that have turned your kitchen game around?

DIY Wednesday: Fruit Roll-Ups

BackDIY Wednesday: Fruit Roll-Ups | Life Healthfully Lived in grade school, having the latest “cool” snack in your lunch was a big deal.  At lunch time, we would eagerly rip open our lunch boxes to see what treasures our moms had packed.  Lunchables were always a hit, fruit gushers, dunkaroos, marshmallow fluff sandwiches, and a can of soda made you a god.  Yes, it was a weird time.

I rarely had any of the packaged snacks that other kids in my class had.  Not only did my mom think they were nutritionally void and classified them as junk food (she was 100% right), but they were also expensive.  Every once in awhile she would put a treat into our lunches and my sister and I got to feel cool for the day.  Again, it was a weird time.

Looking back, I might have felt left out at the time but I think my mom did me a huge favor.  She taught me that food should not only be inexpensive, but it should serve some nutritional purpose.  It was also ok to have the occasional treat.  It’s those food beliefs that are the backbone of my thoughts on food now.DIY Wednesday: Fruit Roll-Ups | Life Healthfully Lived

With those beliefs in mind, I try to find/make snacks that aren’t just glorified junk food.  While I might not be able to recreate fruit gushers or dunkaroos, there are some snacks that can be made with real food.

Remember fruit roll-ups?  The store bought versions have a ton of sugar and dyes added in and rarely have any actual fruit in them.  You can totally make your own fruit roll-ups with less sugar, actual fruit, and cheaper than the ones on the shelves.  There are quite a few recipes/methods out there, but this is the one that I found worked best in my oven.  You might have to experiment with cooking times and temperatures based on your oven.  It takes less than 20 minutes to put everything together and while the cook time is a few hours, it’s all hands off and very simple.

Homemade Fruit Roll-UpsDIY Wednesday: Fruit Roll-Ups | Life Healthfully Lived

  • 1 to 2 cups fruit of your choice, chopped into small pieces (I used peaches)
  • lemon or lime juice (I used the juice from half a lime because that’s what I had)
  • 1-2 tsp cinnamon
  • 1-2 tbsp maple syrup (or honey)
  • water as needed
  1. Put all of your chopped fruit into a medium saucepan and turn heat to medium-low.
  2. As the fruit is cooking add in the lemon or lime juice and cinnamon to taste. Keep cooking until the fruit starts to break down.  If the compote seems dry, add in a little water.  You don’t want a super watery mixture, just enough to keep the fruit from sticking.
  3. After about 15 minutes, remove the fruit from heat.  Add in maple syrup to reach desired sweetness level.  My fruit was really ripe so I only used 1 tbsp.
  4. Now it’s time to puree the fruit.  You can use an immersion blender, food processor, or regular blender.  Whichever you choose, blend until it is completely smooth.  You don’t want any chunks left.
  5. Line a large rimmed baking sheet with parchment paper or a Silpat.  Do NOT use aluminum foil, it will just be a mess.  Pour the fruit puree onto the sheet and spread into a thin layer.  This part will take some time to spread everything out to the right height.  You don’t want it too thick or it won’t cook right and if it’s too thin it won’t hold together.  Take your time and you’ll get it.
  6. Set your oven to the lowest setting, mine is 200, and cook for 3 to 4 hours.  You’ll know it’s ready when it is no longer sticky or wet.  Depending on how low your oven can go, this might take longer or shorter.  Just occasionally check so it doesn’t turn into fruit brittle.
  7. Once the fruit is done, slice it into strips and roll it up with a little bit of parchment paper.  You can keep these in the fridge for up to a week and use them in lunches for a healthy and delicious snack! DIY Wednesday: Fruit Roll-Ups | Life Healthfully Lived

DIY Wednesday: Homemade Mayo + An Egg Free Version

NotDIY Wednesday: Homemade Mayo | Life Healthfully Lived many people know how mayonnaise is made.  You just go to the store and buy a jar of it and go on with your day.  I have never really been a big fan of mayo.  It just had an odd taste to me and I preferred slathering my sandwiches in spicy mustard.  Then one day, I needed mayonnaise for a potato salad I was making.  I didn’t want to go and buy a whole jar just for one recipe so I started looking around to see what if there was anything I could substitute.  That’s when I stumbled on a recipe for homemade mayo.

I was surprised that I could make my own mayonnaise.  This was a few years ago, so I was still learning about how things were made and didn’t know that mayo was just an emulsion of eggs, oil, and seasonings.  I bet that you have all the ingredients right now to make your own mayo.  So I quickly whipped up a batch and to my surprise, I really liked the taste. DIY Wednesday: Homemade Mayo | Life Healthfully Lived

So today’s DIY is all about mayonnaise.  It’s quick and cheap to make your own and you don’t have to worry about additives and preservatives that store brands use to make their product shelf stable.    You can also play with your own seasonings and flavor your mayo with fresh herbs.

Don’t eat eggs?  There is a version here for you too!  Remember that aquafaba I was raving about a few months ago?  Turns out you can make mayonnaise with it too!  I tried it a few days ago and it turned out really well.  Now eggless people can enjoy mayo on their sandwiches and in their recipes too!

Homemade MayoDIY Wednesday: Homemade Mayo | Life Healthfully Lived

  • 1 large egg
  • 2/3  cup neutral tasting oil (I like avocado or safflower oil)
  • 1 tsp lemon juice
  • 1 tsp spicy mustard
  • 1/2 tsp garlic powder
  • 1/2 tsp herbs like dill, basil, oregano, or cilantro (optional)
  • salt and pepper to taste
  1. Place all the ingredients except the herbs into a tall glass.  Use an immersion blender to whip everything together.  Once the mixture starts to get thick, slowly pull up the immersion blender to make sure everything is incorporated.
  2. You could also do this in a blender.  Place everything in the blender except the oil and the herbs.  Start blending everything and slowly add in the oil until the mixture is nice and thick.
  3. Stir in the herbs and store in an airtight container in the fridge for up to 3 days.

Eggless Mayo

This is the recipe that I used to make the eggless may and it worked great.  I used less oil than the recipe calls for.  The biggest key is to SLOWLY add the oil so you don’t end up with an oily, soupy mess.  DIY Wednesday: Homemade Mayo | Life Healthfully Lived

That’s it.  Just a few pantry items and you have delicious homemade mayo.  Make sure that you choose a neutral oil so that you don’t have an odd tasting mayo.  You can use this on sandwiches, in salads, as a marinade, and pretty much anywhere that you would use storebought mayo.  Plus, it’s really cool to see the whole thing magically turn into mayo, kids would definitely love helping with this one.

DIY Wednesday: Simple Salsa

OkDIY Wednesday: Simple Salsa | Life Healthfully Lived , so Monday and Tuesday this week I was wracking my brain trying to think of a DIY post for you guys.  I could not come up with one single thing.  I was starting to worry that I was out of ideas and trying to scramble for something to post today.  I even went as far as to ask Adam for some help.

Luckily, he pulled through like a champ.  Actually his friend, Eric, came through like a champ but Adam was the middle man so we’ll give him a little credit.  I asked Adam and he asked Eric if there was something that he usually bought at the store that he wanted to make at home to save money or make healthier.  He came back with salsa.

Salsa!  So simple yet I had completely overlooked it!  I even thought I already had a recipe up on my blog but quickly found out I didn’t.  So thank you ET for saving the day!DIY Wednesday: Simple Salsa | Life Healthfully Lived

I haven’t bought salsa in a very long time because it is so easy to whip up your own.  Plus my mother in law makes a mean salsa and always makes sure we have a jar or two.  This is the very simple salsa I make whenever we have a Mexican feast, which is like every other weekend.  What can I say?  I like tacos!

This salsa isn’t fancy or have any exotic ingredients, it is something you can make quickly when you are in a pinch for salsa.  It tastes awesome and because it is so simple you can always have some on hand.  If you want to make it fancy you can add extra things like corn or black beans.  You can control how spicy or mild it is as well as the consistency.  Pretty much this salsa can be everything you want and nothing you don’t.  Let’s make some salsa!

Simple Salsa

DIY Wednesday: Simple Salsa | Life Healthfully Lived

  • one 28 oz can of whole peeled tomatoes or 3-4 fresh tomatoes
  • 2/3 cup diced onions
  • 3 cloves garlic
  • 1 to 2 jalapeno peppers, roughly chopped and seeds removed (you can leave the seeds in for a spicier salsa. You can also omit completely)
  • juice and zest of one lime
  • 2 tsp chili powder
  • 1 tsp cumin powder
  • 1 to 2 tsp salt
  • small handful of cilantro (more if you really like cilantro like me)
  1. Roughly chop tomatoes and onion and add everything but the cilantro into a blender.
  2. Blend until you reach your desired consistency.  I like it fairly chopped but blend less for a more chunky salsa.
  3. Taste and adjust any seasonings.  Add in the cilantro and pulse a few times to mix it in.
  4. Serve with homemade tortilla chips and enjoy!DIY Wednesday: Simple Salsa | Life Healthfully Lived

DIY Wednesday: Chocolate Caramel Candy

SometimesChocolate Caramel Candy | Life Healthfully Lived you just need something sweet, preferably covered in chocolate.  There are days that a piece of fruit is just not going to satisfy your sweet tooth.  I used to think that I had to fight that sweet craving because it was a sign of my weakness.  I would ignore it and tell myself that I was making my willpower stronger.  I was really just making myself miserable.

Having a craving for sweet stuff doesn’t mean that you are weak, it means that you are human.  Indulging in a sweet treat every once in a while is totally fine and better for your sanity in the long run.  You just have to do it the right way.  If you find yourself reaching for a candy bar multiple times throughout the day, then maybe you need a little sugar detox. But if you’re looking for a little bite every now and then, this DIY is just for you.

Homemade food is always going to trump store bought because you are in control of the ingredients.  That is especially true for this candy.  It’s only two simple ingredients, but will still satisfy that craving for a little something decadent.  You can even add nuts or seeds for a little crunch and texture.  Make a batch and keep them on hand for whenever you need a little bite of chocolatey caramel-y goodness!

Chocolate Caramel Candy

Chocolate Caramel Candy | Life Healthfully Lived

  • 10 Medjool dates, pitted and sliced in half (you could also use prunes)
  • 1 cup dark chocolate chips (read notes for another substitution)
  • 1 tbsp coconut oil
  • pinch of sea salt
  • peanuts, cashews, hazelnuts, almonds (optional)
  1. Place pitted and sliced dates into a bowl and cover with hot water.  Let dates soak for 10 to 15 minutes until very soft
  2. Drain the dates and place them into a blender with the pinch of salt.  Blend until everything is completely smooth.
  3. Spoon about a teaspoon or so of the date caramel mix into a silicone mold.  You could also put them on a parchment lined cookie tray.  If you’re using nuts, press one into each caramel now.  Freeze for 30 to 45 minutes.
  4. Melt the 1/2 cup of dark chocolate chips and 1 tbsp coconut oil.  You can do this in the microwave in 20-second intervals stirring until all the chips are melted and it’s smooth.  Or you could melt the chips in a double broiler.
  5. Line a cookie sheet with parchment paper.  Remove the frozen date caramel and pop them out of the molds.  Using a fork, dip the caramel into the chocolate and place onto the cookie sheet, working quickly. Place the sheet into the freezer once they’re all covered
  6. Freeze for 15 minutes then enjoy!  Keep the candy in a container in the freezer so they don’t melt.

Chocolate Caramel Candy | Life Healthfully Lived

*Note* You can also use baking chocolate for the coating. Use 100% cacao and melt in a double broiler with 1 tablespoon coconut oil and 1 tablespoon of maple syrup or honey.  Stir constantly until completely smooth.