DIY Wednesday: Mushroom Gravy

IDIY Wednesday: Mushroom Gravy | Life Healthfully Lived have another holiday edition of DIY Wednesday for you today: gravy.  After the ganache last week, I thought we would go savory today.  I know it’s a little late for Thanksgiving, but there are still plenty of meals this season that will warrant gravy.  I wanted to show you how easy it is to make your own gravy because I was just as surprised when I learned.

When I was younger, gravy was bought in a jar.  My mom pretty much made the rest of our Thanksgiving feast from scratch, but the gravy and the jellied cranberries came from a jar and a can.  So in my tiny kid mind, that is how all gravy was made.  In a jar and then heated up on the stove.DIY Wednesday: Mushroom Gravy | Life Healthfully Lived

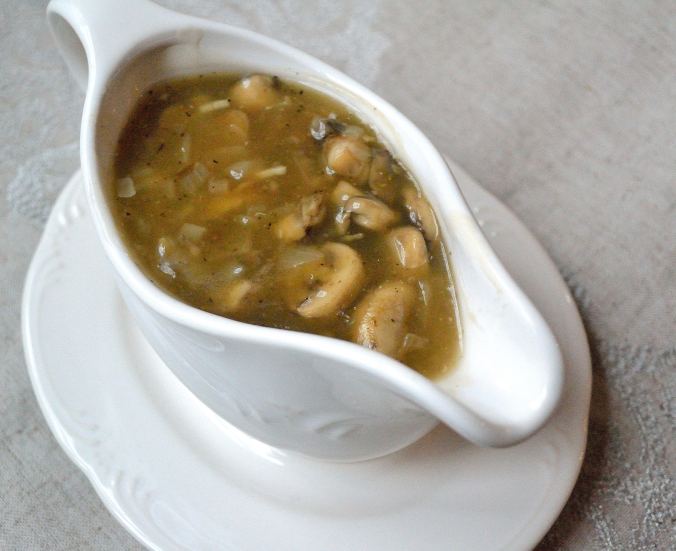
As I got older and started cooking for myself and reading cookbooks, I saw recipes for gravy.  What?! You can make this from scratch?!  Yes.  Yes, you can.  And it is really easy.

I’m making a mushroom gravy for those of us who don’t eat meat, but you can make gravy from pretty much any cooked meat you have following this recipe.  Whichever you choose, it’s really simple and so much healthier to make your own gravy.  It’s also cheaper which is a must during the holiday season!

Mushroom GravyDIY Wednesday: Mushroom Gravy | Life Healthfully Lived

  • 8 oz mushrooms (I used baby bellas), sliced
  • 2 large cloves of garlic, minced
  • Olive oil
  • 1/3 cup onion, minced finely
  • 1 to 2 tbsp coconut aminos, liquid aminos, or soy sauce
  • 1/2 cup vegetable broth
  • 2 tbsp white wine vinegar
  • 1 tbsp potato starch or tapioca starch (I used potato)
  • 1 1/2 cup cool water
  • 1 tsp parsley
  • 3 tsp fresh rosemary leaves
  • salt and pepper.


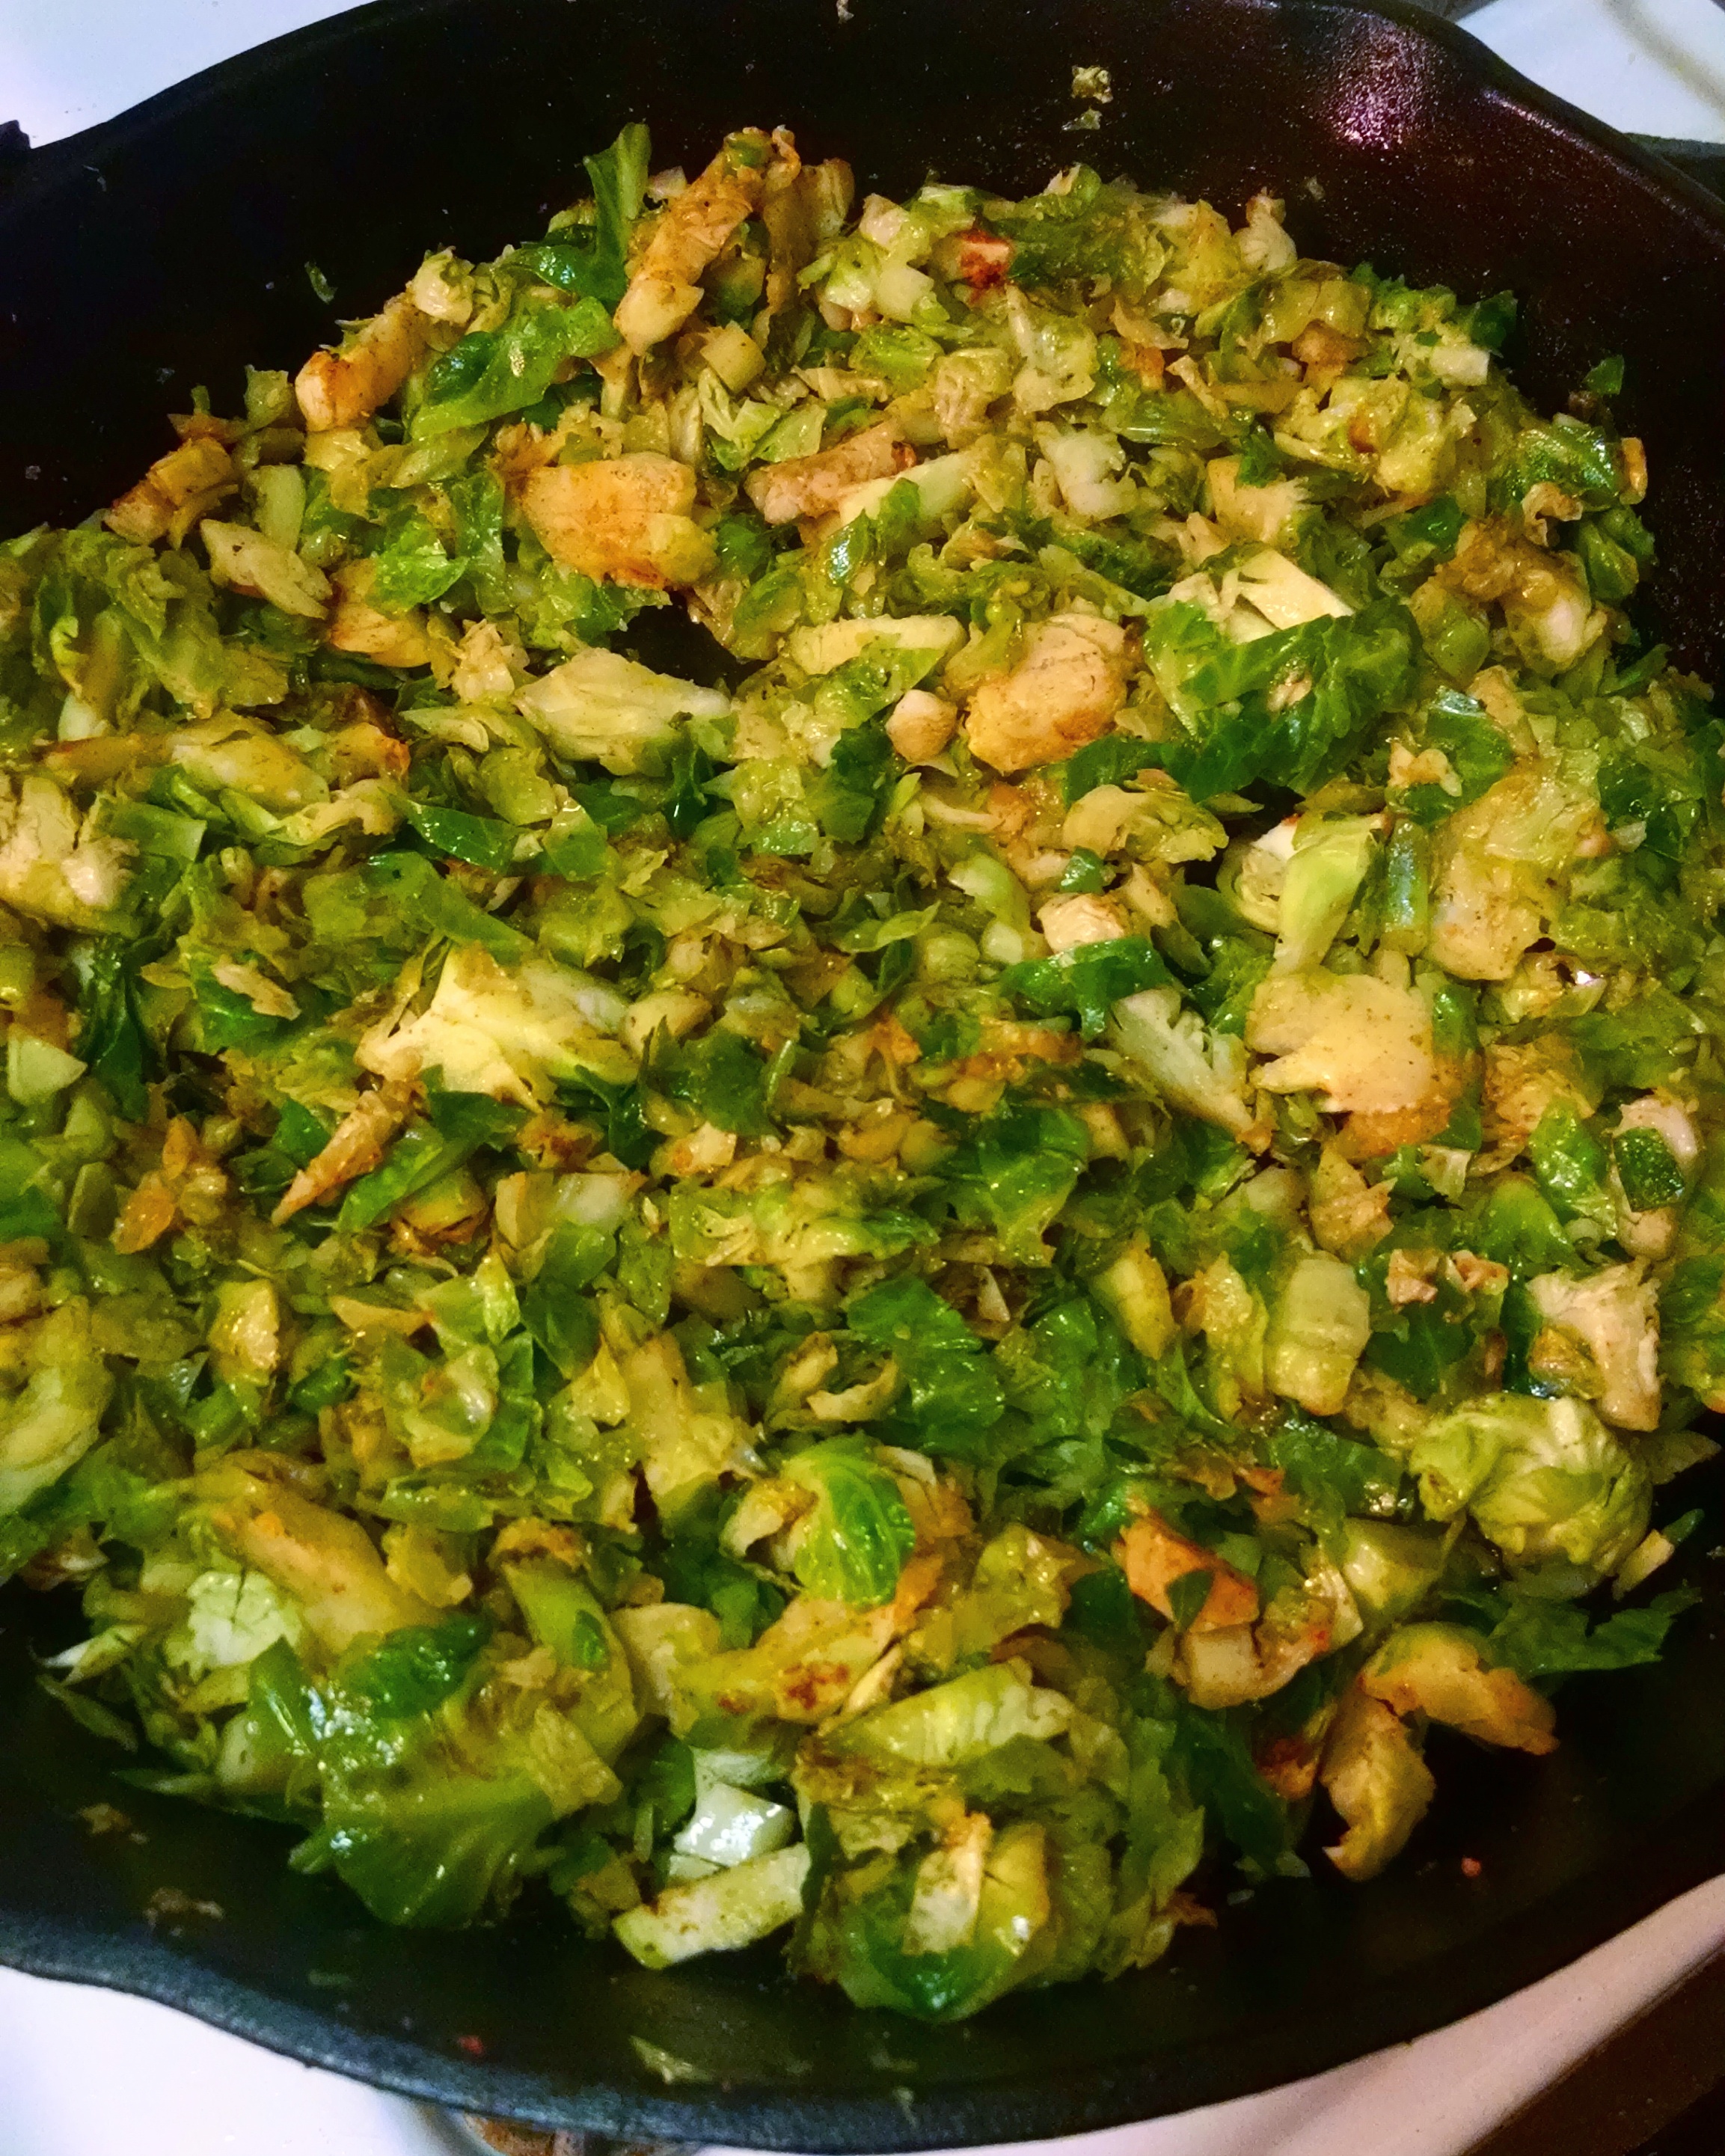
  1. Heat a little olive oil in a medium skillet over medium-high heat.  Add the onions and mushrooms and saute for about 5 minutes until the onions are soft. Sprinkle in a little salt and pepper then add the garlic and saute for another minute.
  2. Add the coconut aminos or soy sauce, white wine vinegar, and the vegetable broth.  Cook until the liquid has reduced by about half and the mushrooms have gotten smaller.
  3. While the mushrooms are cooking make the starch slurry.  Combine the 1 and 1/2 cups water and 1 tablespoon of starch and mix together with a fork.  Make sure the mixture is smooth and all lumps are gone.
  4. Pour the slurry into the skillet and stir to mix everything together.  The slurry will start to thicken as it cooks.  Add the parsley and rosemary.  Taste and add salt and pepper to your taste.
  5. Once the gravy is thick enough, pour into a gravy boat or bowl and use immediately.

Gravy needs to be used right after it’s made, because unlike its store bought counterpart it doesn’t last forever.  It’s much better fresh and since it’s so easy to make you can whip it up right at the end of your cooking.DIY Wednesday: Mushroom Gravy | Life Healthfully Lived

What is your favorite holiday dish to make from scratch?

DIY Wednesday: Dairy-Free Ranch Dressing

IDSC_3095 have lived in Illinois my entire life, so I am a Midwest girl through and through.  I think a big stretch of farmland is beautiful, I can drive in most snowy conditions, and I know malls are the best way to shop for everything.  The other thing that my Midwestern upbringing has taught me?

Ranch dressing belongs on everything.

Raw vegetables?  Instantly better doused in ranch.  That boring old salad? Drench it in the white stuff.  Chicken fingers and nuggets were made for dunking into the nectar of the Midwest gods.  I’ve even dipped french fries, meatloaf, and sausage into ranch.  Don’t judge until you try it.

DSC_3089

Unfortunately, the combination of ranch dressing on all the food and frying everything possible has made the people of this part of the country just a little less healthy.  When I changed the way I ate, I begrudgingly quit my ranch habit.  After a short (read: longer than I thought) adjustment period, I actually started to enjoy the flavor of my food without the aid of ranch dressing.

But there was still that fat Midwestern kid inside that wanted to swim in a vat of ranch.  I decided to fix it.

I made this dressing with full-fat coconut milk and my DIY ranch seasoning and was shocked with how much it tasted like traditional ranch.  It was a little runny at first, but after a few hours in the fridge it thickened up nicely.  I tend to like a more watery ranch, so I let it sit out a few minutes before I use it.

The fact that it’s so easy to make this dressing and the fact that I love it on everything have made it a weekly staple.  Try it on roasted sweet potatoes or mixed into mashed potatoes.  It is amazing with carrots and celery sticks and is wonderful whisked into a frittata.  I even made a topping with mashed potatoes and this ranch and spread it on top of my lentil loaf.

So if you have been missing ranch dressing in your healthier lifestyle, try this dairy-free version.  I promise you won’t be disappointed!

Dairy-Free Ranch Dressing

DSC_3116

  • 1 cup full-fat coconut milk, unsweetened
  • 2-3 tsp ranch dressing seasoning, add more or less to your taste
  • 1/2 tsp celery salt (sea salt will also work)
  • 1 tsp roasted garlic (you could also use garlic powder)
  1. Put all the ingredients into a blender and blend for a few minutes until everything is combined.
  2. Pour into an airtight container (like a mason jar) and put in the fridge to thicken.  Keep it stored in the fridge for up to a week.

That’s it. Easy Peasy, time to put ranch on all the things and not feel like the fat Midwestern kid you might just be at heart! DSC_3120

Have a great day everyone!

DIY Wednesday: Herbed Macadamia Butter

HaveDIY Wednesday: Herbed Macadamia Butter | Life Healthfully Lived you ever seen a log of herbed butter?  All cut into pretty round slices and full of delicious herbs like parsley, chives, basil, and oregano?

This is not like that.

Well, it’s sort of like it but not quite.  I had the idea to try and come up with an alternative to those fancy herbed butters that are so delicious.  I haven’t had dairy in years, and I wanted to see if I could make a dairy-free version.

Sure, there are tons of vegan specialty butters that you can buy.  But many times those butters are full of processed ingredients that aren’t any better for me than regular butter.

So I decided to go the route of making a savory nut butter.  First I had to decide which type of nut to use.  Almonds and peanut butter have their own distinct taste and I wanted to use something a bit milder so that you could really taste the herbs.

Cashews are pretty mild, but they can be a little grainy in texture unless you have a high-powered blender.  I settled on macadamia nuts.  They are mild and have a slightly buttery taste to them and come out nice and smooth when blended into butter.DIY Wednesday: Herbed Macadamia Butter | Life Healthfully Lived

I was surprised how quickly this came together and I was pleased with the taste and the spreadability.  The only thing that I couldn’t really change was the color.  Yeah, it’s kind of an icky brown, but sometimes the ugliest concoctions taste the best.  Just trust me on this one.

A few notes about the recipe.  You don’t have to roast the nuts, but it adds a nice depth of flavor to the savory butter.  Raw nuts will give you a lighter, more appealing color.  Don’t worry about the coconut oil giving this butter a coconut-y flavor, it’s just to help the butter set in the fridge and spread nicely on things like bread.

Herbed Macadamia ButterDIY Wednesday: Herbed Macadamia Butter | Life Healthfully Lived

  • 2 cups raw macadamia nuts
  • 2 tsp roasted garlic
  • 2 tsp coconut oil, melted
  • 1 tsp salt
  • 1 tsp dried oregano
  • 1 tsp dried basil
  • 1 tsp dried thyme
  1. Preheat oven to 350 and spread the macadamia nuts on a large baking sheet in an even layer.
  2. Roast the nuts for 10 minutes and then transfer to a blender or food processor immediately.
  3. Blend the nuts, scraping down the sides as needed, until you have a smooth and drippy butter.  It should be almost liquid like.
  4. Add in the teaspoons of coconut oil and the 1 tsp of salt and blend until combined.
  5. Add in the garlic and the rest of the seasonings and blend until completely combined.  Taste and adjust any seasonings as needed.

This will obviously not act the same way as real butter, as in it won’t melt.  But it does add a nice salty, herby, and fatty quality to whatever you use it on.  And really, who doesn’t like things that are salty, herby, and fatty?DIY Wednesday: Herbed Macadamia Butter | Life Healthfully Lived

Keep this in an airtight container in your fridge and let it warm up a few minutes before you use it so it spreads easily.  And there you have it!  Your own savory spread that you didn’t have to pay top dollar for! Enjoy!

DIY Wednesday: Basil Salad Dressing

FriendsDIY Wednesday: Basil Salad Dressing | Life Healthfully Lived, I’m ready to admit something.

I’m kind of having a love affair with basil.   I know, I know.  It’s just a summer fling, but I can’t get enough of the stuff.  It smells so good, looks so pretty, and tastes phenomenal.  Even better, it makes any food I put in my mouth taste phenomenal.

I got into the fresh basil game a little late this summer because for most of the summer we were gone every weekend and I couldn’t get to the farmer’s market and I was not going to pay over $3 for the tiny little packages at the store.  But this past month we have made it to the market and one stand there sells fresh herbs of all kind and I can get a whole bunch of basil for $2.  Naturally I load up on it and come home and make all the basil things.

Besides the obvious pesto (which I have like 3 jars of right now) I have been making basil and lemon oil, and this dressing.  I have swooned about this dressing a few times over on Instagram so  I thought that I would share it with you guys.DIY Wednesday: Basil Salad Dressing | Life Healthfully Lived

I’ve talked about making your own salad dressing before and I think it’s the best money and health saving switch you can make.  Making your own salad dressing is SO simple and you get to control the ingredients.  Store bought dressing is full of preservatives and you’re paying a lot of money to ingest those things.

So why not make your own?  This literally comes together in the touch of a blender button and BAM, you have a delicious, basil-filled dressing ready to go on salad, over vegetables, or straight into your mouth with a straw.  Which I’ve never done…

Basil Salad DressingDIY Wednesday: Basil Salad Dressing | Life Healthfully Lived

  • 1 cup loosely packed, whole basil leaves
  • 2 tsp roasted garlic or 2 cloves fresh garlic
  • 2 tbsp tahini
  • 1/3 cup full-fat coconut milk (you could also use almond milk)
  • juice of half a lime
  • 1/4 tsp salt
  • 1/4 tsp black pepper
  1. Ready for this?  Put everything into a blender and blend until smooth.  Taste and adjust seasoning.  Store it in an airtight container in the fridge for up to a week…. if it lasts that long.

I love one step recipes almost as much as I love basil.  See how easy it is to make dressing?  You can even switch up the herbs you do and use parsley, dill, or cilantro.  Whatever your little heart desires! DIY Wednesday: Basil Salad Dressing | Life Healthfully Lived

5 Things That Have Found Their Way Into My Kitchen

It might come as a shock to you, but sometimes I get stuck in food ruts.  I usually make the same thing for dinner during the week so that I can keep Adam and I on track with healthy meals and I can keep our food costs down.  But the other reason is that I can get lazy.  Sometimes the idea of coming up with something new and delicious just makes me tired.  So it’s easy to rely on the same old favorites in the kitchen and not venture into new territory.

While there is nothing wrong with preparing the same food that you know you like and you know is healthy and works for your body, it does get a little boring after awhile.  Boredom, as least for me, only leads to bad things in the area of food.  Soon I start eating more and more to feel satisfied because the meals I’m eating are the same old same old.  When that happens I know it’s time to switch things up and throw some new tricks into my old routine.

Here are some things that I have added to my kitchen and pantry in hopes of shaking things up and keeping my meals healthy and fun!

P.A.N- Pre-cooked White Corn Meal5 Things That Have Found Their Way Into My Kitchen | Life Healthfully Lived

If you follow me on Instagram (which you should, I’m fun), then you have heard me rave about this.  Actually you have heard me rave about arepas which are made from pre-cooked corn meal.  I have seen arepas on other bloggers feeds and seen them on shows like Diners, Drive-ins, and Dives.  Every time I see them being made, I’m like, “Those look amazing, I need to try them myself.”  So I finally got this flour to make my own arepas.  Yes, you have to use pre-cooked corn meal not regular corn meal.  This was the brand that was recommended everywhere I looked, and I found it on Amazon for like $2.  Expect an arepa recipe soon because not only is it delicious, it is way easier to make than you would think.

Figs

5 Things That Have Found Their Way Into My Kitchen | Life Healthfully Lived

This is another thing that I constantly see on social media and yet I have never tried them.  Well, I have never tried fresh figs.  I have had dried figs and fig newtons if you can count those as actual figs.  But the fresh version was never on my radar. They have a very short season and I just happened to see them on sale at my Jewel so I picked some up on a whim.  They are really good!  I think I might have to try making some fig jam with them so I can enjoy them just a little bit longer.

Canned Coconut Milk5 Things That Have Found Their Way Into My Kitchen | Life Healthfully Lived

Ok, this isn’t a new one for me, but I had forgotten about it for awhile.  I used to get a couple of cans of coconut milk a week and use them in soups and stews and oatmeal and baked goods.  It’s really nice and creamy, so it works great as a substitute for things like heavy cream or whole milk.  My favorite thing to do with it lately is make creamy herb dressings/sauces, which I used on my pasta salad recipe last week and which leads me to the next thing….

Fresh Herbs5 Things That Have Found Their Way Into My Kitchen | Life Healthfully Lived

Another one that isn’t new, but that I had put on the back burner.  I usually pick up a bunch of cilantro each week, but one stand at my farmer’s market sells every fresh herb known to man.  I have started getting fresh basil, dill, parsley, cilantro, and lemon grass and using them in all the things.  Seriously, go get some fresh herbs and put them in your meals.  They enhance the flavor and bring a wonderful freshness to boring old dishes.  Throw some basil into a frittata or blend in some parsley with meat/lentil loaf.  It will up your dinner game and everyone will think you’re a culinary whiz.  You can also freeze, turn them into oil, or sauces to have them on hand for the winter months.

Trader Joes5 Things That Have Found Their Way Into My Kitchen | Life Healthfully Lived

We have a Trader Joes in our neighborhood, but I always forget about it because it isn’t in my usual rotation of grocery stores.  That needs to change because I went there on Friday to find shaved brussels sprouts (another Instagram phenom) and remembered why I love Trader Joes.  They have good food for a decent price.  Plus I found these dark chocolate covered espresso beans for Adam that he has become obsessed with at work.  Brussels sprouts and chocolate.  Yup, good combo.5 Things That Have Found Their Way Into My Kitchen | Life Healthfully Lived

Long story short, don’t be afraid to branch out of your food comfort zone.  It can get so easy to make the same things over and over and over… but even just a little change can add some pizzazz and flavor back into your meals.  Plus there are plenty of healthy options out there to make dinnertime tasty and nutritious.

What are some things that have turned your kitchen game around?