DIY Wednesday: Cauliflower Stem Cream Sauce

Ok, so if you read my post on Monday then you know that last week I was fighting off a stomach bug/virus.  It really knocked me on my butt and I’m still trying to get back to completely normal.  Because I couldn’t eat anything more than baby carrots and brown rice cakes (totally weird combo I know, but it’s the only thing that didn’t make me want to run to the bathroom) I ended up with a lot of vegetables that were just about to go bad.

Instead of throw them away, because I hate wasting food, I decided to come up with new interesting ways to use them.  One of my biggest missions is to reduce the amount of food waste we create each year.  There are so many things that we can do with food rather than throw it away but sometimes you have to get creative.  If you want a few other ways to cut down on food waste, you can check out this postDIY Wednesday: Cauliflower Steam Cream Sauce | Life Healthfully Lived

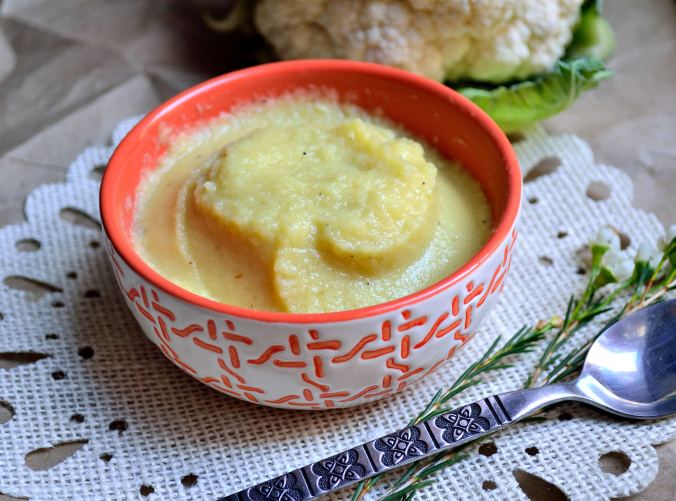
So today we have a recipe that uses a part of the vegetable that most of us throw away, cauliflower stems.  Yup, you can eat the stem but because gnawing on a big old stem doesn’t sound too appealing, we’re going to make a creamy sauce that can go on pasta, vegetables, meat, or even used as dressing.  The best part is it only requires a few ingredients and minimal effort.

Stop throwing away food that you think you can’t eat because I bet you can use it in a unique and delicious way!

Cauliflower Stem Cream SauceDIY Wednesday: Cauliflower Steam Cream Sauce | Life Healthfully Lived

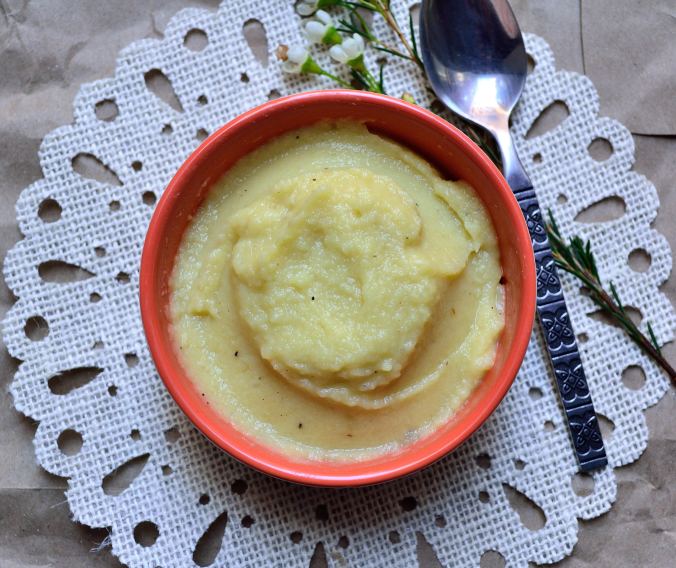
  • 1 1/2 cauliflower stems, cut into chunks
  • 1 tsp roasted garlic (or 1/2 tsp garlic powder)
  • 1 tsp dried parsley
  • 1/2 tsp salt
  • 1/4 tsp black pepper
  • 1 to 2 tbsp nutritional yeast (or 1/4 cup parmesan cheese if you do dairy)
  • 1/2 to 1 cup reserved steaming water
  1. Save the large main cauliflower stem from your bunch along with any other trimmed pieces you aren’t using with the cauliflower florets.  Trim off the green leaves and the tough woody bottom of the large stem and then cut everything into bites size chunks.
  2. Fill a medium pot with about 2 cups water and set up a steamer basket if you have one.  If not, you can just boil the cauliflower right in the pot.  Steam the cauliflower until very soft and easily pierced with a fork.
  3. Transfer the cauliflower to a blender or food processor and save the steaming water.  Add the rest of the ingredients to the blender and blend until you have a thick paste.  Add the reserved water a few tablespoons at a time until you reach the consistency you would like.  Thinner for things like dressing and pasta sauce, a little thicker for meat and vegetables. DIY Wednesday: Cauliflower Steam Cream Sauce | Life Healthfully Lived

Slow Cooker Cauliflower Pesto Mac N’ Cheese

I’m having a bit of a thing with cauliflower right now.  I buy at least three big heads of it per week and have been experimenting putting it into different dishes.  I pretty much look at any recipe and wonder, “Could I do this with cauliflower instead?”  Sometimes it works and sometimes it doesn’t, but that’s kind of how life goes right?

Look, life lessons while making yummy food.  Can’t get any better than that.Slow Cooker Cauliflower Pesto Mac N' Cheese | Life Healthfully Lived

Last week I had delicious taquitos (which you should definitely make immediately… after today’s recipe) that had a cauliflower filling and this week I’m doing a little bit of a twist on macaroni and cheese.  Spoiler alert: there is no macaroni.  Or cheese.  There is, however, cauliflower, a delicious cheese-esque sauce, and a slow cooker.

Now, before you Mac N’ Cheese purists come at me with pitchforks and torches this recipe isn’t meant to taste exactly like Mc N’ Cheese it just uses a similar process.  And if we’re on the subject of tasting like Mac N’ Cheese, apparently Kraft rolled out it’s new less artificial Mac N’ Cheese and told NO ONE and there were literally no complaints about it.  So if we want to get technical, no one really knows what Mac N’ Cheese tastes like so who’s to say my version isn’t right?

Ok, that took a weird little turn but back to this recipe.  I love the pesto-cheesy sauce on this and I like that I made it in my slow-cooker so there was minimal effort.  You could easily prepare the sauce stuff before hand and then throw everything together in the slow cooker when it’s time to make dinner.  It all tastes rich, creamy, and decadent yet you’re still getting a lot of nutrients and a big dose of vegetables.  Talk about a win!

Cauliflower Pesto Mac N’ CheeseSlow Cooker Cauliflower Pesto Mac N' Cheese | Life Healthfully Lived

  • 1 large head of cauliflower, about 5 to 6 cups, cut into florets
  • 1 batch of No Mozzarella Mozzarella
  • 1 batch of Spinach Pesto
  • 3/4 cup of full-fat coconut milk or any other non-dairy milk you like
  • 1/2 tsp salt
  • 1/4 tsp pepper
  • 1/2 to 1 tsp smoked paprika
  1. Cut up your cauliflower and set aside.  Make the No Mozzarella Mozzarella and the Spinach Pesto.  You can do this the night before if you want or right before.
  2. Lightly oil your slow cooker with a little olive oil and place cauliflower florets into your slow cooker.  Sprinkle with the salt and pepper.
  3. Meanwhile, in a large saucepan over medium-low heat, whisk together the mozzarella and pesto.  It will be really thick but don’t worry.
  4. Add the coconut milk slowly and keep whisking until you have a smooth and pourable sauce.  You might not use all the milk and you might need a little more just adjust until you have the right consistency.
  5. Pour the pesto sauce over the cauliflower, making sure to coat everything.  Sprinkle the top with smoked paprika, cover, and cook on high for 3 hours or a little longer if you want super soft cauliflower.

Serve up and enjoy the goodness!Slow Cooker Cauliflower Pesto Mac N' Cheese | Life Healthfully Lived

Buffalo Cauliflower Taquitos

Buffalo Cauliflower Taquitos | Life Healthfully LivedFun fact:  I’ve never had taquitos.  Ok, that isn’t really a fun fact but it is a fact.  I’ve never had fresh taquitos, I’ve never had them from the frozen food section, and I’ve never thought, “Man, I could really go for a nice taquito right now.”  Then as I was roaming around the internet I saw a few recipes for taquitos and they looked really good and simple to make.

And they are good and simple to make.  Really good.  Like so good I seriously thought about eating leftover taquitos for breakfast the next day.  And if the taquitos were delicious, the dip I used was heaven.  I could have stuck a straw in it and had that alone.  Not even exaggerating.Buffalo Cauliflower Taquitos | Life Healthfully Lived

You busy people out there are going to like these too because you can make a big batch and then freeze them.  Now you have a quick dinner ready to go on a busy night.  Just take them out of the freezer and heat them up in the oven.  Boom! Healthy dinner.

If you have time, you can make the filling beforehand and then when you’re ready to make the taquitos all you have to do is fill, roll, and bake.  That sounds like a new dance craze that all the younguns will be into next week.  Just remember, I started it here first.

Buffalo Cauliflower TaquitosBuffalo Cauliflower Taquitos | Life Healthfully Lived

  • 1 large head of cauliflower
  • 1/4 cup of my buffalo sauce or your favorite brand
  • 1 cup butternut squash puree, you can also use sweet potato or canned pumpkin
  • 1 package of small tortillas, I used corn but you can use flour shells or a paleo version
  • 1 batch of my dairy-free ranch with a few changes, recipe below
  • optional: guacamole, salsa, regular ranch or bleu cheese dressing
  1. Preheat the oven to 325. Remove the leaves from the cauliflower and cut into florets removing as much of the stem from each floret as possible.
  2. Place the cut cauliflower into a food processor or blender and pulse a few times until the cauliflower looks like rice.  Scoop it out and place it into a bowl
  3. Add the butternut squash to the cauliflower rice and stir so everything is coated.  Heat a little (like about 1 tsp) olive oil in a large skillet over medium-high heat.
  4. Put the cauliflower into the skillet and saute for about 10 minutes.  Add the 1/4 cup of buffalo sauce and stir to combine everything.  You can add a little more buffalo sauce if the cauliflower doesn’t look like it’s coated enough.
  5. Cook this for another five minutes and then turn the heat to low and cover the skillet.  Let this sit for 5 minutes and then move to a large bowl.
  6. Put a little skillet (about the size of your tortilla shells) over low heat.  Don’t add any oil, you’re just using this to heat up the tortilla shells so the roll easily.
  7. Heat the shells about 15 to 20 seconds on each side then add a large spoonful of filling and roll the tortilla up.  Place it seam side down on a large baking sheet. Do this until you’ve used up all the filling.
  8. Bake for 20 minutes, checking towards the end to make sure the tortilla edges aren’t burning.  Remove from the oven and let cool then serve with fancy ranch (that’s what I’m calling it), salsa, and guacamole!

Fancy RanchBuffalo Cauliflower Taquitos | Life Healthfully Lived

  • 1/2 cup full-fat coconut milk
  • 1/4 cup cashews, soaked overnight or in boiling water for 15 minutes
  • 1 tbsp apple cider vinegar
  • 1 tsp roasted garlic
  • 2 tsp ranch seasoning
  • 2 tsp smoked paprika
  • 1 tsp cumin
  1. Blend everything together and taste to see if you need to add salt or pepper.  This will thicken up even more in the fridge so don’t worry if it’s a little soupy.Buffalo Cauliflower Taquitos | Life Healthfully Lived

DIY Wednesday: Paleo Porridge

DIY Wednesday: Paleo Porridge | Life Healthfully Lived
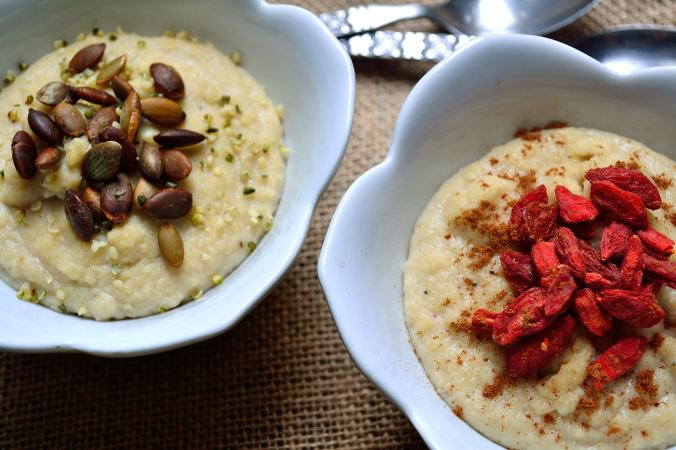
Doesn’t the word porridge always conjure up old-timey meals like in Oliver Twist?  Or at the very least make you think of Goldilocks and the only three bears on the planet that prefer a hot breakfast over raw carcass?

Just me?  Cool.

Porridge is actually any type of oatmeal, grain, or cereal that is cooked with boiling water or milk.  Most people go for oatmeal because it’s the most readily available but you can make porridge out of a lot of different things.  But for the most part it’s usually made out of some kind of grain and if you happen to be following the paleo diet, grains are a no-go.  So does that mean you can never enjoy a warm bowl of porridge on a cold winter morning again?DIY Wednesday: Paleo Porridge | Life Healthfully Lived

Of course not!  Not when you’ve got me around.

Not only can you make porridge out of cereals or grains, you can also make it out of meals (as in ground up stuff) and that includes nut meals.  Finely ground nuts make a great base for porridge and it is entirely paleo-approved!  I decided to go with almond meal because it can be made savory or sweet and it’s what I had on hand.  Also, almond meal is fairly easy to find so you won’t have to hunt through a specialty store to make your own paleo porridge.

I have a recipe for a sweet porridge and a savory porridge, both are essentially same, but the seasonings and liquid choices are a bit different.  If you’ve been missing your morning bowl of warm, cozy porridge try this easy grain-free version!

Paleo Porridge- Makes two servings

Sweet PorridgeDIY Wednesday: Paleo Porridge | Life Healthfully Lived

  • 2/3 + 2 tbsp almond meal (go for meal instead of flour because you don’t want it too finely ground)
  • 1 cup almond milk or any other non-dairy milk you prefer
  • 1 tbsp honey, maple syrup, or coconut nectar
  • 1 tsp cinnamon
  • 1/4 tsp sea salt

Savory PorridgeDIY Wednesday: Paleo Porridge | Life Healthfully Lived

  • 2/3 + 2 tbsp almond meal
  • 1 cup vegetable broth or water
  • 1/4 tsp freshly ground black pepper
  • salt to taste
  1. No matter what version you make, the directions are going to be the same.  In a medium saucepan, bring the liquid to a boil.
  2. Whisk in the almond meal and turn the heat to low.  Keep whisking as the almond meal thickens.  This will take about 5 to 8 minutes.
  3. Add in the sweetener (if making the sweet version) and seasonings as you keep whisking.  Once you’re porridge has reached your desired thickness, pour into a bowl and finish it with your favorite toppings.

If you’re porridge is too thin add more almond meal, one tablespoon at a time.  If it’s too thick add more liquid, one tablespoon at a time. As for topping ideas?  How about:

  • any kind of berry
  • raisins
  • bananas or any fruit
  • cacao nibs
  • pumpkin seeds
  • hemp seeds
  • flax or chia seeds
  • chopped nuts
  • nut or seed butter
  • herbs like parsley or cilantro
  • salsa
  • roasted squash
  • poached egg
  • mushrooms
  • heck, you could even add cooked meat or fish to your savory bowl!DIY Wednesday: Paleo Porridge | Life Healthfully Lived

There you have it!  Porridge two ways for all you grain-free people out there!

Mini BBQ Pizza’s


Mini BBQ Pizza's | Life Healthfully LivedI’m going to tell you a story about pancakes.  Don’t worry it will make sense in the end.

Hopefully.

I can remember one of the first times that I helped my mom make pancakes.  I was very excited because the whole process looked so magical.  We got our mix together, whisked the crap out of it because it was fun, and then started heating up the skillet.  I poured in the right amount and waited until the all-important flip.  After the instructed three minutes, I put the spatula under the pancake and….

Totally destroyed the first pancake.  It stuck to the pan, wasn’t entirely cooked on the bottom, and was just a big mass of half-cooked batter.  I was devastated.  My hopes of being a pancake wizard were dashed.  I started to get a little teary but my mom stepped in and gave some mom advice.Mini BBQ Pizza's | Life Healthfully Lived

“Don’t worry, the first pancake is always like that.  It’s the test pancake.  It lets you test the pan to see if it’s hot enough.  The rest of your pancakes will be better because that first one was messed up.”

And she was right.  The rest of my pancakes turned out just fine.  Now, before you go thinking this was a beautiful teaching moment between mom and daughter, my mom went on to tell me, “Yeah, you’re just like the test pancake.  You were our first baby and we had no clue what we were doing.  We tested everything out on you so when your sister came along we knew what to do.”

I love my mom.

It was all in good fun and it actually was some good advice when it comes to testing out new recipes or new things.  Just because it doesn’t work the very first time doesn’t mean that everything is a total failure.  So what does that have to do with pizza?  I had a bit of trouble making the crust for these tasty treats and my first one (ok, my first like five) turned out like this:

Mini BBQ Pizza's | Life Healthfully Lived

Sad but brave and valiant test pizza crust paving the way for perfection

But I kept at it and was rewarded with this recipe!  I chose to make it with my BBQ sauce and Not Mozzarella, Mozzarella, but you can customize the toppings with what you had on hand!

Thanks mom for teaching me about test pancakes and test babies because without them I couldn’t give the world Mini Pizza’s and that would be a travesty.  Also, you’re welcome for having like the world’s best test baby 😉

Mini BBQ Pizza’sMini BBQ Pizza's | Life Healthfully Lived


  1. Preheat oven to 350 and make sure you have your sauce, cheese, and toppings ready.  Line a large baking sheet or two with a Silpat or parchment paper and set aside.
  2. Place all of the dry ingredients into a large bowl and whisk together.  Pour this into a blender and add the water.  Blend until you have a batter.  It should be more on the thinner side.
  3. Heat up a small skillet with a little olive oil, I used my tiny cast iron skillet, and pour about 1/4 cup batter into the skillet.  Let it cook for a few minutes and then flip it over and cook for another minute before putting it on the prepared baking sheet.  Don’t worry if your first one isn’t perfect 🙂
  4. Keep doing this until all the batter is used up.  Place the baking sheets in the oven and cook for 5 minutes.  Remove and crank the heat up to 400.  While the oven is getting hotter, put the sauce, cheese, and toppings on each pizza.  Pop them back into the oven for another 10 minutes or until the cheese starts to brown.
  5. Remove and let them cool a few minutes before totally devouring!Mini BBQ Pizza's | Life Healthfully Lived


What are your favorite pizza toppings?