DIY Wednesday: Pizza Kale Chips

Ok, before you go running from this post because kale was mentioned, calm yourself.  Yes, kale is a leafy green vegetable.  Yes, it might not be the most appetizing thing IF it isn’t prepared properly.  Yes, kale is a trendy superfood and in everything including lotion and maybe you have tried kale chips before and weren’t impressed.  Hopefully, I can fix all of these things today, I’m just asking that you give it a shot.DIY Wednesday: Pizza Kale Chips | Life Healthfully Lived

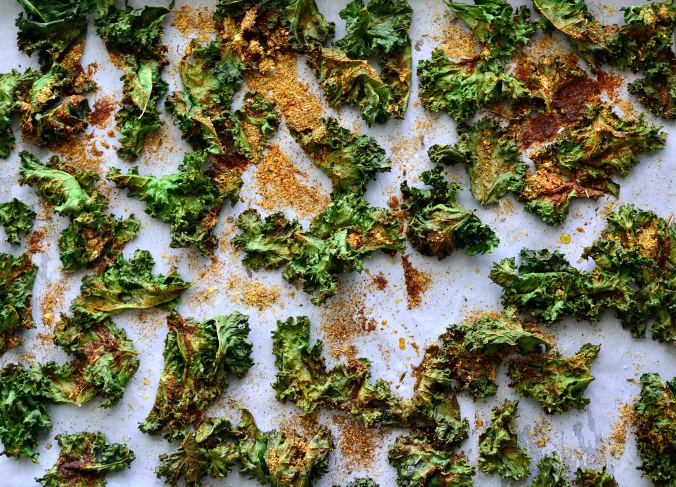
You can find kale chips pretty much everywhere these days and while there are plenty of brands that do a good job and use minimal ingredients in their products, they’re expensive.  Like, way expensive for such a little amount of food.  I like to eat and I want my money to get me as much food as possible without having to take out a small loan.  Which is why when I can, I make my own versions of store-bought stuff.  Including these kale chips.

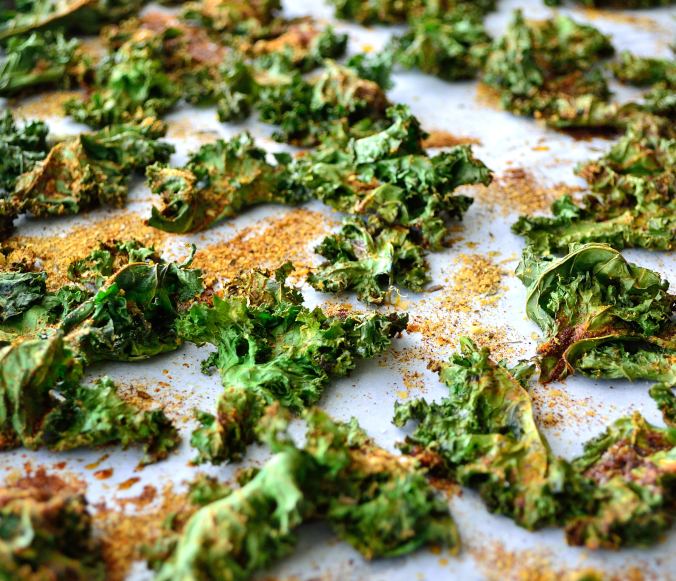
My sister was actually the first one to give me a homemade kale chip and while I thought it was going to be dry and crumbly and generally taste like ash, it had a nice crunch and taste to it.  I made my own a few times and recently decided to play with the seasoning and see what I could come up with.  I wasn’t going for pizza-flavored when I tried this, but that’s what it tasted like so I ran with it.  DIY Wednesday: Pizza Kale Chips | Life Healthfully Lived

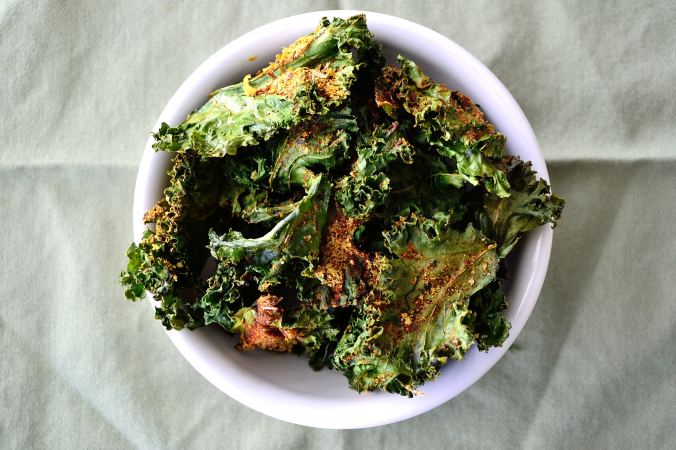
Now, I will tell you one of the keys to getting a good chip and not a soggy mess is making sure that you dry the leaves SUPER well.  I used a salad spinner and then set them out on a towel for a few minutes to really let them dry off.  Whatever you do, make sure you dry the leaves as much as possible.  Other than that, make a really big batch because if you’re like me, you’ll eat the entire thing in one sitting.  Good thing these are vegetables and good for me….

Pizza Kale ChipsDIY Wednesday: Pizza Kale Chips | Life Healthfully Lived

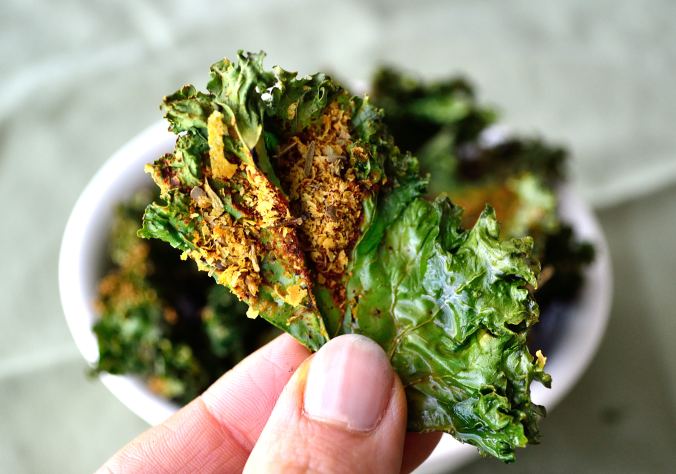
  • 1 bunch of kale leaves
  • 2-3 tablespoons olive oil
  • 1 tsp smoked paprika
  • 1 tsp oregano
  • 1/2 tsp basil
  • 1/2 tsp sea salt
  • 2-3 tablespoons nutritional yeast (more if you want extra cheesy flavor)
  1. Remove the thick stem from the kale leaves and tear the leaves into bite-size, or chip-size, pieces.  Rinse them really well under cool water and then dry them.  You can use a salad spinner (works best) or paper towels but make sure they are really dry.
  2. Preheat oven to 350 degrees and line a large baking sheet with parchment paper or a Silpat.  Don’t use aluminum foil or you’ll end up with a mess.  Once your kale chips are dry put them in a large bowl and drizzle with olive oil.  Not too much but enough to coat the chips.  Massage the leaves a little to make sure they are really coated but don’t mash them up too much.
  3. Spread them in an even layer on the baking sheet making sure there aren’t any spots that are too crowded. Mix all the seasonings together and sprinkle them over the chips.  You can coat them really well to have super flavorful chips.
  4. Bake the kale chips for about 10 minutes and pull them out to check on them.  If the are getting brown on the edges and feel crisp they’re done.  If not cook for another 2 to 5 minutes.
  5. Remove them from the oven and let them cool.  Keep them in an airtight container for 2 to 3 days. DIY Wednesday: Pizza Kale Chips | Life Healthfully Lived

Weather & My Favorite Spring Vegetables

From the title you can probably gather, I don’t have a recipe for you today.  That isn’t to say I don’t have recipes, oh do I have recipes, they just aren’t quite ready for you yet.

But I didn’t want to leave you with nothing this fine Friday so I thought I would highlight some of my favorite spring vegetables that are starting to make their way to the produce section.  First, can we just talk about the weather?

Good.

In the span of about oh… an hour and a half, there has been rain, snow, rain/snow (or wintry mix if you like that better) and full on sun.  Now don’t get me wrong, I understand it’s spring in Chicago so I fully expect bi-polar weather but this is getting a little ridiculous.  I would like to wear my cute spring clothes now.  I would like to put my boots away for good.  I would like to not need five different coats for the weather in ONE DAY.Weather & My Favorite Spring Vegetables | Life Healthfully Lived

I mean, come on!  I married a meteorologist!  Shouldn’t he be able to fix this stuff?  But noooooo.  He gets all technical and scientific and tells me, “That’s not how this works Katie.”  Whatever.  I think he’s just being lazy.  With all his fancy degrees he should be able to make spring weather be better.  Especially for his loving and adoring wife who cooks him delicious meals and tries to make dessert for him most nights… I’m just sayin’

Ok, weather rant over on to my favorite veggies!Weather & My Favorite Spring Vegetables | Life Healthfully Lived

I know that most produce is available year-round so we’ve kind of lost the touch for eating seasonally.  But just because something is available year-round doesn’t mean we should eat it year-round.  Fruit and vegetables just taste so much better when they’re in season and they’re also cheaper.  Cheap tasty food is always going to be better than expensive bland food in my book.

CauliflowerWeather & My Favorite Spring Vegetables | Life Healthfully Lived

If you haven’t noticed lately, I’ve been kind of having a thing with cauliflower.  I turn it into rice, stuff taquitos with it, make mac n’ cheese with it, roast it, turn it into a creamy sauce…. It’s like a magic vegetable that can be anything and do anything.  It’s in peak season now, so pick up a few heads and make whatever you want.  Seriously.

Parsnips

These are technically in season from fall to the beginning of spring but during the winter months, they can be kind of puny and woody tasting.  I like spring parsnips cause they’re sweet and they taste amazing roasted.  You can also puree them and make a delicious mash or soup.  If you like carrots you’ll probably love parsnips.

SpinachWeather & My Favorite Spring Vegetables | Life Healthfully Lived

Give me green things!!! After winter, I’m always grabbing the greenest fresh produce I can.  Spinach (the ones in bunches that are covered with dirt, not in the plastic bags) start hitting the shelves and I can’t help but always grab a bunch.  I eat them raw in salads or wilt them a bit for soup or turn them into pesto or make lasagna with them.  No matter how you prepare them, a little salt, pepper, and lemon juice go a long way.

Leeks and OnionsWeather & My Favorite Spring Vegetables | Life Healthfully Lived

While I might not take a big bite out of a raw leek or onion, they enhance pretty much the flavor of anything you make.  Leeks are great in soup or stews and onions go in everything.  The spring varieties are a little sweeter and they are great caramelized.

Asparagus

Yes, your pee might smell funny but it’s worth it when you have roasted asparagus with a lemony cream sauce and pasta.  Even just roasted asparagus on its own is delicious.  And if you’re a meat-eater, my mom wraps two or three asparagus stalks with some prosciutto and roasts it and everyone goes nuts for it.

Watercress

Ok, so I have never tried watercress (that I know of) but it is like one of the top healthiest foods out there and it starts showing up in the spring.  I haven’t seen it on the shelves just yet, but I’m going to try some when I do find it.  It’s always good to try new fruits or vegetables that way you never get bored of your food!

So those are some of my top picks for spring plus one newbie that I want to try.  What are some of your favorite spring vegetables?

I hope you have an awesome weekend and that the weather by you isn’t as crazy as it is here!


DIY Wednesday: Baba Ganoush

Ok, before making this recipe I had never had baba ganoush.  In fact, I didn’t even really know what baba ganoush was and the only reason I thought about it was because of the movie Wedding Crashers.  Yes, the movie with Vince Vaughn and Owen Wilson.  It’s one of my sister’s and my favorite movies and it’s awesome and if you’ve never seen do it now.

Well, in the movie Owen Wilson’s character affectionately calls Vince Vaughn’s character “Baba Ganoush”.  So the other day I was randomly thinking about the movies and I decided to figure out what baba ganoush meant and when I saw that it was an eggplant and tahini spread I decided I needed to make it for myself.DIY Wednesday: Baba Ganoush | Life Healthfully Lived

Yes, this is how my brain works.

I really love how light and simple this dip is and it’s amazing on chips (particularly pita), cut up vegetables, and while I haven’t tried it yet I bet it would be good spread on fish or chicken.  You could buy baba ganoush at the store but the kind I found had odd ingredients and was way more expensive and why buy it when you can easily make it?DIY Wednesday: Baba Ganoush | Life Healthfully Lived

While this dip won’t replace hummus (hummus love forever yo) it is a new fun dip!

Baba GanoushDIY Wednesday: Baba Ganoush | Life Healthfully Lived

  • 1 medium sized eggplant
  • half a lemon
  • 1 clove garlic minced
  • 4 cloves garlic, roasted
  • 2 tbsp tahini*
  • 1/2 tsp cumin
  • 1/2 tsp smoked paprika
  • 2 tsp fresh parsley, chopped or 1 tsp dried parsley
  • roasted sesame seeds for garnish, optional
  1. Preheat oven to 400 and prepare a large baking sheet with a Silpat or parchment paper.
  2. Wash and rinse the eggplant really well and poke it all over with a fork.  Place it on the baking sheet.  Take 4 cloves of peeled garlic and wrap them in a little foil pouch with a little olive oil and salt and place the pouch on the pan with the eggplant.
  3. Roast the eggplant until it’s soft and starting to collapse rotating it halfway through. About 30 to 35 minutes.  Roast the garlic for about 15 to 20 minutes or until golden brown.
  4. Once the eggplant and garlic are done roasting, let them cool until you can easily handle the eggplant.  Slice in half and scoop out the flesh and place it into the food processor along with the rest of the ingredients, except the sesame seeds.
  5. Process until it’s smooth.  Scoop into a bowl and if you’re serving right away top with toasted sesame seeds and a drizzle of olive oil.

* I also tried this with almond butter and it worked just fine but I like the flavor tahini adds. Use whatever you like and have on hand.DIY Wednesday: Baba Ganoush | Life Healthfully Lived

DIY Wednesday: Lemon Poppyseed Vinaigrette

Be prepared for all the lemon/poppyseed recipes this week.  More specifically, be ready for Meyer lemon and poppyseed recipes.  I found a whole bag of Meyer lemons at Aldi for $1.99 and since I had never tried them I picked them up and found a few delicious ways to use them.

Dressing was one of the first things I did with them, I also made muffins, marinades, smoothies, drizzled over fish and chicken for the husband, and even tried them in eggs. Yeah, that last one was not good.  But gotta experiment right? Lemon Poppyseed Dressing | Life Healthfully Lived

If you aren’t familiar with Meyer lemons, they’re kind of like if an orange and a lemon had a baby.  It’s a little sweet and a little sour and a lot yummy.  It works really well in a lot of recipes because it doesn’t have the puckering effect of lemon but doesn’t end up overly sweet.  Sadly, Meyer lemon season is short but that makes it even more special.  So if you have seen these lemons in your grocery store but have never known what to do with them, stick around and try my vinaigrette today and some muffins on Friday!

Lemon Poppyseed VinaigretteLemon Poppyseed Dressing | Life Healthfully Lived

  • 1/3 cup freshly squeezed Meyer lemon juice (please use fresh juice, it tastes so much better)
  • 1 tbsp lemon zest (from those lemons you just squeezed)
  • 1/3 cup extra virgin olive oil
  • 1 shallot, minced very small
  • 1 small clove garlic, minced very small (more if you REALLY like garlic)
  • 2 tsp poppyseeds
  • 1 tsp maple syrup or honey
  • 1/4 tsp salt (more if needed)
  1. Place a fine mesh sieve or strainer over a large bowl or sturdy measuring cup.  Squeeze your lemon juice over this so you can catch seeds and any pulp.  Keep going until you have 1/3 cup.
  2. Put the rest of the ingredients into a mason jar or other container with a secure lid.  Shake everything together and use over your next salad or as a marinade for fish, chicken, or pork.

Make sure you store this in the fridge and use it within the next few days.  Now, just so you know as this sits, the ingredients will separate into different layers.  That’s fine, all you have to do is shake it up right before you use it.  The olive oil also might solidify a bit in the fridge but that doesn’t mean it’s gone bad or anything, just let it sit out until it’s back to room temperature.Lemon Poppyseed Dressing | Life Healthfully Lived

Other than that, enjoy this refreshing and healthy vinaigrette!

Broccoli Rabe Pesto

I have another recipe for you today that uses up leftover vegetables and still tastes delicious.  Broccoli rabe has been one of my favorite things lately.  It’s a little bitter and earthy, but if you prepare it right and use all the garlic it turns into this amazing dish that I have been putting in my veggie noodle bowls every weekend.

It’s a vegetable-palooza up in here.

Well, last week I was not digging the greens and ended up with a pile of cooked broccoli that was just about to go bad.  I was so tempted to throw it away because what can you do with almost mushy vegetable? Broccoli Rabe Pesto | Life Healthfully Lived

Turn it into pesto!  Yes, you can use anything to make pesto and I will use any excuse in the book to make and use pesto because as Phoebe would say, pesto is the besto.

I kind of threw stuff together and hoped that everything would turn out and I got pretty lucky.  I thought I was so revolutionary but then a quick internet search proved me wrong BUT my version is dairy-free so I think that counts for something.  You can also make this pesto with regular broccoli if you haven’t jumped on the broccoli rabe bandwagon or can’t find it.  Just make sure whatever you use is already cooked because raw broccoli rabe pesto would definitely not be the besto.

Broccoli Rabe PestoBroccoli Rabe Pesto | Life Healthfully Lived

  • 1 1/2 cup cooked broccoli rabe or plain broccoli
  • 1/3 cup slivered almonds (you could use slices too)
  • 3 tbsp nutritional yeast (if you do dairy you could use parmesan)
  • 2 cloves garlic
  • 1/3 cup olive oil
  • salt and pepper to taste
  1. Preheat oven to 325 and spread the almonds onto a baking sheet and toast for about 5 minutes.  Check often to make sure you don’t end up with burnt almonds.  Remove from oven and let cool.
  2. While the almonds are toasting, check your broccoli rabe and remove any pieces that are too brown or mushy (a little mushy is ok as everything will be blended up)
  3. Put the garlic cloves into a blender or food processor and pulse a few times until it’s fairly minced.  Add the almonds and nutritional yeast or cheese and pulse until you have a crumbly mixture.
  4. Add the broccoli rabe and pulse again and then add the olive oil.  Blend until you have a smooth and creamy sauce.  Taste and add salt or pepper if needed. Broccoli Rabe Pesto | Life Healthfully Lived

You can use this pesto anywhere that you would use regular pesto.  Pasta, bread, vegetables, vegetable noodles, spoons, fingers… You know, the usual.  It would be a great spring-like dish to bring to your Easter feast on Sunday and a great way to get in extra vegetables.

I hope you have a great Easter weekend and I’ll see you on Monday!