DIY Wednesday: Fruit Roll-Ups

BackDIY Wednesday: Fruit Roll-Ups | Life Healthfully Lived in grade school, having the latest “cool” snack in your lunch was a big deal.  At lunch time, we would eagerly rip open our lunch boxes to see what treasures our moms had packed.  Lunchables were always a hit, fruit gushers, dunkaroos, marshmallow fluff sandwiches, and a can of soda made you a god.  Yes, it was a weird time.

I rarely had any of the packaged snacks that other kids in my class had.  Not only did my mom think they were nutritionally void and classified them as junk food (she was 100% right), but they were also expensive.  Every once in awhile she would put a treat into our lunches and my sister and I got to feel cool for the day.  Again, it was a weird time.

Looking back, I might have felt left out at the time but I think my mom did me a huge favor.  She taught me that food should not only be inexpensive, but it should serve some nutritional purpose.  It was also ok to have the occasional treat.  It’s those food beliefs that are the backbone of my thoughts on food now.DIY Wednesday: Fruit Roll-Ups | Life Healthfully Lived

With those beliefs in mind, I try to find/make snacks that aren’t just glorified junk food.  While I might not be able to recreate fruit gushers or dunkaroos, there are some snacks that can be made with real food.

Remember fruit roll-ups?  The store bought versions have a ton of sugar and dyes added in and rarely have any actual fruit in them.  You can totally make your own fruit roll-ups with less sugar, actual fruit, and cheaper than the ones on the shelves.  There are quite a few recipes/methods out there, but this is the one that I found worked best in my oven.  You might have to experiment with cooking times and temperatures based on your oven.  It takes less than 20 minutes to put everything together and while the cook time is a few hours, it’s all hands off and very simple.

Homemade Fruit Roll-UpsDIY Wednesday: Fruit Roll-Ups | Life Healthfully Lived

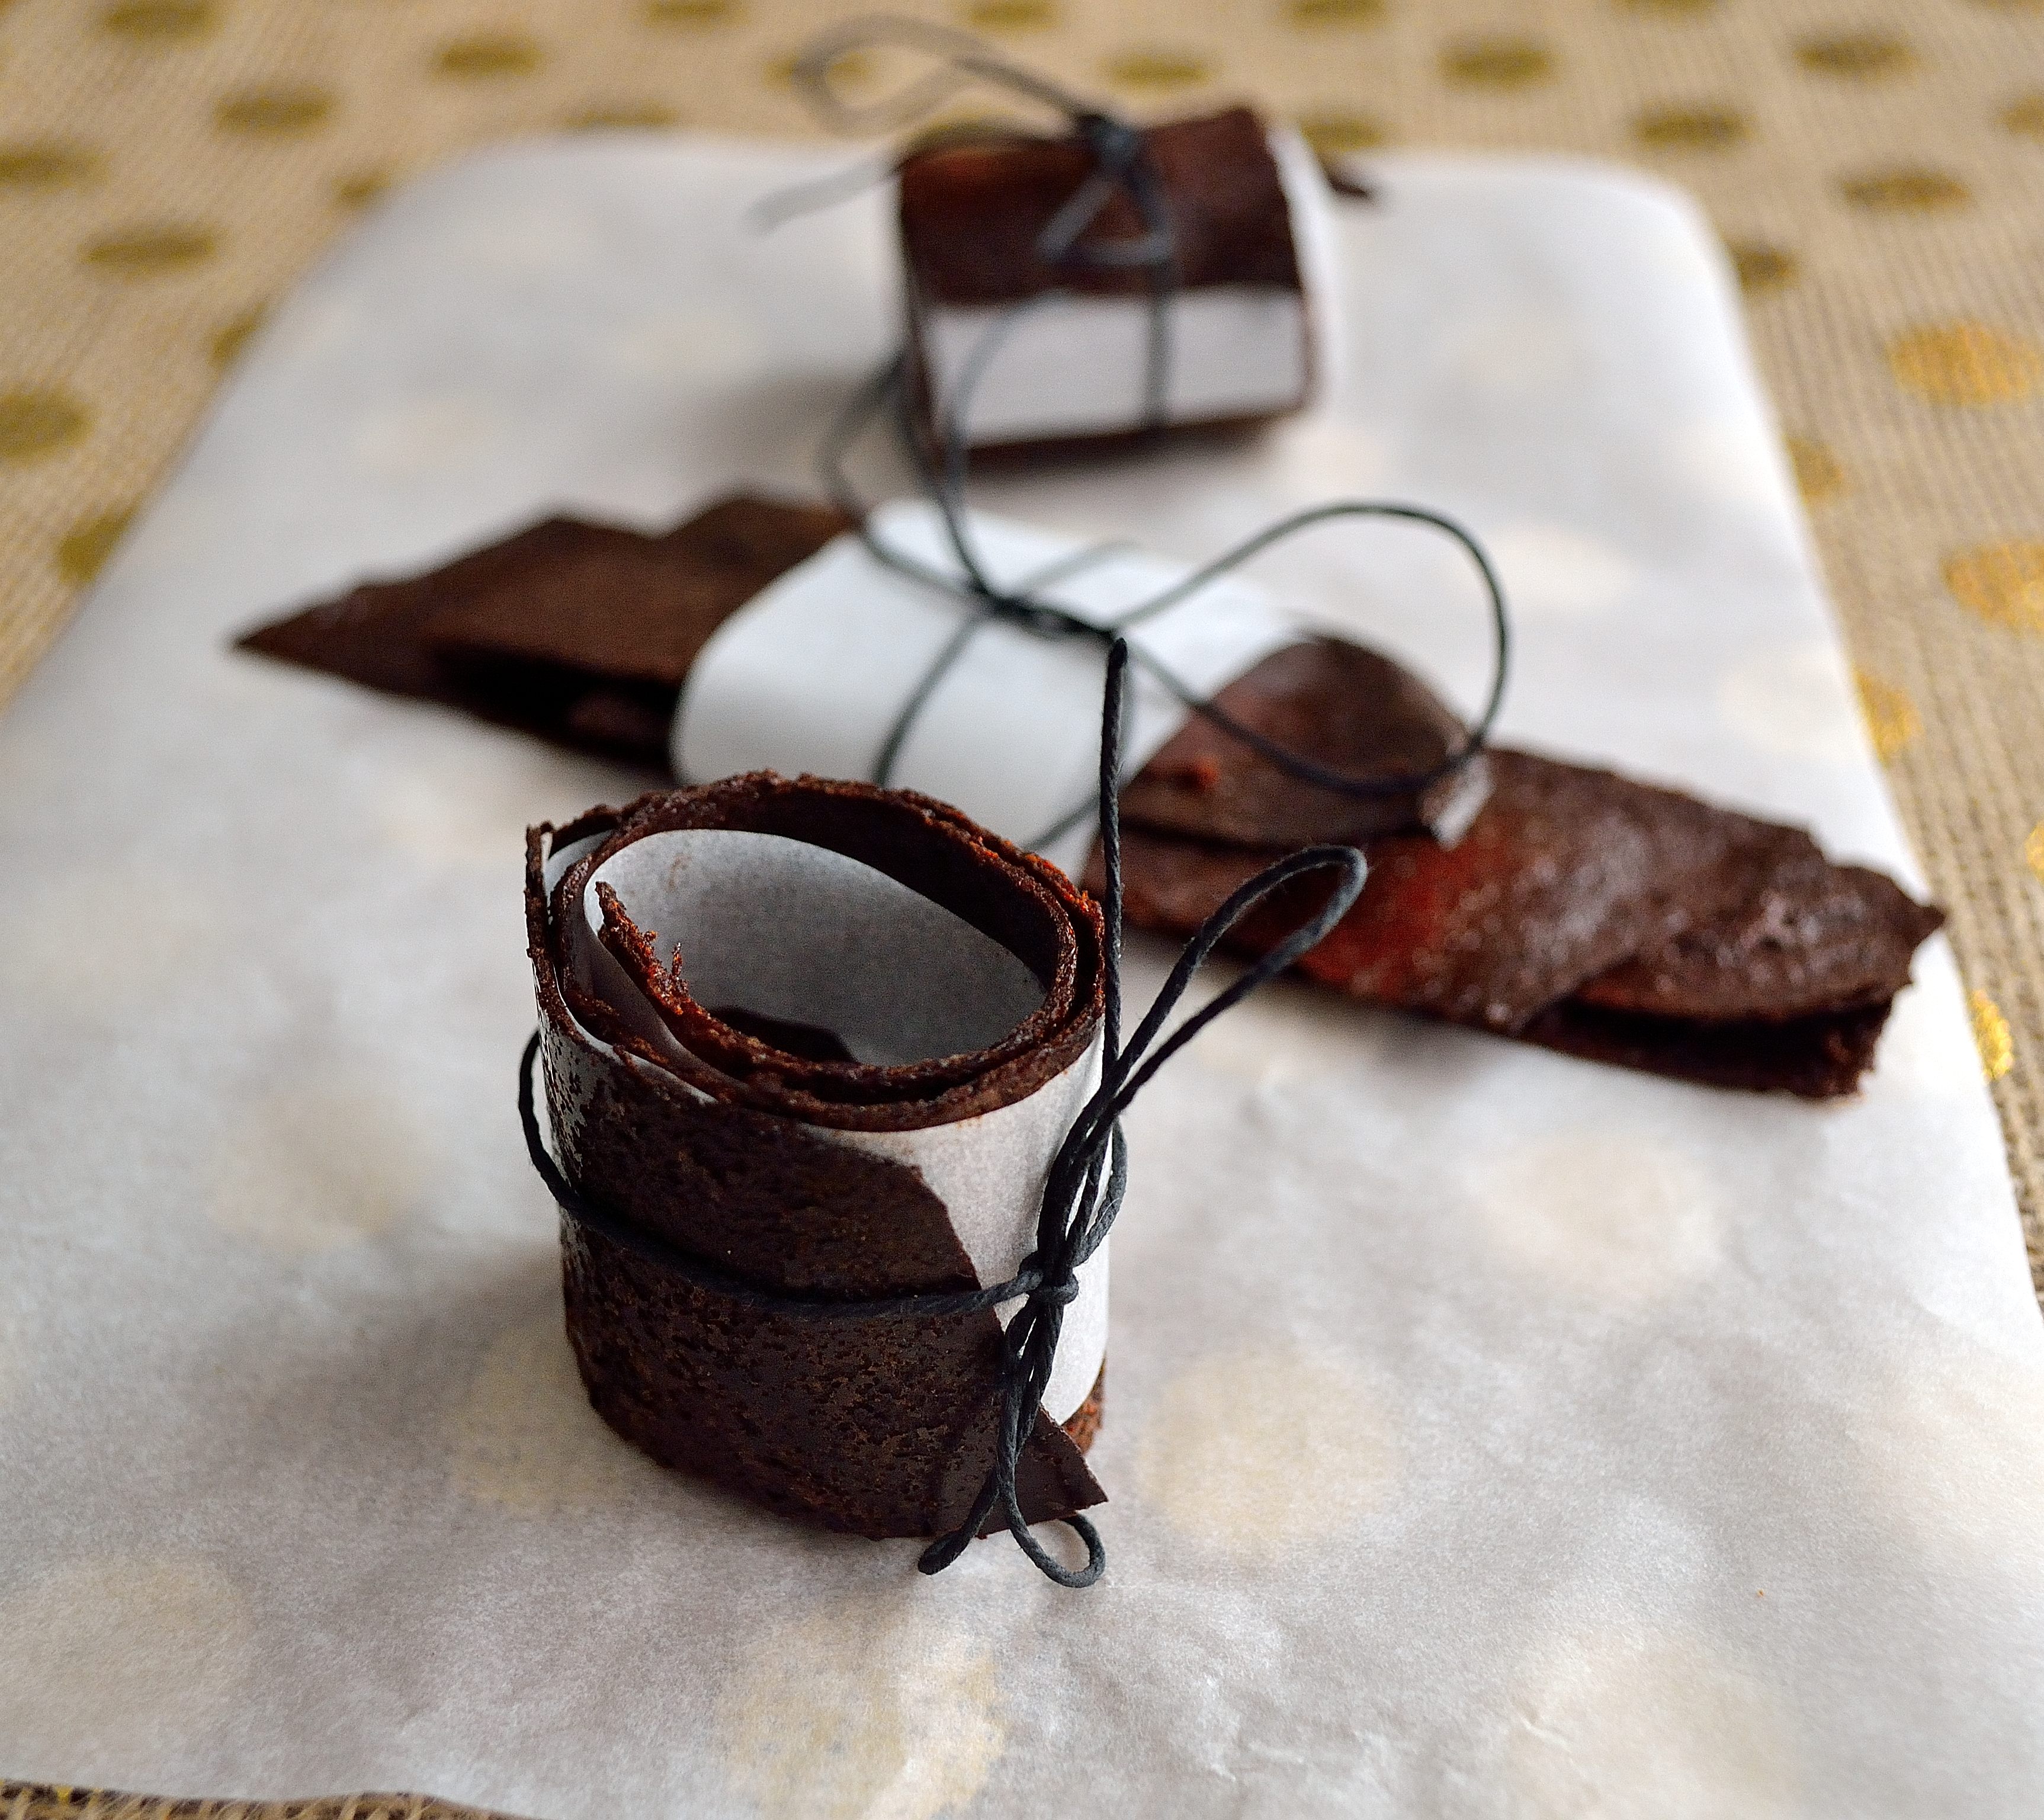
  • 1 to 2 cups fruit of your choice, chopped into small pieces (I used peaches)
  • lemon or lime juice (I used the juice from half a lime because that’s what I had)
  • 1-2 tsp cinnamon
  • 1-2 tbsp maple syrup (or honey)
  • water as needed
  1. Put all of your chopped fruit into a medium saucepan and turn heat to medium-low.
  2. As the fruit is cooking add in the lemon or lime juice and cinnamon to taste. Keep cooking until the fruit starts to break down.  If the compote seems dry, add in a little water.  You don’t want a super watery mixture, just enough to keep the fruit from sticking.
  3. After about 15 minutes, remove the fruit from heat.  Add in maple syrup to reach desired sweetness level.  My fruit was really ripe so I only used 1 tbsp.
  4. Now it’s time to puree the fruit.  You can use an immersion blender, food processor, or regular blender.  Whichever you choose, blend until it is completely smooth.  You don’t want any chunks left.
  5. Line a large rimmed baking sheet with parchment paper or a Silpat.  Do NOT use aluminum foil, it will just be a mess.  Pour the fruit puree onto the sheet and spread into a thin layer.  This part will take some time to spread everything out to the right height.  You don’t want it too thick or it won’t cook right and if it’s too thin it won’t hold together.  Take your time and you’ll get it.
  6. Set your oven to the lowest setting, mine is 200, and cook for 3 to 4 hours.  You’ll know it’s ready when it is no longer sticky or wet.  Depending on how low your oven can go, this might take longer or shorter.  Just occasionally check so it doesn’t turn into fruit brittle.
  7. Once the fruit is done, slice it into strips and roll it up with a little bit of parchment paper.  You can keep these in the fridge for up to a week and use them in lunches for a healthy and delicious snack! DIY Wednesday: Fruit Roll-Ups | Life Healthfully Lived

Quick BBQ Dishes

Happy Labor Day everyone!  As we all enjoy this last long weekend of summer, I thought I would bring you a quick post highlighting some of my recipes that are easy to make and great to bring along to a party.

Maybe you totally forgot that you said you would bring something for the BBQ you’re headed to later today, don’t worry I’ve got you covered.  These recipes come together quick and are a big hit with the masses.  Plus they’re healthy, what more could you ask for?!

Even Better BBQ Sauce– Quick, delicious, and great for meat or vegetables!BBQ

Quinoa Cornbread Bites– Tasty little bites that are quick and gluten free! 

Tomato Cucumber Salad– One of my favorites, and perfect on a hot dayDSC_1760

Avocado Chicken Salad– A fun and tasty spin on the classic chicken salad

Tahini BBQ Summer Vegetable Bake– This one is great because it can be served hot or coldDSC_1843

Penne Pesto Pasta with Roasted Tomatoes– Who doesn’t love pasta, pesto, & tomatoes?DSC_1172

Key Lime Popsicles Make these immediately.  You and other party-goers will thank me. DSC_1818

Healthy Brownie Bites– A healthy version of brownies and a crowd pleaser! 

Hope these help you out and you enjoy your Labor Day!  See you on Wednesday!

Butternut Squash & Black Bean Enchiladas

LastButternut Squash & Black Bean Enchiladas | Life Healthfully Lived Friday, I posted a picture of these enchiladas on Instagram and people went nuts.  Ok, maybe not nuts.  BUT this picture did get 55 likes which is like way more than I ever get.  Plus 9 people commented on it.  Watch out folks.  I’m gonna be an Instagram star!

I get it though.  These enchiladas are fabulous and they are really easy to make.  When I posted these pictures, one of the things that I said was that I loved that I could make them ahead of time and then just throw them in the oven at dinner time.  Meals like that make me happy.

Butternut Squash & Black Bean Enchiladas | Life Healthfully Lived

Little side story about why I went with the butternut squash filling.  A few weeks ago, Adam went on an Alaskan fishing trip.  It was a boys trip with his stepdad and other boys in the family and they spent two days out on a boat in Homer, Alaska fishing for halibut, rockfish, and salmon.  They all caught a ridiculous amount of fish and Adam came home with about 35 pounds of frozen fish.  Now, I have a VERY tiny freezer and it is well stocked.  So when he came back with all that fish I had no idea how it was going to fit.  Butternut Squash & Black Bean Enchiladas | Life Healthfully Lived

It turns out, my husband can Macgyver about 20 lbs of fish into an already full freezer.  When I opened my freezer, I was met with a wall of frozen fish.  Literally.  Just one wall of fish.  So in order to create a little space, I started going through the freezer to see what I could use up.  I found some cubed frozen butternut squash from last fall and decided it was time to put it to good use.  Butternut Squash & Black Bean Enchiladas | Life Healthfully Lived

Long story short:  Alaska + fishing + tiny freezer = delicious enchiladas.

Butternut Squash & Black Bean EnchiladasButternut Squash & Black Bean Enchiladas | Life Healthfully Lived

  • 6 to 8 corn tortillas
  • 2 to 3 cups peeled and cubed butternut squash
  • 1 can black beans, drained and rinsed
  • 3 tbsp fresh cilantro, chopped
  • 1 tsp cumin
  • 1 tsp chili powder
  • 1 tsp garlic powder
  • 1/2 tsp salt
  • 1 can fire roasted tomatoes
  • 3/4 cup water
  • juice of 1/2 a lime
  • 2 1/2 tsp chili powder
  • 2 tsp cumin
  • 1 tsp salt
  • 2 tsp oregano
  • 2 tsp roasted garlic or 2 to 3 cloves garlic, minced
  1. Preheat oven to 400 and line a large baking sheet with parchment paper or a Silpat.
  2. Place the cubed squash into a bowl and drizzle with a little olive oil, 1 tsp cumin, 1 tsp garlic powder, 1 tsp chili powder, and 1/2 tsp salt.  Toss to coat and spread evenly on the baking sheet.  Roast in the oven for 10 minutes and then flip and roast for 10 more minutes.
  3. While the squash is roasting, make the enchilada sauce.  Place the fire roasted tomatoes and 3/4 cup water into a blender.  Pulse a few times and then add in lime, garlic, and rest of the seasonings.  Blend everything until you have a smooth sauce.
  4. Once the squash is done put it back into the large bowl, add in the drained and rinsed beans, and mash things up a bit.  You want a few chunks left in the filling.  Stir in the fresh cilantro.
  5. Get a 9 x 13 casserole dish and pour a thin layer of enchilada sauce on the bottom.  Warm the corn tortillas a little so they are pliable and then fill with 1/4 cup of the filling.  Roll the tortillas and place into the casserole dish, seam side done.  Complete until the filling is gone and dish is full.
  6. Pour the rest of the sauce over the top of the tortillas and then cover with aluminum foil.  At this point, you can keep them in the fridge until you’re ready to cook.  When you’re ready to cook them, preheat oven to 350 and cook for 25 minutes.
  7. Remove from the oven and take off the aluminum foil.  Let the enchiladas cool for at least 5 minutes before serving.  Top with more fresh cilantro if you want. Butternut Squash & Black Bean Enchiladas | Life Healthfully Lived

Ok, it might look like there are a lot of ingredients and a lot of steps but I promise you this meal is not complicated.  You can also make substitutions to fit your dietary needs.  You can use sweet potatoes or pumpkin instead of the squash or you can use shredded chicken, pork, or beef if you want to have meat.  You can top it with cheese if you want and serve it with sour cream, guacamole, or cashew sour cream.  These also make phenomenal leftovers and once they are cooled completely, freeze really well.  So go make some enchiladas and love life!  Butternut Squash & Black Bean Enchiladas | Life Healthfully Lived

What is your favorite make-ahead meal?

P.S. Did you know you can follow all my healthy cooking adventures on Instagram, Twitter, and Facebook?  I know.  Life is good again 🙂

DIY Wednesday: Homemade Mayo + An Egg Free Version

NotDIY Wednesday: Homemade Mayo | Life Healthfully Lived many people know how mayonnaise is made.  You just go to the store and buy a jar of it and go on with your day.  I have never really been a big fan of mayo.  It just had an odd taste to me and I preferred slathering my sandwiches in spicy mustard.  Then one day, I needed mayonnaise for a potato salad I was making.  I didn’t want to go and buy a whole jar just for one recipe so I started looking around to see what if there was anything I could substitute.  That’s when I stumbled on a recipe for homemade mayo.

I was surprised that I could make my own mayonnaise.  This was a few years ago, so I was still learning about how things were made and didn’t know that mayo was just an emulsion of eggs, oil, and seasonings.  I bet that you have all the ingredients right now to make your own mayo.  So I quickly whipped up a batch and to my surprise, I really liked the taste. DIY Wednesday: Homemade Mayo | Life Healthfully Lived

So today’s DIY is all about mayonnaise.  It’s quick and cheap to make your own and you don’t have to worry about additives and preservatives that store brands use to make their product shelf stable.    You can also play with your own seasonings and flavor your mayo with fresh herbs.

Don’t eat eggs?  There is a version here for you too!  Remember that aquafaba I was raving about a few months ago?  Turns out you can make mayonnaise with it too!  I tried it a few days ago and it turned out really well.  Now eggless people can enjoy mayo on their sandwiches and in their recipes too!

Homemade MayoDIY Wednesday: Homemade Mayo | Life Healthfully Lived

  • 1 large egg
  • 2/3  cup neutral tasting oil (I like avocado or safflower oil)
  • 1 tsp lemon juice
  • 1 tsp spicy mustard
  • 1/2 tsp garlic powder
  • 1/2 tsp herbs like dill, basil, oregano, or cilantro (optional)
  • salt and pepper to taste
  1. Place all the ingredients except the herbs into a tall glass.  Use an immersion blender to whip everything together.  Once the mixture starts to get thick, slowly pull up the immersion blender to make sure everything is incorporated.
  2. You could also do this in a blender.  Place everything in the blender except the oil and the herbs.  Start blending everything and slowly add in the oil until the mixture is nice and thick.
  3. Stir in the herbs and store in an airtight container in the fridge for up to 3 days.

Eggless Mayo

This is the recipe that I used to make the eggless may and it worked great.  I used less oil than the recipe calls for.  The biggest key is to SLOWLY add the oil so you don’t end up with an oily, soupy mess.  DIY Wednesday: Homemade Mayo | Life Healthfully Lived

That’s it.  Just a few pantry items and you have delicious homemade mayo.  Make sure that you choose a neutral oil so that you don’t have an odd tasting mayo.  You can use this on sandwiches, in salads, as a marinade, and pretty much anywhere that you would use storebought mayo.  Plus, it’s really cool to see the whole thing magically turn into mayo, kids would definitely love helping with this one.

5 Things I Do When I’m Struggling With Bad Body Image

For5 Things I Do When I'm Struggling With Body Image | Life Healthfully Lived some reason this weekend, I was having a tough time with my body.  Every piece of clothing I put on felt awkward, I didn’t like the way I looked, and I felt like everyone was just staring at all of my flaws.  It was not a very fun weekend to say the least.

As much as I would love to always be proud of my body and never struggle with these insecurities, I know that I will probably always have to work on body image.  When I was younger, I would let these negative thoughts consume me.  I literally thought that my body was ugly and all the problems I saw in the mirror were the only things that other people could see.   These thoughts would rule my day, my mood, and how I viewed my worth.  They dictated what I would say and think, whether I would speak up in class or if I would volunteer for something where people had to look at me.  It was rough and I never thought much of myself.  I just wanted to fade in the background and for the most part, I did.

With a lot of time and work, I have pushed past that younger version of myself.  No one gets to determine my worth based on my looks, not even myself.  I understand so much more about my body and know that just because I see something in the mirror doesn’t mean it’s true in real life.

But there are still days when the struggle is real.  Days when I want to go back to hiding in my shell.  Days when no matter what, the reflection I see does not match what is actually there.  I’m sure every once in awhile, you have those days too.  Days when you doubt whether you are beautiful, capable, or even worthy.  What you do on those days can make you stronger or keep tearing you down.  So here are five things I do when I struggle with bad body image.  Hopefully, these can help you or give you some motivation to find ways to move past the lies you might be telling yourself about your own body.

1.  I realize they are lies5 Things I Do When I'm Struggling With Body Image | Life Healthfully Lived

Most often, the reason I have a “bad body” day  is that I feel like I have gained a ridiculous amount of weight.  The logical part of my brain knows this isn’t true.  There is no way that one meal can make you gain 10 pounds and you don’t wake up one day suddenly overweight.  But the logical part of my brain doesn’t always rule my day.  While I might feel overweight and insecure, I tell myself that it is a lie.  What I see in the mirror isn’t true.  My habits are overall healthy and I won’t suddenly just backslide.  I might not believe this at first, but actually physically telling myself that it is a lie helps to get me back on track.

2. I try something new5 Things I Do When I'm Struggling With Body Image | Life Healthfully Lived

This might sound weird, but trying something new really helps me get out of my funk.  Usually, I try a new yoga pose that I haven’t been able to do before or an exercise that I struggle with.  By doing something new, I get my mind off the woe is me/I’m ugly mentality.  Many times I end up surprising myself by doing something that I didn’t think I could do.  Even if I can’t get into a new pose or still struggle with that tough exercise, the fact that I tried and tried to improve myself helps me feel more confident with my body.

3.  Look at where I started5 Things I Do When I'm Struggling With Body Image | Life Healthfully Lived

I have come a long way from Jr. high/high school Katie.  Looking back at that time, I realize that I am a completely different and better person.  On the days when it feels like I am right back where I started, just taking out pictures from that time proves me completely wrong.  I know I have done a lot of work to get to this point and reminding myself of that helps me see how strong and capable I have become.

4.   I talk about it5 Things I Do When I'm Struggling With Body Image | Life Healthfully Lived

I am a private person and I tend to keep things bottled up inside.  I let my negative thoughts eat away at me and they never fail to bring me down.  While it’s still hard for me to open up and share, talking about it helps let that negativity out.  Sharing things with someone you trust gets things off your chest and shows you that some of those things just aren’t true.  Even writing this post helps me push past my doubt and uncertainty and stops negative talk in it’s tracks.

5.   I understand it will pass5 Things I Do When I'm Struggling With Body Image | Life Healthfully Lived

I won’t let my negative thoughts persist anymore.  They might have ruled my life before, but I refuse to let that happen again.  I know that this bad day is one day and it will pass.  There will be good days again, days where I see how strong I am, how capable I have become, and how beautiful I truly am.  I can’t dwell on these insecure thoughts or else they will take over.  I acknowledge that I have had a bad day and now it is over and I will do my best to move on.  It isn’t always easy, but I know I can do it.5 Things I Do When I'm Struggling With Body Image | Life Healthfully Lived

Next time you are faced with body image issues, try a few of these things.  Or find something that works for you.  The most important advice I can give you is to not let these issues consume you.  Don’t let them take over.  You are better and stronger than they are and you can and will get to a place where you see your beauty and worth!