Chickpea Casserole

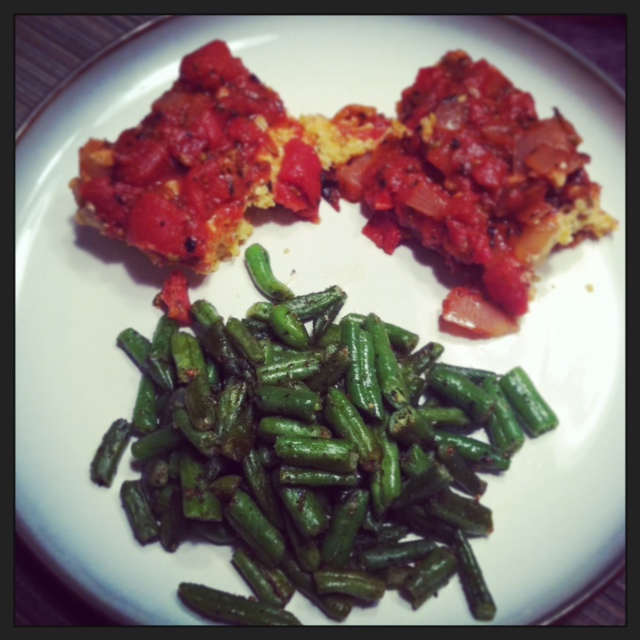
I had the hardest time thinking up a name for this dish.  I had the idea of making a lasagna type dinner, but without the noodles.  I toyed with the idea of naming it noodleless lasagna, but that just sounded weird.  I finally settled on chickpea casserole, even though it’s not exactly what it is.  I know, first world problems right?  Oh well, regardless of what this meal is called, it is delicious.  We devoured it all and quickly wanted more.  It makes fabulous leftovers and it is a great prepare ahead meal so that come dinnertime all you have to do is heat it up in the oven.  Simple and delicious, what more could you want?


Chickpea Casserole

photo 2 (4)

For the chickpea layer:

  • 3 cups chickpeas, soaked/rinsed/cooked (you could also use 2 cans of chickpeas, but I liked dried better)
  • 3/4 cup raw cashews, soaked overnight
  • 1/3 to 1/2 cup nutritional yeast, depending on how “cheesy” you want it to taste
  • 2 tbsp lemon juice
  • 1 tsp italian seasonings
  • salt and pepper to taste


For the sauce:

  • 1 onion, diced
  • 3 cloves garlic, minced
  • 4 tsp oregano
  • 2 tsp basil
  • 1 to 2 tsp fennel seeds
  • 1 can fire roasted tomatoes
  • 1 can diced tomatoes
  • 1/2 cup vegetable broth or water
  • salt to taste


  1. Make your sauce first.  In a medium saucepan, heat a little olive oil over medium heat.  Saute the onion and garlic for about 5 to 7 minutes.  Once the onion is soft add in the oregano, basil, and fennel seeds.  Stir to combine everything and then add in the tomatoes.  Depending on how thick or thin you want your sauce, add in a little bit of the broth at a time.  Bring the sauce to a boil and then lower to a simmer.  Cover the pan halfway with a lid and simmer while you make the chickpea layer.
  2. Preheat the oven to 400 and put the chickpeas into a food processor or blender and pulse a few times to break them up.  Add in the rest of the ingredients and process until it is all combined and creamy.  If it is too dry you can add in a few tablespoons of water or broth.
  3. Lightly oil a casserole pan and spread the chickpea mixture into the bottom.  Press the chickpeas down and make sure that there are no cracks.  Then pour the sauce over the top and cover the chickpeas.  Cover with foil and cook in the oven for 20 minutes.  Remove the foil and cook for another 5 minutes, until the sauce is bubbly.  Take out of the oven and let sit for 5 minutes and then cut and serve.


After you assemble the casserole, you can keep it covered in the fridge until you’re ready to cook it.  Then simply heat up the oven and pop the casserole in.  This would be a really good meal to take to a potluck or share with a big group of people.  You can easily double it and feed a crowd.  And I’m pretty sure they will gobble it up and ask for seconds!  Or maybe that’s just me…. Enjoy!


Simple Vegetable Millet

This meal was made on a Sunday night using whatever I had on hand.  I literally looked in my fridge/freezer/pantry and just pulled random things out that I thought might taste good together.  I never said the way I cook was glamorous, but this turned out really tasty and it was quick to put together.  I used millet but you could easily use quinoa or even brown rice, although you might need to cook for a little longer to make sure the rice is done.  Feel free to add whatever vegetables or leftovers you have on hand to this dish and make it your own!

Simple Vegetable Millet

photo (61)

  • 1 onion, chopped
  • 3 cloves garlic, minced
  • 2 tsp cumin
  • 1 tsp coriander
  • 1 cup vegetable broth or water
  • 1 cup frozen peas
  • 1 cup frozen corn kernels
  • 1/2 cup tomato sauce (I used some leftover homemade tomato sauce, but you can use store bought too)
  • 3/4 cup uncooked millet/quinoa/brown rice


  1. In a medium sauce pan, saute the onion and garlic with a little olive oil.  Once the onions are soft, add in the cumin and coriander and mix well.  Add in the broth, vegetables, and tomato sauce and bring to a boil.
  2. Add in your millet/quinoa/brown rice and stir everything together.  Cover your pot and reduce the heat to a simmer.  Cook for about 15 minutes (a little longer for rice) until all the liquid is absorbed.  Fluff with a fork and serve!

Try this version out first and then experiment with different flavors.  I think another good one would be to use Asian inspired flavors like ginger, five spice, and soy sauce.  Make sure to make enough for leftovers because this is even better the next day. Enjoy!

White Chili

While the calendar says that spring is almost here (technically it is already meteorologically spring, but that’s a whole different post), the temperatures here in the midwest have still been frigid.  True, we have escaped the “polar vortex” but it still isn’t quite t-shirt weather.  So in hopes to keep you warm and cozy, I have a slow cooker chili for you.  It is hearty and delicious and will make you feel a little less sad that it just snowed 4 inches in March.

White Chili 

photo (60)

  • 2 cups dried cannellini beans, soaked overnight (you can use canned, but the flavor and texture is better with dried)
  • 1 1/2 cup frozen corn kernels
  • 1 large green pepper, diced
  • 1 onion, diced
  • 2-3 cloves garlic, minced
  • 4-6 cups vegetable broth
  • 2 tsp cumin
  • 2 tsp chili powder
  • 1/2 tsp cayenne, more if you want a spicier chili
  • 1-2 tsp salt

1. If you are using dried beans (which you should!), make sure to soak your beans for at least 8 hours, preferably overnight.  You want the beans to be soft.  Once they are soaked drain and rinse them.  Take about 1 to 1 1/2 cups of the beans and puree them in a food processor or blender until they are nice and smooth.  Add this to your crockpot

2. Saute the onions, corn, garlic, and green pepper until the onions are soft and the pepper and corn have browned, about 7-10 minutes.  Add this to the crockpot.

3. Add in the rest of your beans and the vegetable broth.  You want the broth to just cover the contents of the crock pot by about an inch.  If you need more, you can always add liquid in at the end.  Next, add in your spices and stir to combine everything.  Cook on low for 6-8 hours.  Once it’s done, check that there is enough liquid and add a little salt if needed.

You could easily add cooked and shredded chicken or pork to this chili and I might add that it tastes really good with cornbread and topped with sour cream or greek yogurt.  You could even top it with some of my avocado cream and it would be even more amazing!  Enjoy!

Misconceptions About Healthy

I believe that there is sometimes a common misconception when it comes to eating well:  healthy diets must contain organic foods.  They also assume that because of this idea, eating healthy is expensive.  These two ideas about a healthy diet can cause people to shy away from changing their current eating habits.  Either they don’t have the money to buy all organic all the time or they don’t even have access to organic food.  They keep eating the same way and tell themselves this is the only way that they can eat.  I’m here to say that this just isn’t true at all.  I want to help people see that a diet full of delicious and healthy food doesn’t have to be expensive and it also doesn’t have to be 100% organic.

Let’s start with the organic idea.  Thanks to marketing and media, the word organic has taken on the association of healthy and that just isn’t necessarily true.  Don’t get me wrong, I am not here to bash organic food.  I fully support the organic movement, but not everything you see labeled as organic is good for you.  I have talked before about the “health halo” that words like organic, gluten-free, and all natural assume.  But an organic candy bar is still a candy bar and a candy bar is not doing anything good for your health.  Sure, you can feel good that you aren’t eating pesticides or factory made preservatives, but don’t think that the organic candy bar is going to miraculously change your health.  Be careful in thinking that as long as everything you buy is organic, it’s healthy.  Packaged and processed organic food is still inferior to whole and real food.

Expense is the other issue that hinders people from changing their eating habits.  The fact is organic food is more expensive.  I wish that we lived in a world where organic practices were the norm and everyone could afford it.  Unfortunately that isn’t the case, but that doesn’t mean your health is doomed.  I don’t buy all organic food, yet I still manage to have a healthy diet.  We are on a tight budget and we can’t afford to buy all organic.  Many of you are probably in the same boat.  This doesn’t mean that you can’t eat well, it just means you have to be smart about how you shop.  When it comes to produce, you can use this chart to choose which foods to buy organic and which you can buy conventional.  Generally foods that you peel or discard the outer layer can be bought conventionally without too much worry.  Because I have a limited budget, I tend to favor those foods a little more.  I buy plenty of bananas and oranges and other citrus, but I also don’t worry too much about buying the other foods non-organically.  I just make sure to wash all my produce thoroughly.  In the end, a conventionally grown apple is still an apple and it will still trump processed food any day.

2013EWGPesticideGuidesml

That same idea translates to other foods as well.  If you can buy organic, that’s great, but don’t stress out about it.  As long as you are avoiding the food-like substances that you can find in the aisles of the grocery store, you can still have a healthy diet.  Check out this post and this post, to get some more tips on how to be a savvy and healthy grocery shopper.  The biggest key is to have a plan and know exactly what you need/want before you get to the store.

When I tell others that they need to eat whole or real foods, I don’t want them to immediately jump to the organic conclusion.  I don’t want people to think that I am saying the ONLY way to be healthy is to eat organically.  It isn’t the only way and no one should feel stuck in their eating habits because of money or availability.  There are ways to eat better, shop better, and ultimately feel better.  It’s totally ok if it isn’t an overnight transformation, as slow and steady wins the race.  When faced with the choice of what food to eat or buy, make the best choice possible available to you.  If that means buying the conventional lettuce, buy the conventional lettuce.  A conventional salad trumps organic junk food every time!

53020130026167

Asian Collard Wraps

Lately, collard and beet greens have become an obsession for me.  I am just really digging them, especially lightly sauteed with just a little garlic, olive oil, and lemon juice.  I know that not everyone is as super excited about dark leafy greens as I may be, but I do know that dark leafy greens are nutritional powerhouses and you should be eating more of them!  While you might not be as enthusiastic about eating plain greens like me, this recipe will make you want to eat all the greens!  They are my version of the lettuce wraps you can get at P.F Changs mixed with cabbage rolls.  Yeah, we’ll go with that!  The other nice thing is you can use whatever you have on hand for the filling, you could even add ground turkey or chicken if you were so inclined.  Go give them a try!

Asian Collard Wraps 

Wraps with leftover filling on the side!

Wraps with leftover filling on the side!

  • 1 bunch of collard greens (or cabbage)
  • 1/2 cup millet, brown rice, quinoa, or whatever grain you have on hand (I used millet)
  • 2 shredded carrots
  • 2 tbsp fresh ginger, minced (or 2 tsp powder)
  • 1 medium onion, diced
  • 3 cloves garlic, minced
  • 2 tsp sesame oil
  • 1-2 tbsp liquid aminos, soy sauce, or coconut aminos
  • 1 batch of my sweet and sour sauce (optional)

1. First, wash your collard greens and cut off the stems.  If you are using cabbage, peel off the leaves keeping them as whole as possible.  Bring a large pot of water to boil and get a large bowl full of cold water.  Once the water is boiling, dunk your leaves into the water for a few minutes until they are nice and pliable.  Then immediately place them into the cold water.  Once you do this with all the leaves place them on a paper towel to dry.

2.  Place your 1/2 cup of millet or whatever grain you are using, and 2 cups water into a medium saucepan.  Bring to a boil and then cover and simmer for 10 to 15 minutes until the millet is cooked through.  Add in the carrots, ginger, onion, garlic, oil, and liquid aminos.  Stir so everything is combined and heat on low for about 3 minutes.

3.  Remove your filling from the heat.  Place a heaping tablespoon full into the middle of your leaf and then roll up the leaf like a burrito so that all sides are closed.  Continue with all the leaves until you run out of filling or leaves.

Now you could eat these just as is, but I kicked it up a notch and cooked them in a large pan with my sweet and sour sauce.  It really added a nice flavor.  All you have to do is cook the sauce in the large pan, then add in your wraps.  Cook until the wraps are heated through, about five minutes.  Now go and eat those delicious and healthy collard greens!