Sweet Potato Hash

Sweet Potato Hash | Life Healthfully LivedThe time has come to share the sweet potato hash that won the hearts of my family over Christmas.  And they have promised me that they really do like it, not just because it was made by me and they have to pretend to like everything that I make.  It’s actually good.

Plus Adam keeps asking for me to make it which is a good indication that he really likes something.  Although the boy did use to but corn syrup on his pancakes and didn’t like mac n’ cheese as a kid.  Seriously, what kind of psycho doesn’t like cheese and noodles as a child?  My husband apparently.

Anyway, back to this sweet potato hash.  I was trying to think of something to make for a crowd for Christmas brunch that tasted good but was still a little healthy.  Gotta balance out those cookies!  I had a bunch of sweet potatoes lying around and instead of just roasting them up like I usually do, I decided to fancy them up a bit.  Ok, not that much but I added some bell peppers, onions, and cilantro and was amazed at how just a few ingredients made such a big difference.

So if you’re looking to change up your normal breakfast hash, give this sweet potato version a whirl.  Promise you won’t be disappointed!

Sweet Potato HashSweet Potato Hash | Life Healthfully Lived

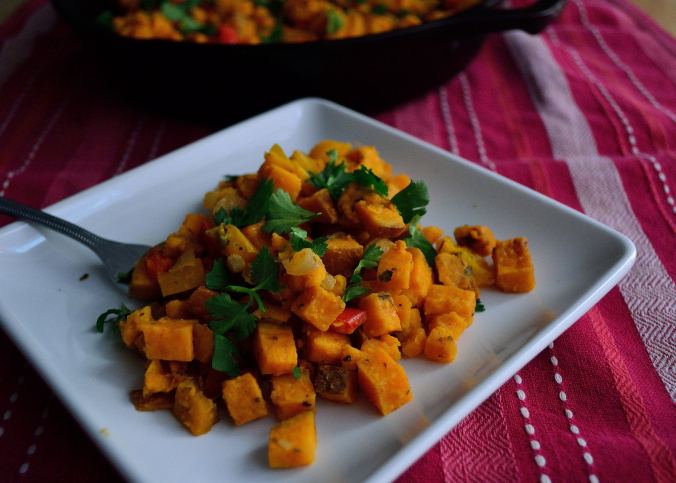
  • 2-3 large sweet potatoes, washed and dried
  • 1 red bell pepper, diced
  • 1 yellow pepper, diced
  • 1 cup onions, diced
  • 2 to 3 cloves garlic, minced
  • 1 tsp Italian seasoning
  • 1 tsp smoked paprika
  • 1/2 tsp salt
  • 1/4 tsp pepper
  • handful of fresh cilantro, stems removed and chopped
  1. Once your potatoes are washed and dried, dice into small cubes.  You want to make sure they are fairly small and uniform inside so they cook properly.
  2. In a large skillet that has a lid, heat a little olive oil over medium-high heat.  Add the onions and saute for a few minutes until a little soft.  Add the bell peppers and saute for another 2 to 3 minutes.  Add the sweet potato cubes and half the minced garlic and mix everything together.
  3. Sprinkle everything with the Italian seasoning, smoked paprika, and a little salt and then cover with the lid.  Let the everything cook for about 15 minutes, stirring occasionally so the potatoes don’t stick to the bottom.
  4. Once the potatoes are fork tender remove the lid and add the rest of the garlic and seasonings.  Cook for another five minutes.  Turn off the heat and add the cilantro and stir to combine.Sweet Potato Hash | Life Healthfully Lived

This hash is awesome served with a poached or fried egg on top.  But then again, most dishes are better with an egg on top.  Tomorrow is Adam’s birthday so we plan to spend some time eating good food downtown and probably going to see Star Wars again.

What does your weekend look like?

DIY Wednesday: Better For You Banana Chocolate Chip Mini Muffins

DIY Wednesday: Better For You Banana Chocolate Chip Mini MuffinsI was watching Friends the other day, a normal happening in my house and the two random episodes that I watched mentioned mini muffins.  This then made me think of the little packages of Hostess mini muffins that were all the rage in middle school.  You were someone if you had mini muffins.

Yeah, it was weird.

I usually did not have mini muffins because they were expensive and my mom wasn’t going to waste money on junk food.  Because let’s face it, muffins, even in mini form, are generally not a health food.  Especially when they’re made by Hostess.DIY Wednesday: Better For You Banana Chocolate Chip Mini Muffins

But boy are they delicious.  And something about them being mini made them even better.  Little food is always better.  That’s just science.  I decided to attempt to make a better for you mini muffin that would still taste good but wouldn’t be full of all this stuff.  That’s what’s in those little bites of happiness.  Yum….

My favorite muffin was always banana walnut but I decided to switch the walnuts for chocolate because duh, chocolate.  My version uses dark chocolate, but you can use whatever you have on hand.  I also decided to add just a few chips to the top rather than mix them throughout because I thought they would be just a little too big for mini muffins.  But you do you.  And you should do these mini-muffins.

Banana Chocolate Mini Muffins- gluten-free, dairy-free, soy-free, and egg-free.  I promise there is something in there! DIY Wednesday: Better For You Banana Chocolate Chip Mini Muffins

  • 1 1/2 cup almond meal
  • 3 tbsp coconut flour
  • 1 tsp cinnamon
  • 1 tsp baking powder
  • 1/4 tsp salt
  • 2 flax eggs (2 tbsp ground flaxseed and 5 tbsp water mixed together)
  • 1 large banana, very ripe
  • 4 tbsp almond milk
  • 3 tbsp maple syrup or honey
  • 1 tbsp coconut oil, melted
  • 1 tsp vanilla extract
  • handful of dark chocolate chips, optional
  1. Preheat your oven to 350 and mix together your flax egg and set aside. Line a mini muffin tin with muffin cups or grease with a little coconut oil.
  2. Put all of the dry ingredients into a large bowl and whisk together so there are no clumps.
  3. In another bowl, mash the banana so it is fairly smooth.  Add in the rest of the wet ingredients, including the flax eggs, and whisk with a fork to combine and smooth.
  4. Pour the wet into the dry and use a spatula to combine everything. Drop about a tablespoon of dough into each well.  These won’t rise a ton, so you don’t have to worry about them spilling over.  If you’re using chocolate chips, press about 3 or 4 into the top of each muffin.
  5. Bake the muffins for about 10 minutes and pull them out to check.  If they are brown around the edges and fairly firm in the middle you’re good.  If not, bake for another 2 minutes.
  6. Remove from the oven and let cool in the pan for a few minutes and then place on a cooling rack to cool completely.DIY Wednesday: Better For You Banana Chocolate Chip Mini Muffins

These will keep in an airtight container in the fridge for about a week or you can make a bunch and put them in the freezer to pull out whenever you need a mini muffin!

What were some of your favorite middle school snacks?

Roasted Pepper Vegetable Tomato Soup

Roasted Pepper Tomato Vegetable Soup | Life Healthfully Lived
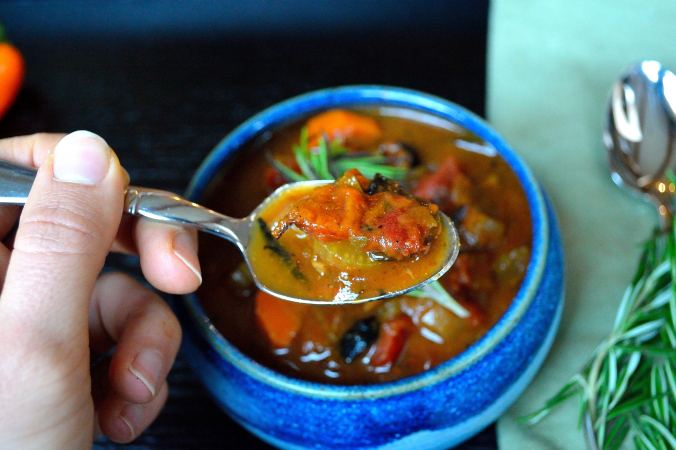
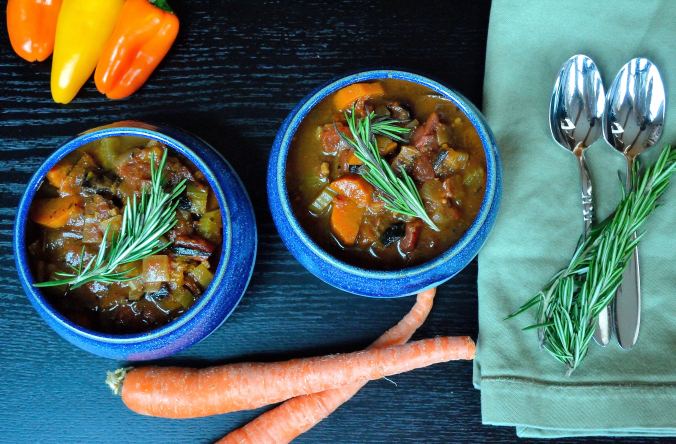
You guys know I’m having a thing with soup lately.  Especially now that Christmas and New Year’s are over.  Brothy soups chocked full of vegetables, herbs, and spices sound pretty amazing right now.  Plus, winter has finally decided to come out to play and cold temperatures always make me crave warm meals like soups or stews.

This is my soup of the moment because of two reasons.  1.  It is absolutely delicious and 2. It is quick and versatile. While the base always stays the same, I can change the vegetables up to whatever I have in my fridge.  Sometimes that includes mushrooms or leeks, other times it’s more peppers and some corn.Roasted Pepper Vegetable Tomato Soup | Life Healthfully Lived

If you can’t or don’t want to do a certain vegetable I have in this recipe, then don’t put it in your soup.  If you want to add a vegetable that I haven’t included, go for it!  That is the beauty of this meal.  As long as the main components are there, you can play around with the other flavors.

If you’re looking for a lighter meal that will still fill you up, give this soup, or any soup for that matter, a try!

Roasted Pepper Vegetable Tomato SoupRoasted Pepper Vegetable Tomato Soup | Life Healthfully Lived

  • 2-3 red or orange bell peppers
  • 1 cup carrots, peeled and sliced
  • 1 cup celery, sliced
  • 1 cup onion, diced
  • 1 leek, green top cut off and white part sliced thin
  • 8 oz package of bella mushrooms
  • 1/2 cup corn kernels
  • 2 cans fire roasted diced tomatoes
  • 6 to 8 cups vegetable broth or water
  • 2 tsp smoked paprika
  • 2 tsp chili powder
  • 2 tsp roasted garlic or 3 cloves minced
  • 2 tsp Mexican oregano (regular if you can’t find Mexican)
  • salt and pepper
  1. Preheat the oven to 400 and arrange the peppers on a large baking sheet lined with parchment paper or a Silpat.  Roast the peppers until the are slightly brown and starting to collapse. Remove and let them cool.  Once they are cool, remove the skins and slice into strips.
  2. If you would like, you can toss the mushrooms with a little oil, salt, and pepper and roast those for 15 minutes.
  3. Heat a little olive oil in a large dutch oven or stock pot.  Saute the carrots, onions, leeks, and celery until they are soft and starting to brown on the edges.  Sprinkle with a little salt and add the roasted peppers, mushrooms, and corn.  Stir everything together.
  4. Add in both cans of roasted tomatoes and then the vegetable broth or water.  Make sure all the vegetables are covered with liquid.  Add all the seasonings and bring the soup to a bowl.
  5. Once boiling, cover with a lid and lower to a simmer.  Let it simmer for 20 minutes.  Taste the soup and adjust the seasonings as needed.Roasted Pepper Vegetable Tomato Soup | Life Healthfully Lived

DIY: Lemon-Ginger Tea

We almost escaped the holidays without getting sick.  Almost.  It’s tough because during the holidays you’re around so many people and eating foods that might not be the healthiest and not sticking to your normal exercise routine.  It’s almost like inviting germs to take up residence in your body.DIY: Lemon-Ginger Tea | Life Healthfully Lived

The Monday after Christmas, Adam started feeling a little funny and by Tuesday was knocked out with a cough and cold.  He had the works, stuffed nose, sore throat, nasty cough, and achy all over.  The doctor said it was a virus, but not the flu, and only gave him a nose spray to relieve congestion.  So he pretty much had to ride it out on the couch for a week.

While taking care of him and seeing his misery, I knew that I had to take action to make sure I wasn’t the next visitor to the sick couch.  I upped my intake of vitamin C with oranges and lemons, made sure I got turmeric in as many dishes as possible, and tried my best to exercise and eat well to make sure that I stayed healthy.DIY: Lemon-Ginger Tea | Life Healthfully Lived

I have a little congestion, but I think I missed the worst of the virus and I’m going to chalk that up to the steps I took to ward it off.  One of the things that I did was down this tea every morning first thing.  You can buy lemon-ginger tea at the store, but it is so easy to make and I think that fresher ingredients make a bigger impact on your immune system.

So if you’re looking to make sure you don’t get sick this winter, try this tea in the morning and if you do feel something coming on, up your self-care routine.  Take extra rest, don’t go run a marathon, but do move a little, and try to eat as much real food as possible.  Your body will thank you!

Lemon-Ginger Tea- if it’s available and you can afford it, try to get organic ingredients.  If not, don’t stress too much over it, this tea is still better than no tea. DIY: Lemon-Ginger Tea | Life Healthfully Lived

  • One-quarter of a lemon (half of a half)
  • 3 thick slices of ginger
  • 8 oz hot water
  • Optional add-ins- honey, sprinkle of cayenne, fresh or powdered turmeric (fresh tastes a little better if you can find it because powdered might not dissolve as much and leave a gritty feeling)
  1. Boil the water.  While the water is heating up, slice and peel the ginger and put into the bottom of your mug.  Slice the lemon and get any add-ins that you want.
  2. Once the water has boiled, let it sit for a few minutes.  Then, pour it over the ginger slice and squeeze in the lemon juice.  I like to put the whole lemon wedge in the water after I’ve squeezed it.  Add in the honey, cayenne, or turmeric if you want and stir everything together.
  3. Let it steep for a few minutes and cool down before you drink it/

Last Minute Christmas

Two more sleeps!  Two more sleeps!  We are almost to the big day and I hope you are as excited as I am!

I do have to admit, though, I was a little grinchy earlier.  I know, I know but I was getting bogged down under my Christmas to-do list on top of my regular to-do list and it felt like they were both growing no matter how hard I was working.  Everything was starting to make me grouchy and less than Christmas-y. Last Minute Christmas | Life Healthfully Lived

Then I took these pictures for last minute Christmas recipes, and I started to feel that Christmas spirit again.  I may have also been watching Elf and other Christmas movies to help put me in the mood.  Either way, I’m glad I snapped myself out of it.  I know this time of year can be stressful, especially if you’re the one planning everything.  You want everyone else to feel the cheer of the season while you’re slowly going crazy with baking cookies, planning feasts, wrapping presents, and making hot chocolate.

While I can’t do everything on your list, I can help out with a few last minute recipes.  Both these recipes take minimal effort and can be made beforehand and then brought out when your guests arrive.  One is sweet and one is savory and both are delicious.  So if you need a quick dessert or appetizer, try one of these out.

And remember, Christmas comes without ribbons, it comes without tags.  It comes without packages, boxes or bags.  Christmas doesn’t come from a store.  Christmas means just a little bit more….

Creamy Cranberry DipLast Minute Christmas | Life Healthfully Lived

  1. Make both the cranberry sauce and no mozzarella, mozzarella.  You can do this a few days before you plan on serving the dip.  Just store them in the fridge.
  2. Preheat the oven to 375.  Oil a small glass casserole dish or another oven safe dish with a little olive oil.  Pour in the mozzarella and bake for 10 minutes.
  3. Pull out the mozzarella and pour the cranberry sauce on top.  Place the dish back in the oven and bake for another 5 minutes.
  4. Remove from oven and serve warm with whatever dipping device you have.

Christmas BlondiesLast Minute Christmas | Life Healthfully Lived

  • 1 can chickpeas, drained, rinsed, and skins removed (don’t skip this last step!)
  • 1/4 cup oat bran
  • 2/3 cup date sugar
  • 2 tbsp cinnamon
  • 1/2 tsp baking powder
  • 1/4 tsp baking soda
  • 1/4 tsp sea salt
  • 1/2 cup tahini
  • 1/2 cup molasses
  • 1 tsp vanilla extract Last Minute Christmas | Life Healthfully Lived
  1. Preheat oven to 350 and oil a brownie pan with a little coconut oil.
  2. Place all of the ingredients into a food processor or blender and blend until smooth.
  3. Pour the batter into the dish, scooping out the last bits with a spatula.  Bake in the oven for 20 minutes.  Pull out the pan and check the middle.  If it is still gooey, bake for another 10 minutes.
  4. Let the blondies cool on a rack completely before cutting and serving.  You can also sprinkle a little powdered sugar on top.  It is Christmas after all!

Last Minute Christmas | Life Healthfully Lived