DIY Wednesday: Sun-Dried Tomatoes

The other day, I wanted to recreate one of my favorite breakfast dishes from a restaurant back in Sycamore, Eggsclusive Cafe.  It’s an omelette that has fresh basil, sun-dried tomatoes, and avocado slices on top.  So simple but so good.

To the store I went to grab the things I needed that I didn’t already have, one of which was the sun-dried tomatoes.  I didn’t want to get the ones packed in olive oil because they tend to make everything else oily and the ones at my store always have some other flavoring like jalapeno added.  So I picked up one of the packages, despite the $5 price tag, and flipped it over to read the ingredient list.  That’s where I was met with sulfates and sulfites and other preservatives to keep “freshness and color retention”.DIY Wednesday: Sun-Dried Tomatoes | Life Healthfully LivedDIY Wednesday: Sun-Dried Tomatoes | Life Healthfully Lived

No brand at my store had sun dried tomatoes without some kind of chemical or preservative and I didn’t want to spend $5 or more on something that I didn’t want in my body.  I almost resigned myself to the oil packed tomatoes when I thought to myself, “Self, can’t you just make your own sun dried tomatoes?  I mean obviously not in the sun, that would take too long and you don’t have a sunny spot in the apartment, but in the oven? And wouldn’t it be like way less expensive?”

Yes, my self was correct.  I can make sun dried tomatoes in my oven and have fresh, preservative free toppings for my omelettes and whatever else my heart desires.  If you have a food dehydrator you probably already know that you can make your own sun-dried tomatoes and it’s fairly simple.  If you don’t, you can do like me and make them in your oven!

Sun Dried TomatoesDIY Wednesday: Sun-Dried Tomatoes | Life Healthfully Lived

  • One 8 oz. package of grape or cherry tomatoes
  • olive oil, optional
  • salt, optional

* I made mine without oil or salt but you can, it just may take a little longer to dry out.

  1. Preheat your oven to the lowest setting.  If it’s 150-170 lucky you, the rest of us will have to make due with 200.
  2. Wash and dry the tomatoes and then slice in half.  Arrange the tomatoes on a baking sheet lined with parchment paper or a Silpat.  If you want to add olive oil and salt, toss the tomatoes in a bowl and make sure they’re covered then arrange on your baking sheet.
  3. Place the sheet in the oven to dry out.  Now, if your oven only goes to 200 you’re going to have to keep an eye on things to make sure the tomatoes don’t burn.  I opened my oven every 10 minutes or so to let out some of the heat.
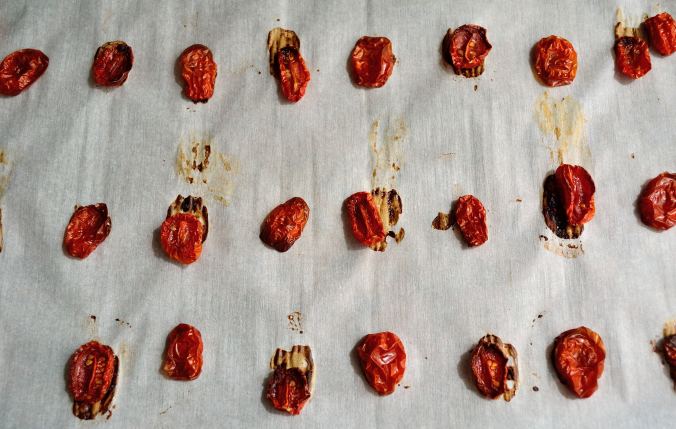
  4. Turn over the tomatoes every so often.  Remember you’re just trying to dry them out, not roast them.  They’re done when they look shriveled like red raisins.  Take them out of the oven and let them cool completely before storing in an airtight container.

* Make sure the tomatoes are completely cool and dry before you store them because any moisture in the container will make them mushy and spoil sooner.DIY Wednesday: Sun-Dried Tomatoes | Life Healthfully Lived

Oil-Free Cilantro Lime Pesto

One of the things I hope this blog proves is just because you have a certain dietary restriction/need/preference doesn’t mean you have to sacrifice flavor or some of your favorite things.  There is usually always a way to meet your cravings based on your food needs.  Now, that being said, that doesn’t mean I’m magic and can fix all your dietary woes with a healthy substitution.  Some things just cannot be recreated and more often than not it’s better that we can’t turn all junk food into healthy food.  Who wants to eat a healthy Twinkie anyway?  Or a real one for that matter….

I digress.  Today’s recipe was created because of two things.  1.  While I love fat, it’s super easy to go overboard with it especially when it comes to liquid oil like olive oil, avocado oil, or coconut oil.  Unless you’re measuring everything out, oil can add up pretty quick.  I started to realize I was buying big jugs of olive oil more and more frequently and running out of them fast.  Which leads me to my second reason… 2. I was out of olive oil and I wanted pesto.Oil-Free Cilantro Lime Pesto | Life Healthfully Lived

I want to stress I don’t think good fats are bad.  In fact, they’re awesome and I try to get them in at every meal.  But too much of a good thing can be bad and when you use an entire 1.5-liter bottle of olive oil in less than a week and a half, you might need to evaluate your food situation.  I’ll still use olive oil to make my spinach pesto, broccoli rabe pesto, and all other delicious things that require olive oil but it’s nice to have an option that is oil-free and just as delicious.

I used this last night on Adam’s fish and he deemed it “pretty tasty”, which is husband speak for good.  It has a nice light flavor from the cilantro and even though there is no oil, it’s still creamy.  You can use any green herb or vegetable you would like, I just happened to have a bunch of cilantro I needed to use so that’s what I went with.  This would also be great on pasta or zoodles or panini’s or chicken/pork or crackers or your finger….

Oil-Free Cilantro Lime PestoOil-Free Cilantro Lime Pesto | Life Healthfully Lived

  • 1 bunch of fresh cilantro, rinsed and dried and ends trimmed
  • 1/2 cup slivered almonds, toasted
  • juice of 1 to 2 limes, depending on how lime-y you want it
  • 2 cloves garlic
  • 2 tsp roasted garlic
  • 1/4 tsp salt
  • 2-3 tbsp nutritional yeast (or freshly grated parmesan if you do cheese)
  1. To toast almonds: Add almonds to a medium skillet over medium-high heat.  Shake the pan back and forth every so often and dry toast the almonds until golden brown.  Let them cool while you get everything else together.
  2. Place the rest of the ingredients into a blender or food processor, starting with the garlic, then cilantro, then seasonings, and finally lime juice.  Pulse a few times then add the cooled slivered almonds.
  3. Blend until you have a relatively smooth and creamy sauce.  If it’s a little too thick you can add more lime juice or water 1 tablespoon at a time to thin it out.  Taste and adjust the salt then store in your fridge in an airtight container for about a week. Oil-Free Cilantro Lime Pesto | Life Healthfully Lived


DIY Wednesday: Pizza Kale Chips

Ok, before you go running from this post because kale was mentioned, calm yourself.  Yes, kale is a leafy green vegetable.  Yes, it might not be the most appetizing thing IF it isn’t prepared properly.  Yes, kale is a trendy superfood and in everything including lotion and maybe you have tried kale chips before and weren’t impressed.  Hopefully, I can fix all of these things today, I’m just asking that you give it a shot.DIY Wednesday: Pizza Kale Chips | Life Healthfully Lived

You can find kale chips pretty much everywhere these days and while there are plenty of brands that do a good job and use minimal ingredients in their products, they’re expensive.  Like, way expensive for such a little amount of food.  I like to eat and I want my money to get me as much food as possible without having to take out a small loan.  Which is why when I can, I make my own versions of store-bought stuff.  Including these kale chips.

My sister was actually the first one to give me a homemade kale chip and while I thought it was going to be dry and crumbly and generally taste like ash, it had a nice crunch and taste to it.  I made my own a few times and recently decided to play with the seasoning and see what I could come up with.  I wasn’t going for pizza-flavored when I tried this, but that’s what it tasted like so I ran with it.  DIY Wednesday: Pizza Kale Chips | Life Healthfully Lived

Now, I will tell you one of the keys to getting a good chip and not a soggy mess is making sure that you dry the leaves SUPER well.  I used a salad spinner and then set them out on a towel for a few minutes to really let them dry off.  Whatever you do, make sure you dry the leaves as much as possible.  Other than that, make a really big batch because if you’re like me, you’ll eat the entire thing in one sitting.  Good thing these are vegetables and good for me….

Pizza Kale ChipsDIY Wednesday: Pizza Kale Chips | Life Healthfully Lived

  • 1 bunch of kale leaves
  • 2-3 tablespoons olive oil
  • 1 tsp smoked paprika
  • 1 tsp oregano
  • 1/2 tsp basil
  • 1/2 tsp sea salt
  • 2-3 tablespoons nutritional yeast (more if you want extra cheesy flavor)
  1. Remove the thick stem from the kale leaves and tear the leaves into bite-size, or chip-size, pieces.  Rinse them really well under cool water and then dry them.  You can use a salad spinner (works best) or paper towels but make sure they are really dry.
  2. Preheat oven to 350 degrees and line a large baking sheet with parchment paper or a Silpat.  Don’t use aluminum foil or you’ll end up with a mess.  Once your kale chips are dry put them in a large bowl and drizzle with olive oil.  Not too much but enough to coat the chips.  Massage the leaves a little to make sure they are really coated but don’t mash them up too much.
  3. Spread them in an even layer on the baking sheet making sure there aren’t any spots that are too crowded. Mix all the seasonings together and sprinkle them over the chips.  You can coat them really well to have super flavorful chips.
  4. Bake the kale chips for about 10 minutes and pull them out to check on them.  If the are getting brown on the edges and feel crisp they’re done.  If not cook for another 2 to 5 minutes.
  5. Remove them from the oven and let them cool.  Keep them in an airtight container for 2 to 3 days. DIY Wednesday: Pizza Kale Chips | Life Healthfully Lived

Weather & My Favorite Spring Vegetables

From the title you can probably gather, I don’t have a recipe for you today.  That isn’t to say I don’t have recipes, oh do I have recipes, they just aren’t quite ready for you yet.

But I didn’t want to leave you with nothing this fine Friday so I thought I would highlight some of my favorite spring vegetables that are starting to make their way to the produce section.  First, can we just talk about the weather?

Good.

In the span of about oh… an hour and a half, there has been rain, snow, rain/snow (or wintry mix if you like that better) and full on sun.  Now don’t get me wrong, I understand it’s spring in Chicago so I fully expect bi-polar weather but this is getting a little ridiculous.  I would like to wear my cute spring clothes now.  I would like to put my boots away for good.  I would like to not need five different coats for the weather in ONE DAY.Weather & My Favorite Spring Vegetables | Life Healthfully Lived

I mean, come on!  I married a meteorologist!  Shouldn’t he be able to fix this stuff?  But noooooo.  He gets all technical and scientific and tells me, “That’s not how this works Katie.”  Whatever.  I think he’s just being lazy.  With all his fancy degrees he should be able to make spring weather be better.  Especially for his loving and adoring wife who cooks him delicious meals and tries to make dessert for him most nights… I’m just sayin’

Ok, weather rant over on to my favorite veggies!Weather & My Favorite Spring Vegetables | Life Healthfully Lived

I know that most produce is available year-round so we’ve kind of lost the touch for eating seasonally.  But just because something is available year-round doesn’t mean we should eat it year-round.  Fruit and vegetables just taste so much better when they’re in season and they’re also cheaper.  Cheap tasty food is always going to be better than expensive bland food in my book.

CauliflowerWeather & My Favorite Spring Vegetables | Life Healthfully Lived

If you haven’t noticed lately, I’ve been kind of having a thing with cauliflower.  I turn it into rice, stuff taquitos with it, make mac n’ cheese with it, roast it, turn it into a creamy sauce…. It’s like a magic vegetable that can be anything and do anything.  It’s in peak season now, so pick up a few heads and make whatever you want.  Seriously.

Parsnips

These are technically in season from fall to the beginning of spring but during the winter months, they can be kind of puny and woody tasting.  I like spring parsnips cause they’re sweet and they taste amazing roasted.  You can also puree them and make a delicious mash or soup.  If you like carrots you’ll probably love parsnips.

SpinachWeather & My Favorite Spring Vegetables | Life Healthfully Lived

Give me green things!!! After winter, I’m always grabbing the greenest fresh produce I can.  Spinach (the ones in bunches that are covered with dirt, not in the plastic bags) start hitting the shelves and I can’t help but always grab a bunch.  I eat them raw in salads or wilt them a bit for soup or turn them into pesto or make lasagna with them.  No matter how you prepare them, a little salt, pepper, and lemon juice go a long way.

Leeks and OnionsWeather & My Favorite Spring Vegetables | Life Healthfully Lived

While I might not take a big bite out of a raw leek or onion, they enhance pretty much the flavor of anything you make.  Leeks are great in soup or stews and onions go in everything.  The spring varieties are a little sweeter and they are great caramelized.

Asparagus

Yes, your pee might smell funny but it’s worth it when you have roasted asparagus with a lemony cream sauce and pasta.  Even just roasted asparagus on its own is delicious.  And if you’re a meat-eater, my mom wraps two or three asparagus stalks with some prosciutto and roasts it and everyone goes nuts for it.

Watercress

Ok, so I have never tried watercress (that I know of) but it is like one of the top healthiest foods out there and it starts showing up in the spring.  I haven’t seen it on the shelves just yet, but I’m going to try some when I do find it.  It’s always good to try new fruits or vegetables that way you never get bored of your food!

So those are some of my top picks for spring plus one newbie that I want to try.  What are some of your favorite spring vegetables?

I hope you have an awesome weekend and that the weather by you isn’t as crazy as it is here!


DIY Wednesday: Baba Ganoush

Ok, before making this recipe I had never had baba ganoush.  In fact, I didn’t even really know what baba ganoush was and the only reason I thought about it was because of the movie Wedding Crashers.  Yes, the movie with Vince Vaughn and Owen Wilson.  It’s one of my sister’s and my favorite movies and it’s awesome and if you’ve never seen do it now.

Well, in the movie Owen Wilson’s character affectionately calls Vince Vaughn’s character “Baba Ganoush”.  So the other day I was randomly thinking about the movies and I decided to figure out what baba ganoush meant and when I saw that it was an eggplant and tahini spread I decided I needed to make it for myself.DIY Wednesday: Baba Ganoush | Life Healthfully Lived

Yes, this is how my brain works.

I really love how light and simple this dip is and it’s amazing on chips (particularly pita), cut up vegetables, and while I haven’t tried it yet I bet it would be good spread on fish or chicken.  You could buy baba ganoush at the store but the kind I found had odd ingredients and was way more expensive and why buy it when you can easily make it?DIY Wednesday: Baba Ganoush | Life Healthfully Lived

While this dip won’t replace hummus (hummus love forever yo) it is a new fun dip!

Baba GanoushDIY Wednesday: Baba Ganoush | Life Healthfully Lived

  • 1 medium sized eggplant
  • half a lemon
  • 1 clove garlic minced
  • 4 cloves garlic, roasted
  • 2 tbsp tahini*
  • 1/2 tsp cumin
  • 1/2 tsp smoked paprika
  • 2 tsp fresh parsley, chopped or 1 tsp dried parsley
  • roasted sesame seeds for garnish, optional
  1. Preheat oven to 400 and prepare a large baking sheet with a Silpat or parchment paper.
  2. Wash and rinse the eggplant really well and poke it all over with a fork.  Place it on the baking sheet.  Take 4 cloves of peeled garlic and wrap them in a little foil pouch with a little olive oil and salt and place the pouch on the pan with the eggplant.
  3. Roast the eggplant until it’s soft and starting to collapse rotating it halfway through. About 30 to 35 minutes.  Roast the garlic for about 15 to 20 minutes or until golden brown.
  4. Once the eggplant and garlic are done roasting, let them cool until you can easily handle the eggplant.  Slice in half and scoop out the flesh and place it into the food processor along with the rest of the ingredients, except the sesame seeds.
  5. Process until it’s smooth.  Scoop into a bowl and if you’re serving right away top with toasted sesame seeds and a drizzle of olive oil.

* I also tried this with almond butter and it worked just fine but I like the flavor tahini adds. Use whatever you like and have on hand.DIY Wednesday: Baba Ganoush | Life Healthfully Lived