DIY Wednesday: Dairy-Free Chocolate Ganache

AfterDIY Wednesday: Dairy-Free Chocolate Ganache a week off, DIY Wednesday is back!  I know you missed it and were totally lost without a fun DIY to fill your Wednesday.  At least that’s what I would like to think.

I’m SUPER excited about this DIY because I didn’t think it was going to work and it did and it is amazing.  If you don’t know what a ganache is, then you obviously don’t spend enough time in bakeries or watching the Food Network.  A ganache is a glaze, sauce, icing, or filling that is typically made with cream and chocolate.  It can be used for cakes, cupcakes, truffles, or donuts.  Basically, anything that is delicious can be made even more delicious with ganache.DIY Wednesday: Dairy-Free Chocolate Ganache | Life Healthfully Lived

Ganache used to be one of my favorite things.  It isn’t super heavy or super sweet like typical frostings and it really lets the chocolate flavor shine through.  And let’s face it, chocolate is the reason many of us get up in the morning.  Wait, is that just me?  Oh well, it’s true and I ain’t ashamed of that.

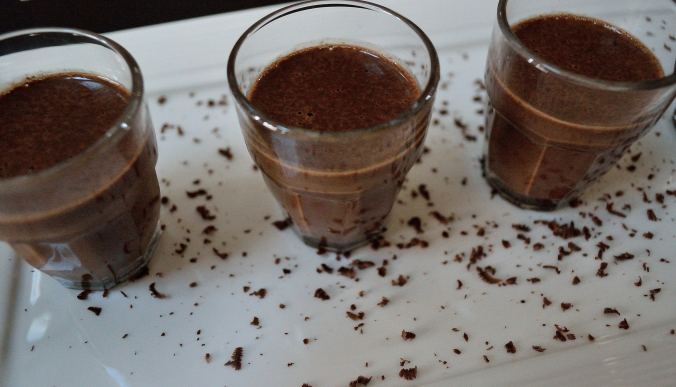
So you can imagine how excited I was when I was able to make it without dairy but still just as delicious.  I figured I would share this one with you right as the holiday season is upon us because this will definitely come in handy for all your baking needs.  You can use it as a frosting or icing for you cooking, as a decadent hot chocolate drink, as a filling for pastries or sweet breads, or stick it in the fridge for a rich and creamy mousse and a simple dessert.  The possibilities are endless and with just a few ingredients you can have this on hand at all times.  That is a very good thing!

Dairy-Free Chocolate GanacheDIY Wednesday: Dairy-Free Chocolate Ganache | Life Healthfully Lived

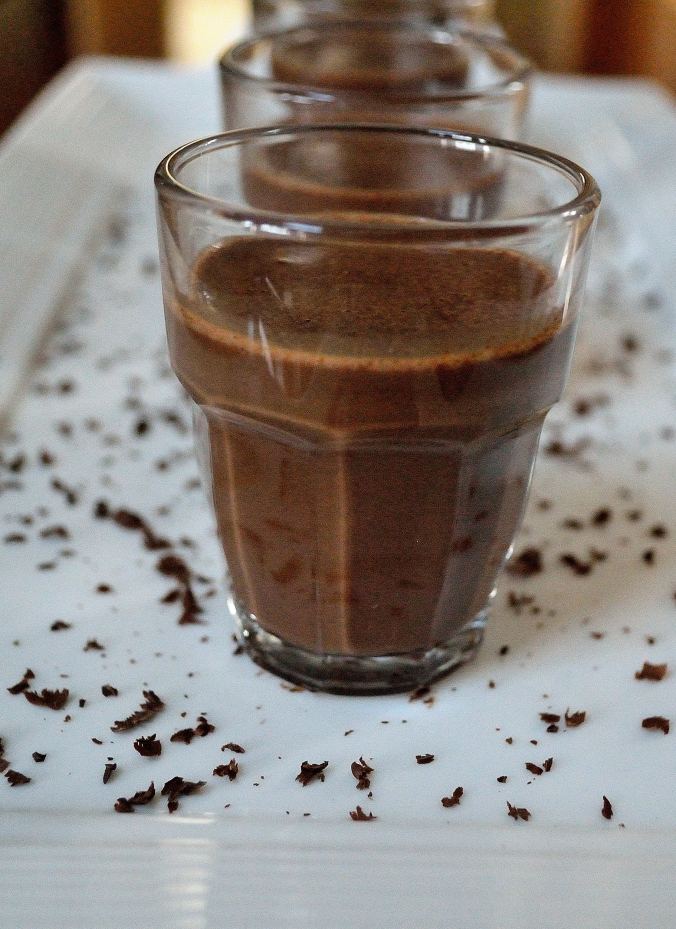
  • 1 cup full-fat coconut milk, unsweetened
  • 2 oz unsweetened baking chocolate (I used Baker’s brand)
  • 2-3 tbsp maple syrup, honey, molasses, whatever liquid sweetener you have on handDIY Wednesday: Dairy-Free Chocolate Ganache | Life Healthfully Lived


  1. Using a microplane or fine grater, grate the 2 oz of chocolate into a medium bowl until you have a little pile of chocolate shreds.  Set bowl aside.
  2. Get a small to medium saucepan and pour the coconut milk in.  Heat the milk over medium heat and whisk frequently.  You don’t want the milk to boil or scald.  Whisk in the maple syrup or other sweetener and whisking until you get a light simmer.  This should take about 10 minutes
  3. Remove the milk from the heat and get your bowl with chocolate shreds.  Slowly pour in the sweetened warm milk, whisking the whole time.  Keep whisking until the chocolate is completely melted and everything is smooth.
  4. You can use the ganache right away or you can store it in an airtight container in the fridge for up to a week.DIY Wednesday: Dairy-Free Chocolate Ganache | Life Healthfully Lived

DIY Wednesday: Coconut Chips

I’mDIY Wednesday: Coconut Chips | Life Healthfully Lived not a huge snacker, but every now and then the snacking bug will bite and I can’t seem to stop grazing.  Luckily I try to only keep healthy snacks around the house so I’m not binging on cookies and chips, but store bought healthy snacks can be full of unnecessary ingredients.

While some people might crave sweet snacks or salty snacks, I usually crave a combo.  I love the mix of sweet and salty.  Kettle corn is a weakness and Garrett’s Chicago Mix (it will never be anything else to me)?  Forget about it.

I have seen coconut chips in the stores and online for awhile now and they always sound really good.  A nice mix of sweet and salty, healthy fats from the coconut, and the satisfying crunch of the baked chips.  A snacker’s dream.  Not so dream like?  The cost.  A tiny bag of coconut chips at the store can cost almost $15.  Ain’t nobody got time for that.DIY Wednesday: Coconut Chips | Life Healthfully Lived

Good for you and me that it’s really easy to make your own at home!  A few things, don’t worry if you don’t like the flavor of coconut these do not have a very coconutty taste.  You will also want to make sure that you get the coconut flakes and not shreds otherwise you’ll end up with a pile of shriveled and burnt coconut shreds.

These come together fast and don’t require many ingredients, so if you feel a snack attack coming on you’re only a few minutes away from these sweet and savory coconut chips!

Coconut ChipsDIY Wednesday: Coconut Chips | Life Healthfully Lived

  • 2 cups unsweetened coconut flakes, not shreds
  • 2 tbsp coconut aminos, you can also use liquid aminos, soy sauce, or tamari
  • 1 tbsp maple syrup, honey could also work
  • 1/4 tsp sea salt
  • 1/4 tsp garlic powder
  • 1/4 tsp smoked paprika
  1. Preheat the oven to 350
  2. Dump the coconut shreds into a large bowl.  Add in the rest of the ingredients and stir to coat everything.
  3. Place some parchment paper or Silpat onto a large baking sheet and spread the chips in an even layer.
  4. Bake for 5 minutes and stir the chips.  Bake for another 2 minutes, watching carefully so the chips don’t burn.
  5. Remove from oven and let cool…. or dig right in if you can’t wait!

Make sure to keep an eye on the coconut chips in the last few minutes because these can go from golden and delicious to charred very quickly.  Store them in an airtight container for up to a week…. if they last that long! DIY Wednesday: Coconut Chips | Life Healthfully Lived

Apple-Banana Muffins

IApple-Banana Muffins | Life Healthfully Lived like to eat, eat, eat, eeples and baneenees.

If you have no clue what I am talking about, you need to spend more time in pre-school.

Last week I went to the apple orchard with my dad and came home with a whole peck of apples.  I’ve already made a huge batch of my squash apple butter, eaten as many raw as I can, and a tart is in the works.

I also wanted to try making a bread with my apples and I had a few over-ripe bananas sitting on my counter so I thought an apple/banana combo was in order.  Two baked goods in a row on the blog… Lucky you!Apple-Banana Muffins | Life Healthfully Lived

While my baking is getting better, I still run into a few problems now and then.  When I made my first batch of my bread concoction, the flavor and texture were right but it did not hold together very well.  My second time around I tweaked a few things and decided to make them into muffins instead of one loaf.

Success!

I ended up with a yummy fall inspired muffin that also happens to be gluten free, dairy free, egg free, and refined sugar-free.  Pretty impressive if I do say so myself!

Apple-Banana MuffinApple-Banana Muffins | Life Healthfully Lived

  • 1 cup almond meal
  • 1/2 cup coconut flour
  • 2 tsp baking powder
  • 1/4 tsp baking soda
  • 1 tsp pumpkin pie spice
  • 3 tbsp date sugar or coconut sugar
  • 1/2 cup almond milk
  • 2 large ripe bananas (the riper they are the sweeter the muffin will be)
  • 1 tbsp molasses or maple syrup
  • 2 tbsp macadamia nut butter or almond butter
  • 1 tsp vanilla extract
  • 1 large apple, shredded (more subtle apple flavor) or small diced
  • 16-18 whole pecans, optional
  1. Preheat the oven to 350 and line a muffin tin with paper liners
  2. Combine all of the wet ingredients and mix well until you have a smooth batter.
  3. Combine all of the dry ingredients into a large bowl and whisk together.  Pour the wet ingredients into the dry and stir to combine.  The batter will be a little stiff, that is ok.
  4. Add in the shredded or diced apple and stir to mix everything together
  5. Spoon a little over a tablespoon of the batter into each muffin well and press down just a little.  Press one pecan onto the top of each muffin.
  6. Bake the muffins for 20 to 25 minutes, until the top is slightly brown and batter is set.
  7. Let the muffins cool in the muffin tin for 5 minutes and then move to a wire rack to cool completely.

These are kind of like fall in a muffin wrapper and that isn’t a bad thing. You could also try making this into two mini loaves if you really wanted bread.Apple-Banana Muffins | Life Healthfully Lived

Anyone have fun plans for this weekend?  Adam and I are planning on just hanging around our neighborhood and relaxing.  Oh and if you’re keeping count, only 8 more days until my birthday.  Delicious food presents welcome…

Happy weekend friends!

Things That Are Making Me Happy Right Now

I don’t know about you, but I had a pretty great weekend.  It was filled with family, laughs, and covered bridges.  Adam and I spent the weekend in Brazil, Indiana and I got to experience the covered bridge festival for the first time.

Yes, there was a covered bridge.  There was also a ton of food, crafty things, and pretty much anything else you could think of.  I had a good time and was glad for the time to relax. Things That Are Making Me Happy Right Now | Life Healthfully Lived

So while covered bridges have made me happy, I thought I would share a few other things that are making me happy right now.

Changing Leaves

It felt like fall would never really come this year.  For most of October, our neighborhood has been surrounded by green leaves and summertime vibes.  Just in the past week or so we have finally had leaves falling and changing color.  I love how pretty this city gets in the fall!

Fall Running PaceThings That Are Making Me Happy Right Now | Life Healthfully Lived

I love the beginning of fall and the cooler temps because it means I run even faster than normal.  I can’t seem to slow down for the first few weeks of fall running and that’s just fine with me.  I love feeling like I’m flying down the Lake Shore Trail.

New Quilted Sheet SetThings That Are Making Me Happy Right Now | Life Healthfully Lived

This is how I know that I’m an adult.  I am super excited about a brand sheet set.  This was a covered bridge find and an early birthday present (12 days and counting).  I have been wanting to change up our bedspread for awhile now to something more bright and cheery.  I love the grey and yellow together and I think that Dot approves as well.

All The BakingThings That Are Making Me Happy Right Now | Life Healthfully Lived

Now that it isn’t torture to turn on the oven, baking all the things can commence.  I am not a strong baker, so I am always trying to improve.  I gave you some carrot cake cookies last week and I’m working on a fall banana bread for you guys this week.  You can also check out my cranberry coffee cake over on Girlish.  Yay baked goods!

Kuri Squash

I am all about fall/winter squash and I’m always excited to try new to me varieties.  I found this one at Whole Foods the other day and figured I would give it a go.  Whelp, now I’m obsessed with it.  I love that you don’t have to peel it, just scoop out the seeds, cut into chunks, and roast it at 425 with a little oil and your favorite seasonings.  It’s creamy and a little sweet like butternut squash.  I bet it would be great in soup or my gnocchi.

The CubsThings That Are Making Me Happy Right Now | Life Healthfully Lived

I was born a Cubs fan and have always hoped that maybe next year would be their year.  It’s looking like 2015 could be it… I will be cautiously optimistic and just keep rooting for my Cubbies.

28

I don’t know why but turning 28 is sounding pretty good to me.  I think there are some good things in store for my 28th year on this big blue marble we call Earth.  Can’t wait to see what they are…

DIY Wednesday: Date Sugar

SugarDIY Wednesday: Date Sugar | Life Healthfully Lived has been getting a lot of attention lately.  Really, it’s always gotten some type of attention.  Is it good or bad?  Are there better or healthier sugars?  Are no calorie sweeteners ruining our health?  Will you die immediately if you have one of your grandma’s famous chocolate chip cookies?

There are so many opinions, studies, research, and questions swirling around sugar lately as more and more people are trying to adopt a healthier lifestyle.  I don’t have all the answers about sugar, but I can share my experience/relationship with sugar.

When I totally changed the way I ate a few years ago, I cut out refined sugar.  No more white sugar or brown sugar.  I relied mostly on honey as a sweetener, but for a long time I avoided anything sweet other than fruit.  That worked for a little while and eventually I didn’t crave sugar like I used to but every now and then I wanted something sweet.  At first I thought that was a weakness on my part, but I’ve learned that it’s ok to crave things and to address those cravings in the way that makes me feel best.  I still avoid refined sugar, but I use things like honey, molasses, and maple syrup as sweeteners when I’m baking and cooking.DIY Wednesday: Date Sugar | Life Healthfully Lived

Today’s DIY is all about another type of sweetener, date sugar.  I’ve seen it in stores like Whole Foods and usually it’s really expensive for a small amount.  When I saw that dates were the only ingredient, I figured I could make my own.  A quick search on Google confirmed that it is a thing and you can make your own date sugar.  I like this sweetener because it isn’t a liquid sweetener like honey or syrup.  It doesn’t dissolve in liquid like white sugar, but it does add a really nice caramel flavor.  You can use this in oatmeal in place of brown sugar, in baked goods, or even in coffee or tea if you don’t mind the grainy bits.  I also like this sweetener because it offers all the nutritional benefits of dates while adding a sweet flavor.

DIY Date SugarDIY Wednesday: Date Sugar | Life Healthfully Lived

  • 20 Medjool dates, pitted and sliced in half
  1. Preheat oven to 250 and line a large baking sheet with parchment paper or a Silpat.
  2. Arrange the sliced dates on the sheet and bake in the oven for 2-3 hours checking every so often to make sure the dates don’t burn.
  3. Turn off the oven and let the dates sit in the oven for another few hours or overnight until the are completely hard.
  4. Once the dates are cooled and hardened, put them into a blender or food processor and grind until you have a fairly fine powder.

Keep your date sugar in an airtight container and store it in the fridge or freezer if you aren’t going to be using it right away.DIY Wednesday: Date Sugar | Life Healthfully Lived

Told you this one was easy!  Now remember, the one thing about sugar I can tell you is that sugar is sugar.  Your body can’t tell the difference between high fructose corn syrup or date sugar.  It’s ok to have a sweet treat now and then but don’t make this the basis of everything you put in your mouth.  It’s all about balance people!

Hope you have a great Wednesday and tell me, what’s your favorite sweetener?DIY Wednesday: Date Sugar | Life Healthfully Lived