DIY Wednesday: Baba Ganoush

Ok, before making this recipe I had never had baba ganoush.  In fact, I didn’t even really know what baba ganoush was and the only reason I thought about it was because of the movie Wedding Crashers.  Yes, the movie with Vince Vaughn and Owen Wilson.  It’s one of my sister’s and my favorite movies and it’s awesome and if you’ve never seen do it now.

Well, in the movie Owen Wilson’s character affectionately calls Vince Vaughn’s character “Baba Ganoush”.  So the other day I was randomly thinking about the movies and I decided to figure out what baba ganoush meant and when I saw that it was an eggplant and tahini spread I decided I needed to make it for myself.DIY Wednesday: Baba Ganoush | Life Healthfully Lived

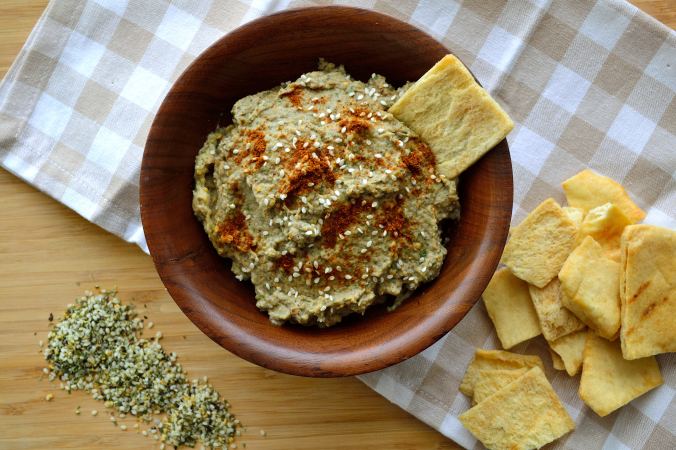
Yes, this is how my brain works.

I really love how light and simple this dip is and it’s amazing on chips (particularly pita), cut up vegetables, and while I haven’t tried it yet I bet it would be good spread on fish or chicken.  You could buy baba ganoush at the store but the kind I found had odd ingredients and was way more expensive and why buy it when you can easily make it?DIY Wednesday: Baba Ganoush | Life Healthfully Lived

While this dip won’t replace hummus (hummus love forever yo) it is a new fun dip!

Baba GanoushDIY Wednesday: Baba Ganoush | Life Healthfully Lived

  • 1 medium sized eggplant
  • half a lemon
  • 1 clove garlic minced
  • 4 cloves garlic, roasted
  • 2 tbsp tahini*
  • 1/2 tsp cumin
  • 1/2 tsp smoked paprika
  • 2 tsp fresh parsley, chopped or 1 tsp dried parsley
  • roasted sesame seeds for garnish, optional
  1. Preheat oven to 400 and prepare a large baking sheet with a Silpat or parchment paper.
  2. Wash and rinse the eggplant really well and poke it all over with a fork.  Place it on the baking sheet.  Take 4 cloves of peeled garlic and wrap them in a little foil pouch with a little olive oil and salt and place the pouch on the pan with the eggplant.
  3. Roast the eggplant until it’s soft and starting to collapse rotating it halfway through. About 30 to 35 minutes.  Roast the garlic for about 15 to 20 minutes or until golden brown.
  4. Once the eggplant and garlic are done roasting, let them cool until you can easily handle the eggplant.  Slice in half and scoop out the flesh and place it into the food processor along with the rest of the ingredients, except the sesame seeds.
  5. Process until it’s smooth.  Scoop into a bowl and if you’re serving right away top with toasted sesame seeds and a drizzle of olive oil.

* I also tried this with almond butter and it worked just fine but I like the flavor tahini adds. Use whatever you like and have on hand.DIY Wednesday: Baba Ganoush | Life Healthfully Lived

Meyer Lemon Poppy Seed Muffins with Blueberry Bottoms

Told you this week was all about the Meyer lemons and poppy seeds.Meyer Lemon Poppy Seed Muffins with Blueberry Bottoms | Life Healthfully Lived

Of course, I had to make some lemon poppyseed muffins because who gets lemons and poppy seeds and DOESN’T make muffins?  Psychos, that’s who.  I might be crazy but I’m no psycho.  Anyways….

I was a little worried that these wouldn’t turn out after I made my first batch and they were…. well, bland.  They tasted like nothing and that’s not what you want from a muffin.  So I switched a few things around and the second batch turned out much better.  They even got the approval of my family at Easter, so that’s an even bigger plus!DSC_4509_00004DSC_4507_00003

I used frozen blueberries because that’s what I had at the time but if you want to use fresh that’s good too.  You might have to adjust your cook time, so keep an eye on them.  Other than that this recipe is pretty straightforward and fairly simple to make!

After the recipe, you’ll find a quick poll.  It will only take a few seconds and it will help me make this blog even better for you.  Thank you in advance and have an awesome weekend!

Meyer Lemon Poppy Seed Muffins with Blueberry BottomsMeyer Lemon Poppy Seed Muffins with Blueberry Bottoms | Life Healthfully Lived

  • 1 cup almond flour
  • 6 tbsp tapioca starch
  • 1/2 tsp baking powder
  • 1/4 tsp baking soda
  • 1/4 tsp salt
  • 1/2 cup freshly squeezed Meyer lemon juice
  • 3 tbsp Meyer lemon zest
  • 1 flax egg (3 tbsp flax meal mixed with 6 tbsp water. Let sit for 10 minutes to gel)
  • scant 1/4 cup maple syrup
  • 1/4 cup coconut oil, melted
  • 2 tbsp coconut sugar
  • 2 tbsp poppy seeds
  • 1 cup blueberries, fresh or frozen
  1. Preheat the oven to 350 and line a muffin tin with paper liners or lightly oil each well.
  2. Combine all of the dry ingredients, except for the lemon zest, into a medium bowl and whisk together so it’s light and fluffy.
  3. In a smaller bowl, whisk together the wet ingredients and make sure everything is completely incorporated.
  4. Make a well in the dry ingredients and pour the wet ingredients into the well.  With a spatula, fold everything together.  Once mixed together, add the zest and stir a few times to combine.
  5. Place 3 to 4 blueberries in the bottom of each muffin well and then spoon in about 2 tablespoons of batter.  These won’t rise a ton, so you can fill them about 3/4 of the way up.
  6. Bake the muffins for about 22 minutes (a little less if using fresh blueberries).  Remove them from the oven and see if the middle is set.  If not bake for another 2 minutes.
  7. Remove the muffins from the oven and let them cool in the pan for about 5 minutes and then move them to a wire rack to cool completely.


DIY Wednesday: Lemon Poppyseed Vinaigrette

Be prepared for all the lemon/poppyseed recipes this week.  More specifically, be ready for Meyer lemon and poppyseed recipes.  I found a whole bag of Meyer lemons at Aldi for $1.99 and since I had never tried them I picked them up and found a few delicious ways to use them.

Dressing was one of the first things I did with them, I also made muffins, marinades, smoothies, drizzled over fish and chicken for the husband, and even tried them in eggs. Yeah, that last one was not good.  But gotta experiment right? Lemon Poppyseed Dressing | Life Healthfully Lived

If you aren’t familiar with Meyer lemons, they’re kind of like if an orange and a lemon had a baby.  It’s a little sweet and a little sour and a lot yummy.  It works really well in a lot of recipes because it doesn’t have the puckering effect of lemon but doesn’t end up overly sweet.  Sadly, Meyer lemon season is short but that makes it even more special.  So if you have seen these lemons in your grocery store but have never known what to do with them, stick around and try my vinaigrette today and some muffins on Friday!

Lemon Poppyseed VinaigretteLemon Poppyseed Dressing | Life Healthfully Lived

  • 1/3 cup freshly squeezed Meyer lemon juice (please use fresh juice, it tastes so much better)
  • 1 tbsp lemon zest (from those lemons you just squeezed)
  • 1/3 cup extra virgin olive oil
  • 1 shallot, minced very small
  • 1 small clove garlic, minced very small (more if you REALLY like garlic)
  • 2 tsp poppyseeds
  • 1 tsp maple syrup or honey
  • 1/4 tsp salt (more if needed)
  1. Place a fine mesh sieve or strainer over a large bowl or sturdy measuring cup.  Squeeze your lemon juice over this so you can catch seeds and any pulp.  Keep going until you have 1/3 cup.
  2. Put the rest of the ingredients into a mason jar or other container with a secure lid.  Shake everything together and use over your next salad or as a marinade for fish, chicken, or pork.

Make sure you store this in the fridge and use it within the next few days.  Now, just so you know as this sits, the ingredients will separate into different layers.  That’s fine, all you have to do is shake it up right before you use it.  The olive oil also might solidify a bit in the fridge but that doesn’t mean it’s gone bad or anything, just let it sit out until it’s back to room temperature.Lemon Poppyseed Dressing | Life Healthfully Lived

Other than that, enjoy this refreshing and healthy vinaigrette!

Broccoli Rabe Pesto

I have another recipe for you today that uses up leftover vegetables and still tastes delicious.  Broccoli rabe has been one of my favorite things lately.  It’s a little bitter and earthy, but if you prepare it right and use all the garlic it turns into this amazing dish that I have been putting in my veggie noodle bowls every weekend.

It’s a vegetable-palooza up in here.

Well, last week I was not digging the greens and ended up with a pile of cooked broccoli that was just about to go bad.  I was so tempted to throw it away because what can you do with almost mushy vegetable? Broccoli Rabe Pesto | Life Healthfully Lived

Turn it into pesto!  Yes, you can use anything to make pesto and I will use any excuse in the book to make and use pesto because as Phoebe would say, pesto is the besto.

I kind of threw stuff together and hoped that everything would turn out and I got pretty lucky.  I thought I was so revolutionary but then a quick internet search proved me wrong BUT my version is dairy-free so I think that counts for something.  You can also make this pesto with regular broccoli if you haven’t jumped on the broccoli rabe bandwagon or can’t find it.  Just make sure whatever you use is already cooked because raw broccoli rabe pesto would definitely not be the besto.

Broccoli Rabe PestoBroccoli Rabe Pesto | Life Healthfully Lived

  • 1 1/2 cup cooked broccoli rabe or plain broccoli
  • 1/3 cup slivered almonds (you could use slices too)
  • 3 tbsp nutritional yeast (if you do dairy you could use parmesan)
  • 2 cloves garlic
  • 1/3 cup olive oil
  • salt and pepper to taste
  1. Preheat oven to 325 and spread the almonds onto a baking sheet and toast for about 5 minutes.  Check often to make sure you don’t end up with burnt almonds.  Remove from oven and let cool.
  2. While the almonds are toasting, check your broccoli rabe and remove any pieces that are too brown or mushy (a little mushy is ok as everything will be blended up)
  3. Put the garlic cloves into a blender or food processor and pulse a few times until it’s fairly minced.  Add the almonds and nutritional yeast or cheese and pulse until you have a crumbly mixture.
  4. Add the broccoli rabe and pulse again and then add the olive oil.  Blend until you have a smooth and creamy sauce.  Taste and add salt or pepper if needed. Broccoli Rabe Pesto | Life Healthfully Lived

You can use this pesto anywhere that you would use regular pesto.  Pasta, bread, vegetables, vegetable noodles, spoons, fingers… You know, the usual.  It would be a great spring-like dish to bring to your Easter feast on Sunday and a great way to get in extra vegetables.

I hope you have a great Easter weekend and I’ll see you on Monday!

Asian-Style Green Beans

Are Chinese buffets still a big thing?  I haven’t been to one in many years, but for a while when I was younger my family and I would go often.  It was just easier because everyone could get what they wanted and it was good for my notoriously picky sister because there were always a few things like pizza and chicken nuggets.  Which of course are Chinese.  Asian-Style Green Beans | Life Healthfully Lived

One of my favorite things at the buffet were the green beans.  They were crispy, crunchy, green, sweet, and salty.  They had those huge granules of salt and garlic and they balanced so well with the other flavors.  I would always get numerous helpings and could have easily made a meal of them.

Of course, they were probably SUPER high in sodium and flavorings that might not have been the best but when compared to the other offerings at the buffet (I’m looking at you General Tso’s chicken and crab rangoon) they were a pretty good choice.  The other day I had a hankering for those green beans and decided to make my own healthier version and I’m pleased to say I think I got pretty close!Asian-Style Green Beans | Life Healthfully Lived

Fresh green beans are making their way back into grocery stores so you should be able to find them pretty easily.  But if you can’t don’t worry, you can use frozen green beans too.  Give these green beans a try at your next meal and I guarantee your family will polish them off.  At least, my husband did….

Asian-Style Green BeansAsian-Style Green Beans | Life Healthfully Lived

  • 2 cups fresh green beans, ends trimmed (if using frozen make sure to thaw them first)
  • 3 cloves garlic, minced
  • 2 tsp dried onion flakes
  • 1 tsp powdered ginger
  • 1 to 2 tsp coarse sea salt (if you don’t have coarse that’s fine just adjust the amount so it’s not too salty)
  • 2 tbsp coconut aminos (you can use soy sauce or liquid aminos too)
  1. Heat a little oil in a large saute pan over medium-high heat.  Add the minced garlic and swirl everything around the pan a few times.
  2. Add the green beans to the pan and then add the onion flakes, ginger, and salt.  Stir so everything is mixed together.  Saute for 5 minutes.
  3. Pour the coconut aminos over the green beans, stir everything together, and cover.  Lower the heat to low and cook for another 2 minutes.