Chocolate PB Bars and Superbowl Snacks

Chocolate PB Bars and Superbowl Snacks | Life Healthfully LivedWhile I don’t take a HUGE interest in football, kind of hard when your team is the Bears…. but I do enjoy watching games and I really like watching the big game.  Ok, ok, I’m mostly watching for the commercials and the halftime performance, BUT I still like to watch.

I’m also in it for the food.  Come on, does that one shock you?  Chips and dip, pizza, wings, snacks of all shapes and size, the Superbowl isn’t just super because of the football players.  The Superbowl comes right at a time when you have been working hard to make eating healthy a habit.  It feels like it’s there to test your willpower and you’re a horrible human being if you slip up and eat a chicken wing…. or fifty.Chocolate PB Bars and Superbowl Snacks | Life Healthfully Lived

You should never feel guilty for eating food, even if it isn’t the healthiest.  You made a choice and that’s fine.  Eat the food and move on.  To help yourself feel a little better of eating a super bowl during the Superbowl (see what I did there?), try making real food snacks and appetizers for your party.  Instead of buying your chips and dip, make your own.  Create a build your own pizza bar and provide plenty of fresh vegetables for toppings.  Or do a taco bar!  Mmmmmm tacos….. There are plenty of ways that you can make your party food taste indulgent and healthy.

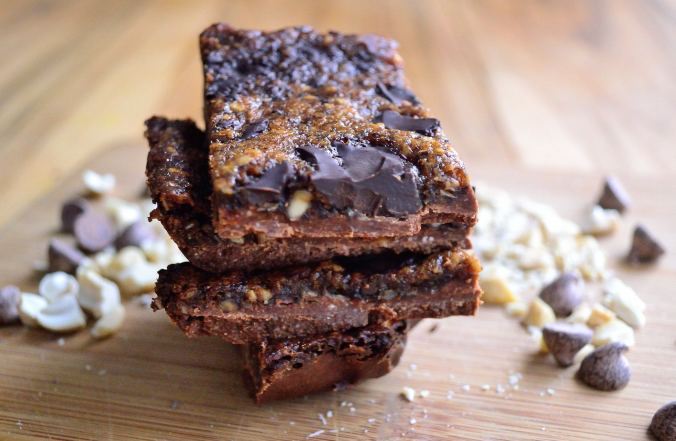
Which is why I made this treat for you guys!  I love my salted caramel chocolate swirl bars from Christmas and I wanted to see if I could make something with my favorite combo: chocolate and peanut butter.  I mean really, is there anything better than chocolate and peanut butter?  No.  The answer is no.  Chocolate PB Bars and Superbowl Snacks | Life Healthfully Lived

These are gluten, dairy, and egg free so they can cover a variety of diets, allergies, and intolerances.  If you can’t or don’t do peanut butter just sub in your favorite nut or seed butter, crunchy almond butter works really well!  You can also make these a few days in advance and that is one less thing you have to prepare.

So make these and be the hit of the party and enjoy the comm… I mean the game!

Chocolate PB BarsChocolate PB Bars and Superbowl Snacks | Life Healthfully Lived

Chocolate Cookie Crust

  • 1/2 cup coconut flour
  • 1/4 cup almond flour
  • 1/4 cup cocoa powder
  • 1/4 tsp sea salt
  • 2 1/2 tbsp coconut sugar
  • 6 tbsp solid coconut oil
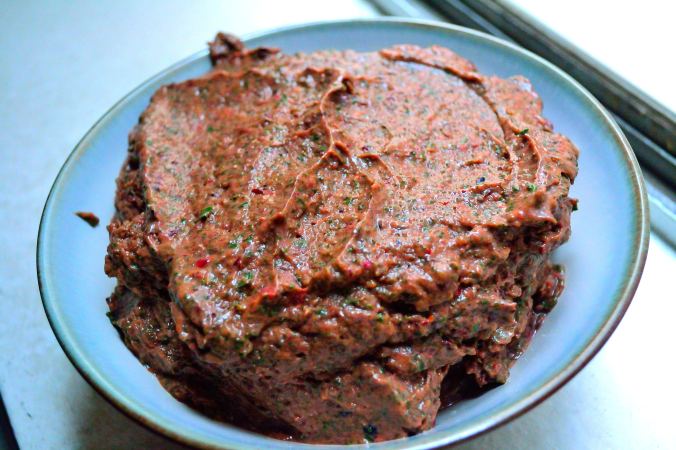
  1. Preheat oven to 350.  If your coconut oil isn’t solid, measure it out and then stick it in the freezer for a few minutes.  Meanwhile, combine the rest of the ingredients in a blender and pulse until fully combined.
  2. Add in the coconut oil and pulse until the mixture is all crumbly.  Lightly oil an 8 x 8 pan with some coconut oil and line with parchment paper with a little hanging over the sides.  Press the cookie crust into the bottom of the pan and bake for 10 minutes.  It will look like it isn’t set, but don’t freak out. It will all be ok!
  3. Once it’s done let it cool for a few minutes and then place it in the freezer to harden while you get the filling together.

Peanut Butter Filling

  • 1 flax egg (1 tbsp ground flax seed and 3 tbsp water mixed together)
  • 1 tsp baking soda combined with 1 tbsp white vinegar
  • 2 tbsp chunky peanut butter or almond butter
  • 1 tsp vanilla extract
  • 3 tbsp coconut sugar
  • 1/4 cup unsweetened coconut shreds
  • 1/4 cup dark chocolate chips/chunks
  1. In a medium bowl, mix flax egg, baking soda mixture, peanut butter, vanilla, and coconut sugar together.  Make sure it is really well combined.
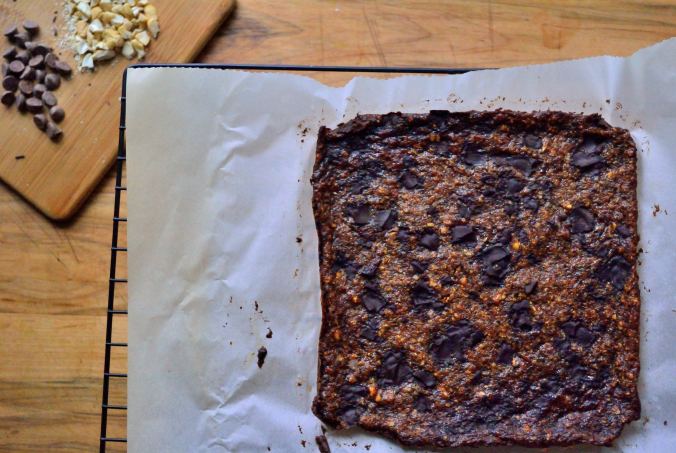
  2. Stir in the coconut shreds and spread the filling on the cookie crust.  Bake for about 8 minutes.
  3. Pull it out and sprinkle the chocolate chips on top and then bake for another 2 to 3 minutes.
  4. Remove from oven and let it cool completely before you cut them into bars.  The bars may seem a little gooey, but they will firm up as they cool.  Keep them stored in the fridge or the freezer until you’re ready to eat them.  Chocolate PB Bars and Superbowl Snacks | Life Healthfully Lived

DIY Wednesday: Sports Drink

DIY Wednesday: Sports Drink | Life Healthfully Lived
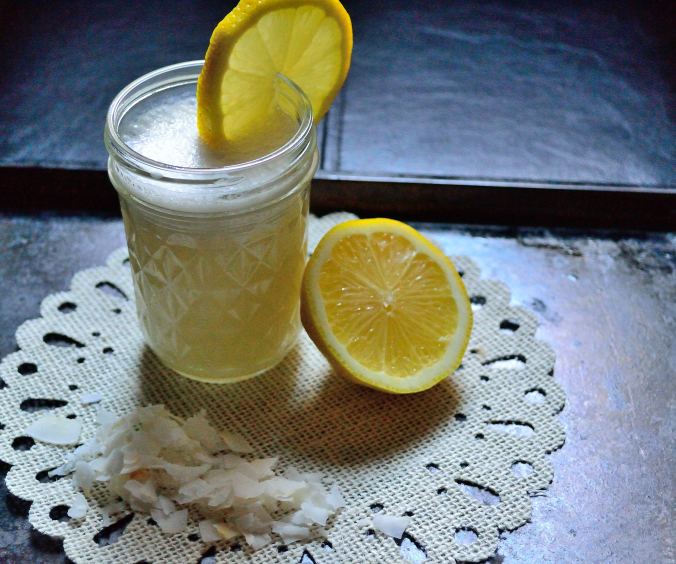
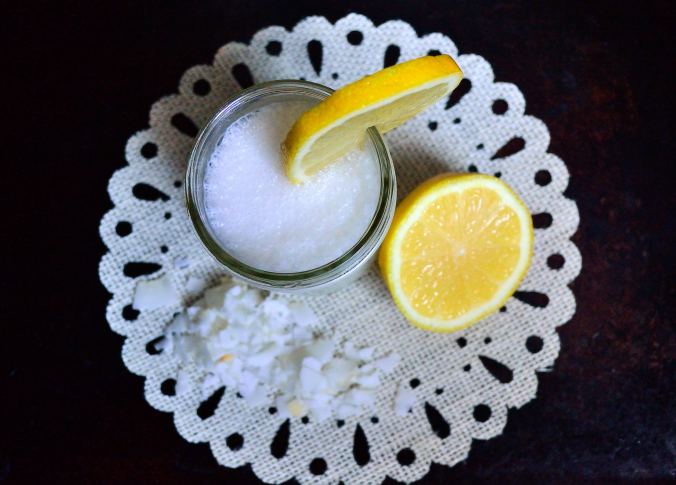
I would say that sport’s drinks like Gatorade, Propel, and Powerade are some of the most controversial products when it comes to hydration.  You have the people who are firmly in the water-is-the-only-hydration-you-need camp and then you have others who are firmly in the you-need-to-replenish-your-electrolytes-after-activity camp.  Then you have those in the murky middle ground who believe sometimes you need sports drinks and sometimes you don’t.  It can be very confusing.

I am somewhere in the murky middle ground.  It all depends on the activity you’ve been doing and how long you’ve been active for.  The vast majority of us don’t do enough work or exercise that will require anything other than water to rehydrate.  There is no need for a Gatorade after a 20-minute workout or to hand out sports drinks after a kids soccer game.  There are a few instances where you do need to replenish your electrolyte levels with something other than just water.

People who run/train for marathons, triathlons, Ironman competitions, or any other grueling endurance sport are probably going to need something more than just water.  That is because they are asking their bodies to work at full capacity for a long period of time.  Anything more than a 90-minute workout session is going to probably warrant a little extra attention to your hydration levels.DIY Wednesday: Sports Drink | Life Healthfully Lived

Now, here is my other sticking point:  I think that commercially sold sports drinks are NOT the way to replenish your fluids and electrolytes.  They’re full of sugar and other ingredients that actually make you thirstier than you were before.  How else would they sell their product?  If one drink made rehydrated you, you wouldn’t need another.  Plus you’re getting way more calories than you need from a drink.

Lucky for you, it’s easy to make your own sports drink that will rehydrate you as well as replenish your electrolyte levels without the calories, sugar, or any other possible weird ingredients.  You can make these in advance of a tough workout or activity and have them ready to go when you’re done.  You can play with the levels of citrus and natural sweetener to suit your tastes.

You can play with the levels of citrus and natural sweetener to suit your tastes and if you don’t want or can’t find coconut water, regular water works just as well.  And yes, I know there is salt in here and you’re going to tell me that is ridiculous because we all know that salt makes you thirstier.  Yes, BUT, you also need the proper amount of sodium levels in your body to rehydrate and absorb minerals like potassium.  If you’ve been sweating like crazy, then you have been losing a lot of sodium as well and need to replenish those stores.  So don’t skip the salt (and make sure you use sea salt NOT regular table salt), it won’t make you thirstier and you won’t be choking down a salty drink.

Sports DrinkDIY Wednesday: Sports Drink | Life Healthfully Lived

  • 1 cup coconut water or regular water (make sure it’s just plain coconut water, no added sugars)
  • 1-2 tsp fresh lemon juice
  • 1-2 tsp fresh lime juice
  • 1 tsp honey or maple syrup (less or more to suit your taste)
  • pinch of sea salt
  1. Put everything into a blender and blend for a few seconds.  Taste and adjust things as needed.

Keep this drink stored in the fridge up to 2 days before you need it.  You can also double or triple this recipe to make sure that you have enough on hand for when it’s needed.


Subtraction Vs. Addition

Don’t worry, this isn’t going to be a math lesson.  Trust me, you don’t want me teaching you math.  Anyone who knows me will back me up on this one (right, Mom?).

No, this is going to be a comparison of two different mindsets when it comes to living a healthier life.  I find that there are two approaches to changing bad habits, the subtraction approach and the addition approach.  I’ve actually taken both approaches myself and in my experience find one is definitely better than the other.  Because I want you to be successful in living a healthier life, I wanted to share the tiny difference between these approaches that can make a huge impact on your success.

The Subtraction ApproachSubtraction Vs. Addition | Life Healthfully Lived

I am going to be healthier by taking away all of the bad things in my life.  

This is a common way to look at things, and technically it’s what you want to do.  In with the good out with the bad, right?

Almost.  This immediately sets up a feeling of deprivation and an “I can’t have/do that anymore.”  It makes you feel like you’re losing a part of what was your daily routine and that can make you feel a little uncomfortable and maybe even sad.

You keep trying to tell yourself that it’s good, you’re getting rid of what made you unhealthy.  You’ll be happier once this process is over.  So, you start subtracting:

  • The “bad” food you used to eat
  • The lazy habits you had formed
  • The time you used to sit around instead of exercise
  • The social settings where you maybe weren’t the healthiest
  • The friends or family who don’t fully support you

You might start to see a change in your health doing this, of course.  You might lose weight, start to develop a regular exercise routine, but it still feels like you’re depriving yourself of things that once made you happy.  Even if they weren’t good for you.  You can start to pine for the way things were, especially since they are “off-limits” now.Subtraction Vs. Addition | Life Healthfully Lived

And this can set you up for the relapse.  A night of binging.  A week of no exercise.  Cheat meals/snacks/days.  You know you’re being “bad” but you can’t seem to help yourself.  And then you can’t help feeling guilty once it’s all over.  It’s a vicious cycle and it’s no fun.  Trust me, I’ve been there.

Let’s look at the other approach.

The Addition ApproachSubtraction Vs. Addition | Life Healthfully Lived

I am going to be healthier by adding good things into my life to crowd out the bad. 

This might seem counterintuitive.  You want to put more stuff into my life so that I’m healthier?  How can I do that when most people/diets/health systems tell me I need to get rid of the bad?

It’s simple.  Start thinking of things to add to your day that make you feel better than your older habits.  You’re going to crowd out all the things that you used to do or eat so that you no longer have time or energy for those.Subtraction Vs. Addition | Life Healthfully Lived

Now your days feel full and like you’re actively doing things to turn your habits around.  You’re not taking anything away, you’re adding things like:

  • More fruits and vegetables to each serving, crowding out the overly processed
  • More activity in your day, life short walks, crowding out the time you used to sit around
  • More friends and family who like the same healthy things you do
  • More time focusing on what makes you feel good instead of what you used to do that was “bad”

At a glance, these two approaches might look similar.  And to be honest, you’re doing a lot of the same things but by telling yourself that you’re adding to your life not subtracting from it makes it easier and more fun to keep making changes.Subtraction Vs. Addition | Life Healthfully Lived

It’s just a tiny switch, but it makes a big difference.  I’m not forcing myself to get rid of my entire life, I’m adding to it and changing things for the better.  As you go, soon you’ll realize that the good has overtaken the bad and your lifestyle is healthier and happier.Subtraction Vs. Addition | Life Healthfully Lived

So don’t focus on subtracting as much as you can to be healthier, add in as much good as you can and your health will follow suit.

What can you add to your life to be healthier?

Flashback Friday Recipes

There are two reasons that I’m doing this post:

  1. Winter lighting in my apartment is KILLING me and my ability to get some good pictures

AND

    2.  I have to relearn picture stuff.

Don’t you hate it when you finally have something down that you used to be really crappy at and then something beyond your control makes you crappy again?  Yeah, me too.

Recently I had to get a whole new photo editing program and I feel like I am back at square one with my pictures.  I have to go back and relearn everything that I already knew how to do in my old program with this new one.  Which is super frustrating because I felt like I had finally gotten into the swing of things when it came to food pictures.  Taking good pictures has been a weakness of mine and I keep trying to improve so that my blog can look all pretty for you guys.  Now I have to take some time and get back to where I was.

In the same vein, I’m battling some pretty bad light here in my apartment.  I live on the interior of my building which means that I have two windows both of which face brick walls and get no direct sunlight.  It’s kind of like living in a cave, especially in the winter when the light is already scarce.  That means natural light (a food blogger’s best friend) is very hard to come by here at Casa Dawson.

What is the point of all this rambling?  To tell you there is no brand new recipe for today.  I’m teaching myself some new photo stuff and doing everything I can to get as much good light as I can on the recipes I do have to share.  But fear not, I’m not leaving you totally recipe-less.  I thought it would be fun to bring back some old recipes from when I first started this blog.  It’s kind of fun to see where I came from and where I am now.  For the most part, the recipes are delicious and the pictures are horrendous.  But it’s all about improving right?

At least I don’t take pictures for the blog with my iPhone anymore….

Anyways, here are some Flashback Friday recipes for you and I promise I’ll be back with more new stuff next week!

Slow Cooker Minestrone SoupFlashback Friday Recipes | Life Healthfully Lived

Stir Fry With Spicy Peanut SauceFlashback Friday Recipes | Life Healthfully Lived

Eggplant LasagnaFlashback Friday Recipes | Life Healthfully Lived

Baked Falafel with Tahini SauceFlashback Friday Recipes | Life Healthfully Lived

Turmeric Scented Mushrooms and Brown Rice Noodles

https://lifehealthfullylived.wordpress.com/2013/11/08/healthy-brownie-bites/

Crispy Coconut Avocado FriesFlashback Friday Recipes | Life Healthfully Lived

Healthy Brownie Biteshttps://lifehealthfullylived.wordpress.com/2013/11/08/healthy-brownie-bites/

DIY Wednesday: Build A Smoothie Bowl

I know I’m late to the smoothie bowl action.  It’s been a thing for awhile and I just recently joined in on the hype, but better late than never, right?

If you’re totally confused as to what a smoothie bowl is, don’t worry it couldn’t be easier.  It’s a smoothie that you put into a bowl.  Mind blown, I know.  Smoothie bowls tend to be a little thicker than a typical smoothie and can’t be eaten with a straw.  You need a spoon for these bad boys.

Which is part of why they are so awesome.  It’s kind of like having ice cream for breakfast and who doesn’t want that?  The other part of why they’re so awesome?  They are a great way to get a lot of nutrients.  So basically, you have a nutrient-packed meal in a bowl that you eat with a spoon that is kind of like ice cream.

Excited yet?

You should be and for those of you who are about to tell me, “Smoothie’s are just sugar bombs masquerading as healthy”, you’re right.  Sort of.  It all depends on how you make your smoothie and that is what my post today is all about.  Building a smoothie that isn’t just sugar in smoothie form.

There are three parts to building my smoothie bowl, so let’s get started.

The Frozen

We start with the frozen part of our smoothie bowl.  This is what’s going to make it thicker than a regular smoothie as well as keep it cool without adding extra ice which can make it watery.DIY Wednesday: Build A Smoothie Bowl | Life Healthfully Lived

  • Frozen Leafy Greens.  I like to use kale or spinach and sometimes both, but you can use whatever greens you would like.  Try collard, beet, turnip, or even mustard greens.  You could also add in frozen green vegetables like broccoli or peas, totally up to you.  I like to use frozen greens because they are cheaper and easier to find as well as make my smoothie bowl nice and thick.  I like to use 2 cups so I’m getting a good dose of healthy vegetables.
  • Frozen Fruit.  I have been using a 1/2 cup of blueberries and a 1/2 cup of cranberries plus one small frozen banana.  If I have some frozen cherries, I’ll throw a few of those in as well.  I like to choose fruit that naturally has a lower sugar content, plus I like the tartness of the cranberries.  The banana adds a nice creaminess and a little bit of sweetness to the mix.  You could also try strawberries, raspberries, blackberries, pineapples, or mangoes.  Try to keep your fruit to around 1 cup so you aren’t putting in too much sugar.

The Fresh

Moving on, we have the fresh part of the smoothie bowl.  These are the things that are going to get blended in that aren’t frozen.DIY Wednesday: Build A Smoothie Bowl | Life Healthfully Lived

  • Canned Pumpkin.  I love pumpkin and usually add 2 to 3 tablespoons into my smoothie.  It helps smooth out the texture and adds a lot of nutrition.
  • Small Avocado. I put one whole avocado into my smoothies.  Yes, a whole avocado.  Now it’s usually fairly small and probably adds up to 1/2 a cup, but don’t start freaking out about the fat content.  Avocados are a good fat which is essential to your health.  Plus they make the smoothie nice and cream and not at all like guacamole.
  • Flax and Chia Seeds. I add a tablespoon of each to give my smoothie fiber which helps slow down the absorption of the sugar in the smoothie.  They also thicken it even more and you can always use more fiber in your diet!
  • Full-Fat Coconut Milk.  I only use a splash or two of this, just enough to get the smoothie moving as it’s blending.  If this were just a regular smoothie, you would use probably 1 cup to make it thinner.  I also like using coconut milk because it’s another good fat but you could use soy, almond, or any other non-dairy milk that you prefer.

The Mix-Ins/Toppings

To be honest, these are my favorite things about a smoothie bowl.  You can use whatever you have on hand or whatever toppings you’re feeling that morning.  These ones are my go-to lately.DIY Wednesday: Build A Smoothie Bowl | Life Healthfully Lived

  • Cacao Nibs.  Like chocolate, but better.  I love these things and sometimes have to hold myself back from drowning my smoothie in them.  I just tell myself they’re just like vitamins.  Tiny, chocolate vitamins
  • Goji Berries.  Another tart berry that is full of good for you stuff, I like adding in 1 tablespoon of dried goji berries for a nice chewy texture.
  • Hemp Seeds.  No, these won’t make you high and you can’t make a necklace out of them, but they will provide you with a good dose of protein and a nice little crunch to your smoothie.
  • Peanut Butter.  There is no question, there will always be peanut butter in or on my smoothie.  If you can’t do PB, try almond butter, sunflower butter, or even tahini.
  • Cinnamon.  This adds a little sweetness and a whole lot of nutrition.  Did you know that cinnamon can slow your bodies insulin absorption so that you keep your blood sugar levels even?  That’s a very good thing.

And that’s it!  That is what has been going in my blender for the past month or so and I have been enjoying every frosty spoonful.  The great thing about this breakfast is you can tailor it to your needs and tastes whenever you need.  Just make sure that you use more greens than fruit, add a little protein and fat to help keep you satisfied, and don’t go too crazy with your toppings!

Build Your Own Smoothie Bowl

DIY Wednesday: Build A Smoothie Bowl | Life Healthfully Lived

Real Talk: I took this smoothie bowl picture right before I ate and I was hungry. This is as good as it gets when Katie gets hangry!

  • 2 cups frozen greens (spinach, kale, collard, broccoli, peas….)
  • 1 cup frozen fruit (blueberries, strawberries, cranberries, cherries, bananas, mangoes…)
  • 2 tbsp canned pumpkin or butternut squash
  • 1 small avocado
  • 2 tbsps flax or chia seed or both
  • splash or two of coconut milk (almond, soy, rice, oatmeal, or whatever non-dairy milk you prefer)
  • toppings of your choice (nut or seed butter, cacao nibs, goji berries, raisins, hemp seeds, pumpkin seeds, cinnamon)
  1. Starting with the greens on the bottom, load everything into your blender except the toppings.
  2. Blend everything together until thick and smooth.  You may need to add a little more milk to make everything come together.
  3. Scoop into a bowl and put on your toppings.  Eat and enjoy!DIY Wednesday: Build A Smoothie Bowl | Life Healthfully Lived


Have you ever had a smoothie bowl? What do you like to put into your blender?