Broccoli Rabe Pesto

I have another recipe for you today that uses up leftover vegetables and still tastes delicious.  Broccoli rabe has been one of my favorite things lately.  It’s a little bitter and earthy, but if you prepare it right and use all the garlic it turns into this amazing dish that I have been putting in my veggie noodle bowls every weekend.

It’s a vegetable-palooza up in here.

Well, last week I was not digging the greens and ended up with a pile of cooked broccoli that was just about to go bad.  I was so tempted to throw it away because what can you do with almost mushy vegetable? Broccoli Rabe Pesto | Life Healthfully Lived

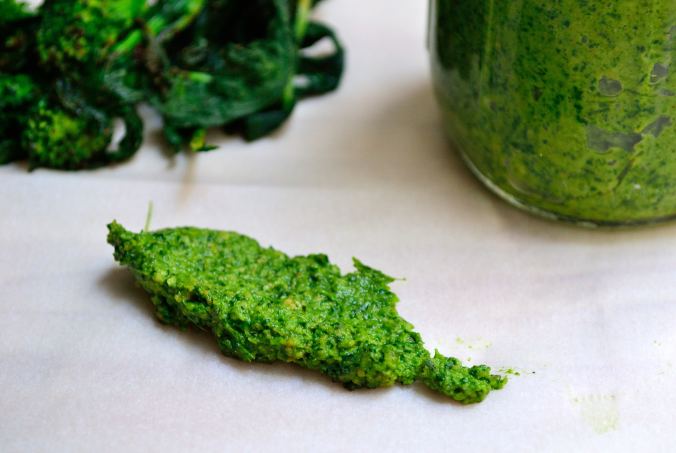
Turn it into pesto!  Yes, you can use anything to make pesto and I will use any excuse in the book to make and use pesto because as Phoebe would say, pesto is the besto.

I kind of threw stuff together and hoped that everything would turn out and I got pretty lucky.  I thought I was so revolutionary but then a quick internet search proved me wrong BUT my version is dairy-free so I think that counts for something.  You can also make this pesto with regular broccoli if you haven’t jumped on the broccoli rabe bandwagon or can’t find it.  Just make sure whatever you use is already cooked because raw broccoli rabe pesto would definitely not be the besto.

Broccoli Rabe PestoBroccoli Rabe Pesto | Life Healthfully Lived

  • 1 1/2 cup cooked broccoli rabe or plain broccoli
  • 1/3 cup slivered almonds (you could use slices too)
  • 3 tbsp nutritional yeast (if you do dairy you could use parmesan)
  • 2 cloves garlic
  • 1/3 cup olive oil
  • salt and pepper to taste
  1. Preheat oven to 325 and spread the almonds onto a baking sheet and toast for about 5 minutes.  Check often to make sure you don’t end up with burnt almonds.  Remove from oven and let cool.
  2. While the almonds are toasting, check your broccoli rabe and remove any pieces that are too brown or mushy (a little mushy is ok as everything will be blended up)
  3. Put the garlic cloves into a blender or food processor and pulse a few times until it’s fairly minced.  Add the almonds and nutritional yeast or cheese and pulse until you have a crumbly mixture.
  4. Add the broccoli rabe and pulse again and then add the olive oil.  Blend until you have a smooth and creamy sauce.  Taste and add salt or pepper if needed. Broccoli Rabe Pesto | Life Healthfully Lived

You can use this pesto anywhere that you would use regular pesto.  Pasta, bread, vegetables, vegetable noodles, spoons, fingers… You know, the usual.  It would be a great spring-like dish to bring to your Easter feast on Sunday and a great way to get in extra vegetables.

I hope you have a great Easter weekend and I’ll see you on Monday!

DIY Wednesday: Cauliflower Stem Cream Sauce

Ok, so if you read my post on Monday then you know that last week I was fighting off a stomach bug/virus.  It really knocked me on my butt and I’m still trying to get back to completely normal.  Because I couldn’t eat anything more than baby carrots and brown rice cakes (totally weird combo I know, but it’s the only thing that didn’t make me want to run to the bathroom) I ended up with a lot of vegetables that were just about to go bad.

Instead of throw them away, because I hate wasting food, I decided to come up with new interesting ways to use them.  One of my biggest missions is to reduce the amount of food waste we create each year.  There are so many things that we can do with food rather than throw it away but sometimes you have to get creative.  If you want a few other ways to cut down on food waste, you can check out this postDIY Wednesday: Cauliflower Steam Cream Sauce | Life Healthfully Lived

So today we have a recipe that uses a part of the vegetable that most of us throw away, cauliflower stems.  Yup, you can eat the stem but because gnawing on a big old stem doesn’t sound too appealing, we’re going to make a creamy sauce that can go on pasta, vegetables, meat, or even used as dressing.  The best part is it only requires a few ingredients and minimal effort.

Stop throwing away food that you think you can’t eat because I bet you can use it in a unique and delicious way!

Cauliflower Stem Cream SauceDIY Wednesday: Cauliflower Steam Cream Sauce | Life Healthfully Lived

  • 1 1/2 cauliflower stems, cut into chunks
  • 1 tsp roasted garlic (or 1/2 tsp garlic powder)
  • 1 tsp dried parsley
  • 1/2 tsp salt
  • 1/4 tsp black pepper
  • 1 to 2 tbsp nutritional yeast (or 1/4 cup parmesan cheese if you do dairy)
  • 1/2 to 1 cup reserved steaming water
  1. Save the large main cauliflower stem from your bunch along with any other trimmed pieces you aren’t using with the cauliflower florets.  Trim off the green leaves and the tough woody bottom of the large stem and then cut everything into bites size chunks.
  2. Fill a medium pot with about 2 cups water and set up a steamer basket if you have one.  If not, you can just boil the cauliflower right in the pot.  Steam the cauliflower until very soft and easily pierced with a fork.
  3. Transfer the cauliflower to a blender or food processor and save the steaming water.  Add the rest of the ingredients to the blender and blend until you have a thick paste.  Add the reserved water a few tablespoons at a time until you reach the consistency you would like.  Thinner for things like dressing and pasta sauce, a little thicker for meat and vegetables. DIY Wednesday: Cauliflower Steam Cream Sauce | Life Healthfully Lived

That’s Not Such A Good Idea

You might think it would be a good idea to eat a bunch of broccoli while you’re feeling nauseated because “Broccoli is good for you, it can only make you feel better.”

That's Not Such A Good Idea | Life Healthfully Lived

I don’t eat broccoli anymore, I just wear it.

You would be wrong.  That’s not such a good idea.

You might think it would be a good idea to workout ONE DAY after laying on the couch the whole day before due to feeling like death.

That's Not Such A Good Idea | Life Healthfully Lived

Totally ready for this workout guys…

You would be wrong.  That’s not such a good idea.

You might think it would be a good idea to try and work at your standing desk right after being knocked out by some stomach virus for a few days.

That's Not Such A Good Idea | Life Healthfully Lived

Bed desk > Standing desk

You would be wrong.  That’s not such a good idea.

You might think it would be a good idea to buy a bunch of vegetables with the hopes of eating it in the next day or two even though you can still barely stomach brown rice cakes and baby carrots.

That's Not Such A Good Idea | Life Healthfully Lived

Immediately regret all the vegetables!

You would be wrong.  That’s not such a good idea.

The moral of the story?  I didn’t have many good ideas in the past few days and I’m still trying to listen to what my body is telling me.  It’s ok if I can’t eat as many green things or exercise as much as I’m used to when my health clearly isn’t at 100%.  I shouldn’t feel bad or like a failure.  When you’re sick you need to forget all your reason and do what feels best because that will get you healthier faster.

And for goodness sake, DON’T take a walk down to the lake just to “get some fresh air” when there isn’t a bathroom in the near vicinity.

That's Not Such A Good Idea | Life Healthfully Lived

At least I got a workout sprinting back to my apartment….

That’s not such a good idea.

Asian-Style Green Beans

Are Chinese buffets still a big thing?  I haven’t been to one in many years, but for a while when I was younger my family and I would go often.  It was just easier because everyone could get what they wanted and it was good for my notoriously picky sister because there were always a few things like pizza and chicken nuggets.  Which of course are Chinese.  Asian-Style Green Beans | Life Healthfully Lived

One of my favorite things at the buffet were the green beans.  They were crispy, crunchy, green, sweet, and salty.  They had those huge granules of salt and garlic and they balanced so well with the other flavors.  I would always get numerous helpings and could have easily made a meal of them.

Of course, they were probably SUPER high in sodium and flavorings that might not have been the best but when compared to the other offerings at the buffet (I’m looking at you General Tso’s chicken and crab rangoon) they were a pretty good choice.  The other day I had a hankering for those green beans and decided to make my own healthier version and I’m pleased to say I think I got pretty close!Asian-Style Green Beans | Life Healthfully Lived

Fresh green beans are making their way back into grocery stores so you should be able to find them pretty easily.  But if you can’t don’t worry, you can use frozen green beans too.  Give these green beans a try at your next meal and I guarantee your family will polish them off.  At least, my husband did….

Asian-Style Green BeansAsian-Style Green Beans | Life Healthfully Lived

  • 2 cups fresh green beans, ends trimmed (if using frozen make sure to thaw them first)
  • 3 cloves garlic, minced
  • 2 tsp dried onion flakes
  • 1 tsp powdered ginger
  • 1 to 2 tsp coarse sea salt (if you don’t have coarse that’s fine just adjust the amount so it’s not too salty)
  • 2 tbsp coconut aminos (you can use soy sauce or liquid aminos too)
  1. Heat a little oil in a large saute pan over medium-high heat.  Add the minced garlic and swirl everything around the pan a few times.
  2. Add the green beans to the pan and then add the onion flakes, ginger, and salt.  Stir so everything is mixed together.  Saute for 5 minutes.
  3. Pour the coconut aminos over the green beans, stir everything together, and cover.  Lower the heat to low and cook for another 2 minutes.

DIY Wednesday: Roasted Salsa Verde

After 2 years of Spanish in Jr. High, three years in high school, and two semesters in college I can say this with certainty: verde means green.  Therefore, that means salsa verde is green salsa.  Mind-blowing things revealed on my blog today, I know. DIY Wednesday: Roasted Salsa Verde | Life Healthfully Lived

In my brain I understood that salsa verde had to be made with some kind of green vegetable but I never really thought about it.  I just ate my regular salsa and left my green dip needs to guacamole.  Then I saw a sale on tomatillos at my grocery store, bought a few on a whim, and then headed home to figure out what to do with them.  After a little research AKA Google search, I realized tomatillos are what make salsa verde, well, verde.

I also found out that roasting them was common and helped bring out their flavor.  Since I am the Queen of roasting any and everything, I roasted them up, blended them up, and then ate them up.

That’s how simple this recipe is.  If you’ve never worked with or had tomatillos before, don’t be intimidated.  They come in a papery husk and kind of look like a giant green berry.  Like this:DIY Wednesday: Salsa Verde | Life Healthfully Lived

All you have to do is peel away the husk, like this: DIY Wednesday: Roasted Salsa Verde | Life Healthfully Lived

Rinse it off and you’re good to go!  I kept this really simple but you could add other things like jalapeno peppers if you want a kick, roasted apples if you want a little bit of sweet, or stir a little salsa verde into your guac for a delicious twist.

Roasted Salsa Verde: DIY Wednesday: Roasted Salsa Verde | Life Healthfully Lived

  • 3 to 4 medium-sized tomatillos
  • 1 small onion, about 1/2 a cup cut into quarters
  • 3 to 4 whole cloves of garlic
  • 1/2 tsp chili powder
  • 1/4 to 1/2 tsp salt
  1. Preheat oven to 350 and line a baking sheet with parchment paper
  2. Peel the husk off the tomatillos and rinse with cool water.  Dry completely.
  3. Place the tomatillos, quartered onion, and garlic cloves into a large bowl.  Drizzle a little olive oil and toss until everything is coated.  Sprinkle with salt and pour everything out onto the baking sheet.
  4. Roast everything for about 15 to 20 minutes until the tomatillos are a little brown around the edges and soft.  It’s ok if they explode a little while roasting.
  5. Remove from the oven and let everything cool for about 10 minutes.  Then, pour the whole pan into a blender, add the chili powder and blend.  Taste and adjust the seasoning.

This salsa is awesome on tacos, with homemade tortilla chips, and even as a dip for plantain chipsDIY Wednesday: Roasted Salsa Verde | Life Healthfully Lived