DIY Wednesday: Cauliflower Pizza Crust

DIY Wednesday: Cauliflower Crust Pizza | Life Healthfully LivedThe cauliflower pizza crust.  For many, it is an elusive dream.  You see recipes on Pinterest and they claim that it is the best crust ever (just like real pizza) and that will fulfill all your gluten-free pizza dreams.

And then you make it.

And it turns into a soggy wet pile.

Or it has five pounds of cheese and eggs holding it together.

I’ve tried a lot of cauliflower pizza crusts and while some were good, none were great.  Most of them had to be eaten with a fork and a knife and that’s ok if you’re eating a deep dish pizza but not ok when you want to pick up a slice and feel like you’re eating pizza.  That’s what I wanted.

Then I stumbled across Sprint 2 The Table’s quinoa flour crust pizza and it sounded simple enough and didn’t have the cheese that most crust recipes use to keep everything together.  So I gave it a shot and EUREKA!  It worked.  I could actually pick it up and while I won’t go as far as saying it tastes exactly like real pizza it was the closest I had ever come.

I kept playing with the crust and swapping out a few things and came up with one that doesn’t use eggs or grains as the flour.  If you’re totally fine with eating quinoa flour and eggs then go ahead and try Sprint 2 The Table’s pizza crust.  If you want an eggless and grain-free version try this one below.

I’ll give you a step-by-step tutorial (along with pictures) so you can get the best pizza crust possible then you can go crazy with toppings.  And I may have gone crazy with my toppings aka the whole refrigerator on my pizza.

Cauliflower Crust Pizza- Based on this one by Sprint 2 The TableDIY Wednesday: Cauliflower Crust Pizza | Life Healthfully Lived

  • 1 cup of cauliflower with as much of the stems removed as possible
  • 1/4 cup coconut flour
  • 3 tbsp ground flaxseed
  • 6 tbsp water
  • 1 tsp oregano
  • 1 tsp basil
  • 1/4 tsp red pepper flakes
  • 1/2 tsp salt
  1. Preheat your oven to 425 and get out a pizza stone/pan or regular baking sheet.  Line whatever you’re going to use with parchment paper (I used a pizza stone and cut my parchment paper into circles) and then cut another piece of parchment paper to match the first.
  2. In a small bowl, combine the ground flaxseed and water and let it sit and gel for a few minutes.
  3. In a blender or food processor, pulse the cauliflower a few times until it’s in small rice-like pieces and then dump it into a large bowl.  Add the flour and seasonings and whisk to combine everything.  It’s ok if it’s a little clumpy.
  4. Add in the flaxseed and water mixture and start stirring everything together with a spatula.  It should start to form a big dough ball.  If it’s too dry, add a little water a tablespoon at a time.  Remember that coconut flour likes to soak up water like a sponge so as you add water wait just a few minutes to see if it needs more.

    DIY Wednesday: Cauliflower Crust Pizza | Life Healthfully Lived

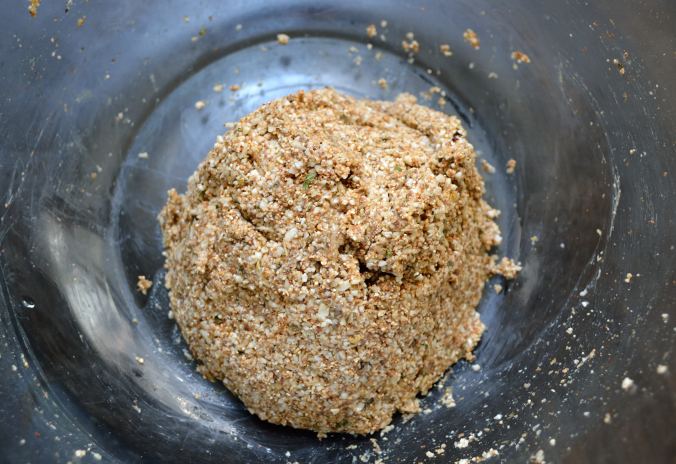
    Nice dough ball. Not too dry or too soggy.

  5. Once you have your dough ball place it on your stone or pan that’s lined with parchment paper.  Slightly flatten the dough with your hand and then using a rubber spatula start pressing the dough out into a pizza shape.

    DIY Wednesday: Cauliflower Crust Pizza | Life Healthfully Lived

    Spreading out the dough. It takes awhile so don’t rush it

  6. Work from the middle pressing out and keep going until you have about a 10 to 12-inch circle.  You want it to be fairly thin so the crust will cook all the way through and not end up soggy.  As you press the dough out the edges might crack a little but that’s ok just press them back together.

    DIY Wednesday: Cauliflower Crust Pizza | Life Healthfully Lived

    About how thick you want your crust. You could even go a little thinner for a crispier crust.

  7. Place the other piece of parchment paper on top of the crust and bake for about 20 to 25 minutes.  Remove it from the oven.
  8. Ok, this is the slightly tricky part.  You’re going to flip the whole crust over.  What worked for me was putting on an oven mitt and then using the parchment paper to slide the middle part of the crust onto my hand and then flipping it over in a quick motion.  The crust should be mostly cooked at this point and if you rolled it out thin enough won’t break apart on you.  Don’t freak out, I’ve made this crust a dozen times and even if I totally botched the flip it hasn’t broken or ruined the crust.
  9. Once it’s flipped remove the parchment paper from the top of the crust and top with your favorite pizza toppings! Bake for another 5 minutes and enjoy!
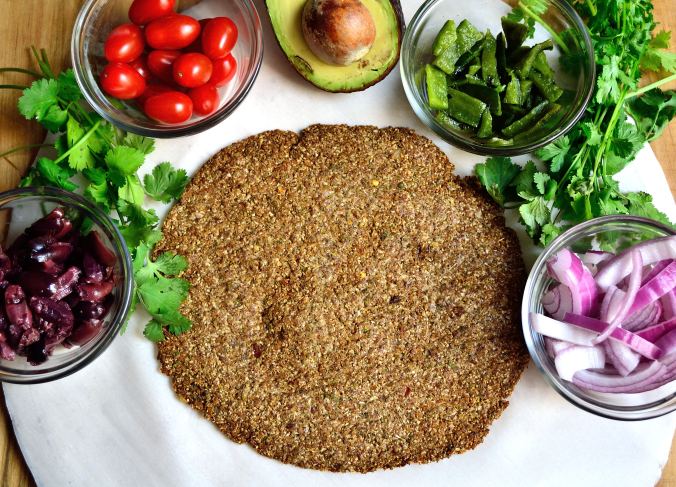
    DIY Wednesday: Cauliflower Crust Pizza | Life Healthfully Lived

    Ready for toppings!

A few other tips:

  • Don’t use a crazy amount of sauce because that is just going to turn the pizza to mush.  Trust me.  My favorite sauce so far has been a light layer of my spinach or cilantro pesto.
  • If you put on a lot of heavy toppings your pizza may fall a little bit as you pick it up.  If you don’t care and want all of the toppings go for it!
  • You can make this crust in advance and keep it in the fridge or freezer until you’re ready to use it.  I’ve only done it a few hours in advance so I can’t vouch for the quality after it’s been frozen and thawed but I will update this if I try it.
  • If you put onions or peppers on your pizza and you want them cooked a little more than the five minutes at the end, saute them before you top your pizza.  If not, they might be a little less done than some would prefer.

More Than My Butt

“Hey! You have a nice butt!”

I was walking to the store on a Friday afternoon, not really paying attention to the people around me.

“You in the purple shirt!  Nice butt!”

That caught my attention.  I was wearing a purple shirt.  I turned towards the voice, expecting some guy to be standing there and was shocked to see a boy.  A boy that couldn’t have been more than 12 maybe 13 or 14 if we’re pushing it.  He was surrounded by 3 or 4 of his friends and they were all snickering as he gave me a thumbs up and then raced off to do something else.

I didn’t think much of it because sadly, this isn’t the first time that someone, usually a male, has felt the need to audibly comment on some part of my body.  But as I walked on I started thinking, “Why is a boy that young talking about my butt?”

Probably a million reasons.  His friends were egging him on, he sees it in the media all the time, he’s watched other boys/men do it in real life, he really like butts, he has no filter from his brain to his mouth… The list could go on and on.  And it’s a sad list.  It’s sad that this is what both women and men have been reduced to.

Body parts.More Than My Butt | Life Healthfully Lived

Think about it.  Everything is aimed at certain aspects of a person but never the whole person.  Magazines tout the latest workout for sexy abs or the newest diet for lean thighs or what you need to do to get bulging biceps.  We look at celebrities and covet certain body parts.  I wish I had Jennifer Lopez’s butt or Taylor Swifts abs or Heidi Klum’s legs.  If I was as ripped as Chris Evans or Ryan Reynolds, all the ladies would want me.More Than My Butt | Life Healthfully Lived

We, me included, always pick and nag at our “worst” attributes.  I want my stomach to be flatter.  Everything I do needs to be working towards getting a flatter stomach.  We never take the time to look at a body as a whole machine.  Something that works together with all the parts to be one awesome mechanism.  It’s always about the one part that doesn’t work or look the way we want it to.

Enough.More Than My Butt | Life Healthfully Lived

I am not my butt.  I am not my abs.  I am not my arms, thighs, or chin.  I am Katie, a human person that is so much more than any one part of me.  And so are you.  Everyone is more than just a body part and all of us need to start seeing that.  To look at people as a whole.  To drop the nitpicking over our one flaw.

That woman walking down the street is not a giant pair of legs.

That man sitting next to you isn’t a huge abdominal.

They are whole humans and they deserve to be treated that way.  So start by treating your own body as a whole being and then spread that idea to the other people you meet.  Maybe, we can start making a difference.More Than My Butt | Life Healthfully Lived

Zucchini and Pea Cauliflower Risotto

Zucchini and Pea Cauliflower Risotto | Life Healthfully LivedYup. Cauliflower is back.  I know you’re probably getting a little tired of seeing it featured in my dishes but you know what?  You’re wrong.  Cauliflower is the magical unicorn of the vegetable world and I love turning it into all sorts of things from taquitos to sauce to sweet and sour bites to mac n’ cheese.  It’s awesome and you’re going to have to deal with it.

Which should be easy if you’re stuffing your face with this tasty meal.  Most people tend to shy away from risotto because it takes a really long time to cook and even if you follow all the steps it somehow still tastes like you didn’t do something right.  Or is it just me chomping away and still uncooked rice?  Just me? Ok.  Zucchini and Pea Cauliflower Risotto | Life Healthfully Lived

Moving on.  If you think risotto is too fussy or you’ve never made it before then you need to try this cauliflower risotto because it is the exact opposite of fussy.  It doesn’t take long to make and you don’t have to stand over the stove stirring until your arm falls off like with regular risotto.  Again, just me?  This risotto is still creamy and rich like regular risotto but it’s also nice and light with all the fresh spring-y vegetables.

One other note about this meal, I really think that what gave this dish the depth of flavor I was going for was the Sherry I used to deglaze the pan.  I know some people don’t like to use alcohol in their cooking (to each their own) and you can use water or broth instead but I don’t think it will have the same taste.  Other than that, this risotto is straight forward and will have you licking your plate clean.  Still just me?

Zucchini and Pea Cauliflower RisottoZucchini and Pea Cauliflower Risotto | Life Healthfully Lived

  • 1 large head of cauliflower, riced (you can grate it for bigger pieces which I did or run it through your food processor for smaller pieces)
  • 2 medium zucchini’s, sliced into half moons
  • 1 cup peas, if frozen make sure they’re thawed
  • 3 cloves garlic, minced
  • 3/4 cup onions, diced
  • 2-3 tbsp nutritional yeast or parmesan cheese
  • 1/4 cup sherry (I used this one) or other dry white wine or water/broth
  • 1/2 cup water/broth
  • 1/2-2/3 cup full-fat coconut milk
  • 1/2 cup toasted slivered almonds (or pine nuts if you can shell out the small fortune a 1 oz bag costs)
  • zest from one lemon
  • 1/4 cup fresh parsley, chopped
  • salt and pepper
  1. Heat a little olive oil in a large skillet or saucepan over medium-high heat.  Saute the onions until they’re soft then add in the garlic.  Season this with a little salt and pepper and cook for about 2 minutes.
  2. Add in the riced cauliflower, adding a little more oil if needed, and season again with salt and pepper.  Cook for another five minutes until cauliflower is soft and just starting to get a little brown. Sprinkle the nutritional yeast or parmesan cheese over top.
  3. Pour in the 1/4 cup sherry and deglaze the pan.  Cook and stir everything until most of the liquid as evaporated.  Add the zucchini and peas and pour in the water/broth and coconut milk.  Stir everything together and cook until the liquid has reduced by about half.
  4. Remove from the heat and stir in the lemon zest and parsley.  Top with the toasted almonds and taste to adjust the salt and pepper.  Zucchini and Pea Cauliflower Risotto | Life Healthfully Lived

DIY Wednesday: Everything Bagel Spice Mix

I used to eat a lot of bagels.  Like a lot.  In high school, our cafeteria was mostly a la carte and you could go in and choose from a variety of things.  There were the hot food entrees that would rotate each day but you could also get things like candy, chips, soda, snacks, cookies, and bagels.  Oh, the bagels.  They were huge and fluffy and a perfect vehicle for cramming more cream cheese into my mouth.  Because I didn’t spread my cream cheese onto my bagel like a normal person.  Oh no.  I would rip chunks off my bagel and dip them into my tub of cream cheese and eat it that way.

I have no idea how I didn’t weigh over 500 lbs in high school.

Anyways, I mostly stuck to plain bagels and got fancy with my cream cheese.  Strawberry one day, veggie the next, and sometimes they had a sour cream and chive version that was to die for.  Plus the cafeteria didn’t really have a ton of choices when it came to the bagels.  And then one of my friends introduced me to Panera bagels and it was game on.  Asiago cheese, cinnamon crunch, french toast…. and just as many amazing cream cheese spreads to go along.  But the one bagel that won my heart was the everything bagel.  I could almost (almost) eat that one without any cream cheese.DIY Wednesday: Everything Bagel Spice Mix | Life Healthfully Lived

I can’t remember that last time I had a bagel or cream cheese for that matter, but I love the flavor of those everything bagels so I make my own spice mix and put it on everything (see what I did there?).  You can put it on homemade bread (it tastes great pressed onto the top of rolls), sprinkle it over vegetables or stir-fry, and chicken and pork taste great if you use it as a crust while pan-searing.

So if you’re an everything bagel fanatic and want to add more of that flavor to your life or you don’t eat bagels anymore but still want that flavor try this simple everything bagel spice mix!

Everything Bagel Spice MixDIY Wednesday: Everything Bagel Spice Mix | Life Healthfully Lived

  • 2 tbsp poppyseeds
  • 2 tbsp toasted sesame seeds (place in a pan over medium heat and shake until golden)
  • 2 tbsp dried minced onion
  • 2 tbsp dried minced garlic
  • 2 tsp course sea salt (use less if you have a finer grain salt)
  1. Place everything into a small bowl or mason jar and shake to combine.  Make sure to keep it stored in a sealed container so it doesn’t go staleDIY Wednesday: Everything Bagel Spice Mix | Life Healthfully Lived

Being Mindful & Taking Care Of My Body

If you remember, at the beginning of this year I decided to take a break from running.  It was no longer bringing me joy and I was totally burned out.  It was a tough choice, but more and more I’m realizing it was the best one for me.

Just because I don’t run doesn’t mean that I have totally given up on working out.  In fact, I think my workouts, and overall health, have improved vastly by taking a step back from running.  Adam and I have been following along with Fitness Blender’s workout programs and they’re no joke!  They incorporate strength, flexibility, HIIT, yoga, pilates, kickboxing, plyometrics… anything is fair game in their workouts and it keeps my body and my mind engaged in what I’m doing.

Last Friday, as we were finishing up our workout, Kelli (one-half of the husband/wife duo behind Fitness Blender) mentioned lifting a weight that’s heavy and challenging for you.  She also said that it was totally ok to drop the weight completely and just use body weight and that it was important to listen to your body.  After hearing this Adam quipped, “Unless you’re Katie, then you just keep pushing through the pain.”  He was mostly kidding and I told him I don’t always do that but then I started thinking about my runs.Being Mindful & Taking Care Of My Body | Life Healthfully Lived

No matter what, I always pushed through my runs.  The only time that I didn’t was when I hurt my knee and physically could NOT run.  Other than that, I ran and there were definitely some times that I should have stayed home.  Pushing through those times is probably what led to me being burned out on running.  It’s probably what made my body tell me that I had to stop or something worse than a slight knee injury was coming.Being Mindful & Taking Care Of My Body | Life Healthfully Lived

I’m not saying pushing through a tough workout is a bad thing.  It’s important to go a little outside your comfort zone and push yourself in order to become stronger, faster, and better.  But it shouldn’t come at the risk of your overall health.  If your body is telling you it has to stop or it’s going to completely give out, you should listen to it.

Which is part of what I have been doing the last few months.  There are days when I am raring to go on my workout, where I feel so strong and can lift heavier than I ever have before.  Then there are days when I’m more tired and can’t go at 115% the whole time.  That’s ok.  Before I would have thought I was just being lazy.  I would have said you have to push past this and keep go, go, going.  Now I pull back and listen and realize my body knows what’s best.Being Mindful & Taking Care Of My Body | Life Healthfully Lived

It’s kind of a relief, for both my mind and my body, to know that I don’t have to go all out 100% of the time.  It’s ok to pull back a little and adjust to what you need in that moment.  Health is a series of ups and downs.  You hope and work for the best but realize there are going to be times when you have to give in and take the down.  It’s a part of life and it’s all good!Being Mindful & Taking Care Of My Body | Life Healthfully Lived